Introduction and system overview
EveryoneZRAutomation.Cloud runs on a server at the site, on the site's own network. It reads the site's devices every 3 seconds, shows their values, switches their outputs, keeps their history, raises alarms and runs the site's time blocks and scenarios. It keeps doing all of this whether or not anyone is looking at a screen.
The parts of the system
- The site server runs the site. Everything the system does happens there.
- The web screen is opened in a browser on the site's local network, on a computer or on a wall tablet. It is where the site is set up and run.
- The cameras are shown through the site's video recorder; the pictures come through the site.
- Remote access connects the site to REDZ's relay, so that the mobile app can reach it from outside the local network.
- The mobile app shows the site on a phone, through remote access, and tells the phone about alarms.
Accounts and roles
Everybody signs in with an account of their own. The account's role decides which pages and devices it sees and what it may change, on the web screen and in the app alike (see Users, roles and permissions).
What needs the internet
The site, its devices, the web screen on the local network, the cameras and the time blocks, including those that follow sunrise and sunset, work without the internet. Remote access and the mobile app, the notifications on the phones and e-mail need it.
Installation and updates
AdministratorsZRAutomation.Cloud is installed on the site server by REDZ or by a person REDZ has authorised. This chapter says what the server needs, what the installation sets up, and how an update is done.
What the server needs
- A computer at the site that stays switched on, on the same network as the site's devices and its video recorder. The site works only while this computer is running.
- 64-bit Windows: Windows 11, Windows 10 Enterprise LTSC or IoT Enterprise LTSC, or Windows Server 2016 or later.
- Nothing else to install: the program brings everything it needs, including the part that decodes the camera pictures.
- The computers and tablets that open the web screen reach the server on port 5000: the web screen's address is the server's address followed by :5000.
- For remote access, an internet connection from the server. The site connects out to REDZ's relay; no port has to be opened towards the site.
What the installation sets up
- The program runs on the server as a Windows service named ZRAutomation.Cloud. It starts with Windows and works without anyone signed in to the server.
- At its first start the site creates its database in the program's folder.
- It also creates an administrator account named superadmin. Its one-time password is written to a file on the server that only the server's administrators can read. The password must be replaced at the first sign-in (see Signing in), and the file is deleted when it is.
Devices, cameras, accounts and roles are then set up on the web screen, as the following chapters describe.
Which version is running
The site's version and the date it was built are in the banner at the top of the web screen. A narrow screen leaves that line out. The System Health page shows how long the site has been running since it last started.
Updates
Updates are installed by REDZ. Before an update, the program and the site's database are copied on the server. The service is then stopped, the new program is put in place and the service is started again.
While the service is stopped the site does not read its devices or run its time blocks and scenarios. The history leaves that time out, as it does any time a device was not read.
The site's data stays: devices, history, alarms, accounts and settings are in the database, which an update does not replace. When a new version needs the database changed, the site does it by itself at its first start and writes an entry about it in the System Logs.
A web screen left open during an update notices the new version when its connection comes back, says so in the banner and reloads itself. If it opens on the sign-in page, sign in again.
Going back to the earlier version
If an update has to be undone, REDZ puts the earlier program back from the copy made before the update. The data is kept, so what was entered after the update stays. What the update added is not available until it is installed again.
Signing in
EveryoneOn the site's local network, open the site's address in a web browser. Enter your Username and Password and select LOGIN. The pages you see depend on your role.
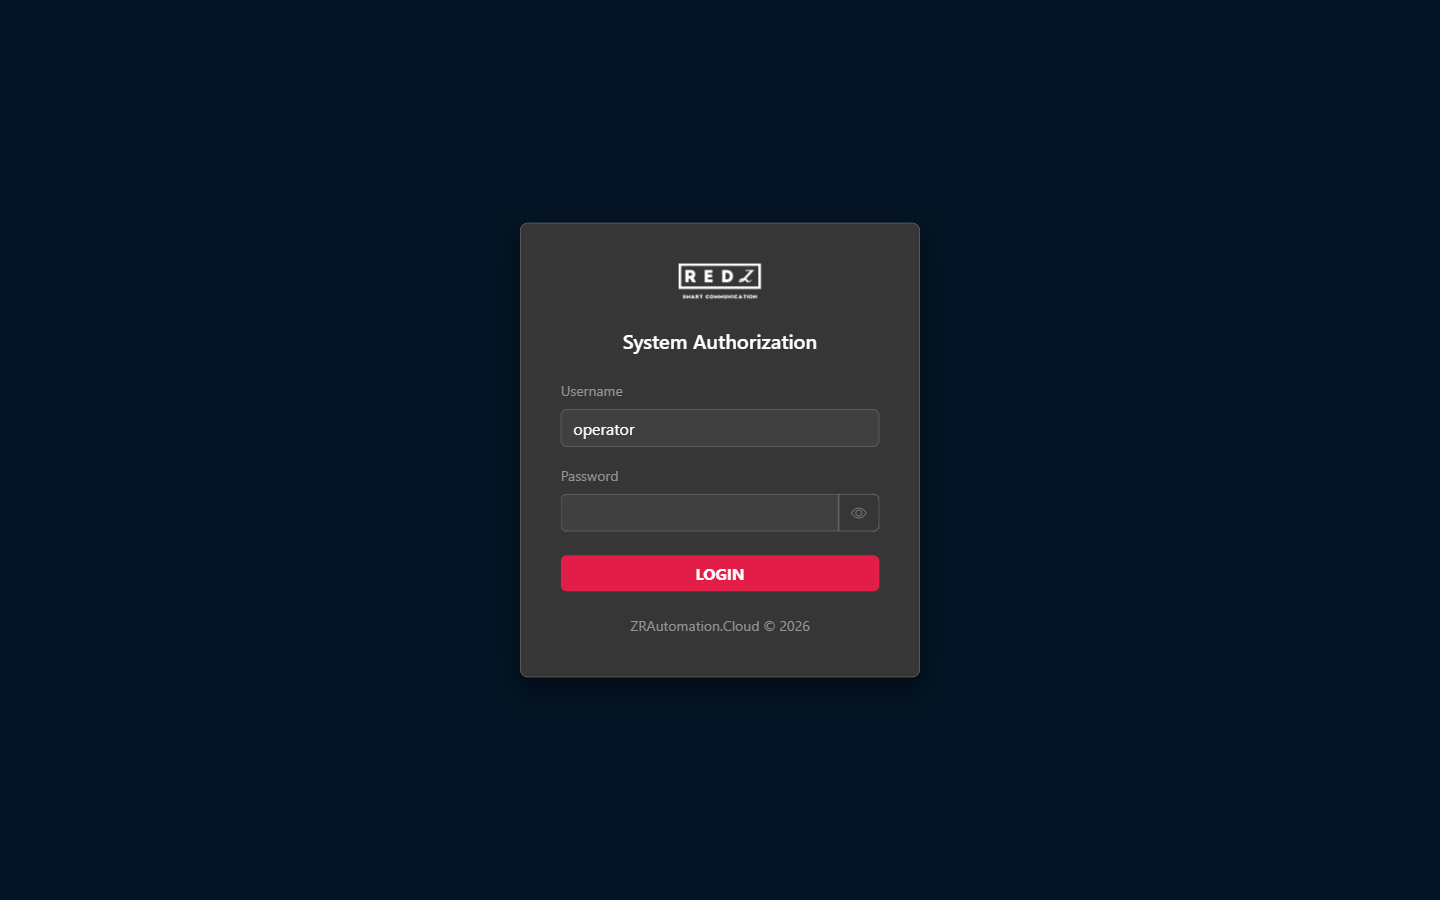
A sign-in lasts 8 hours. With Remember this device ticked, it lasts 30 days without use instead; an administrator with access to all devices can change the number of days in Keep signed in for (days) in System Settings. When a sign-in ends, the screen returns to the sign-in page.
Wrong passwords
After 5 failed attempts the account is locked for 15 minutes. A successful sign-in clears the count.
Setting a new password
The administrator account of a new installation must set a new password at its first sign-in. The screen then asks for a New Password and for the same password again in Confirm New Password. A password has at least 10 characters.
Signing in from outside the site
From outside the local network you sign in with the mobile app, through remote access. Your role needs the Remote Login permission. A role with access to all devices has it only when it is ticked.
If an administrator has turned on Require a mailed code for sign-ins from outside the local network, the app also asks for a Sign-in code of 6 digits, sent to the e-mail address of your account. The code is valid for 10 minutes. Send a new code works after 60 seconds. After 5 wrong entries the code can no longer be used.
With Remember this device turned on, that phone is not asked for the code again for the number of days set in Remember a device for (days), 30 unless changed. Changing your password makes every remembered device ask for the code again.
Devices and channels
Everyone, with administrator partsThe site reads Modbus TCP devices on its network. Each device has channels: the inputs and outputs the site reads and, for outputs, writes.
Fleet Status
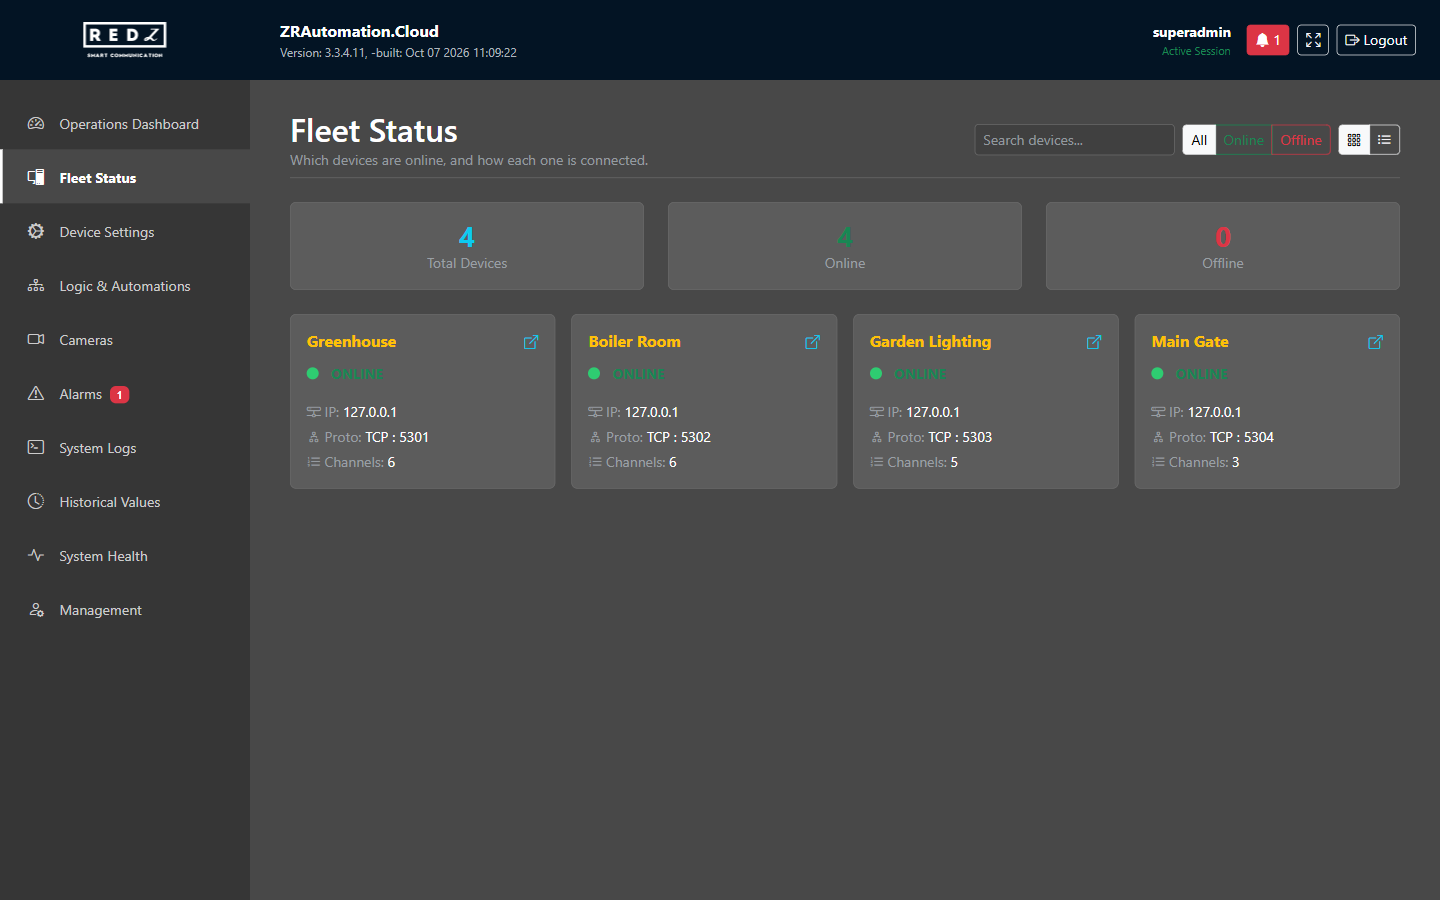
Fleet Status shows the devices your role covers, as cards or as a list. A device the site is reading is ONLINE; an OFFLINE device shows when it was last seen. Search by name, or show All, Online or Offline devices.
The device page
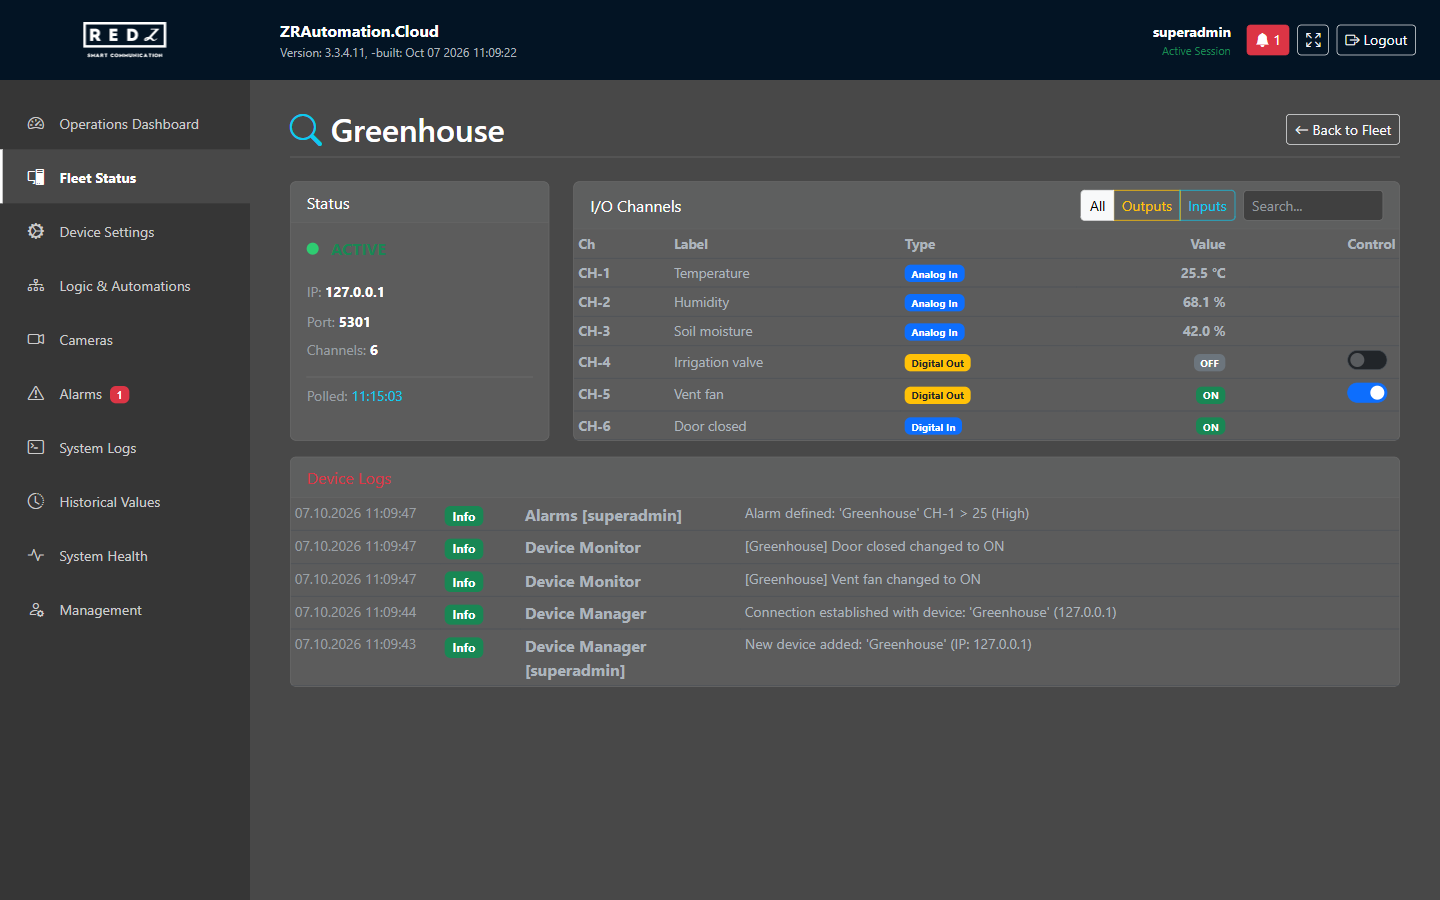
Open a device from its card in Fleet Status, from the device list, or with the button in a dashboard widget's corner. The page shows the device's address, when it was last read, and each channel with its live value. Show All channels, only Outputs or only Inputs, or search them.
In the Control column a digital output is switched and an analog output is given a value within its range. Changing an output needs the Edit (Update) action.
A channel's past values are on the Historical Values page.
Adding a device
Devices are added and changed on the Device Settings page, which lists them on its Devices tab. Adding a device needs the Add (Create) action; changing one needs Edit (Update).
- Open the Add/Edit Device tab.
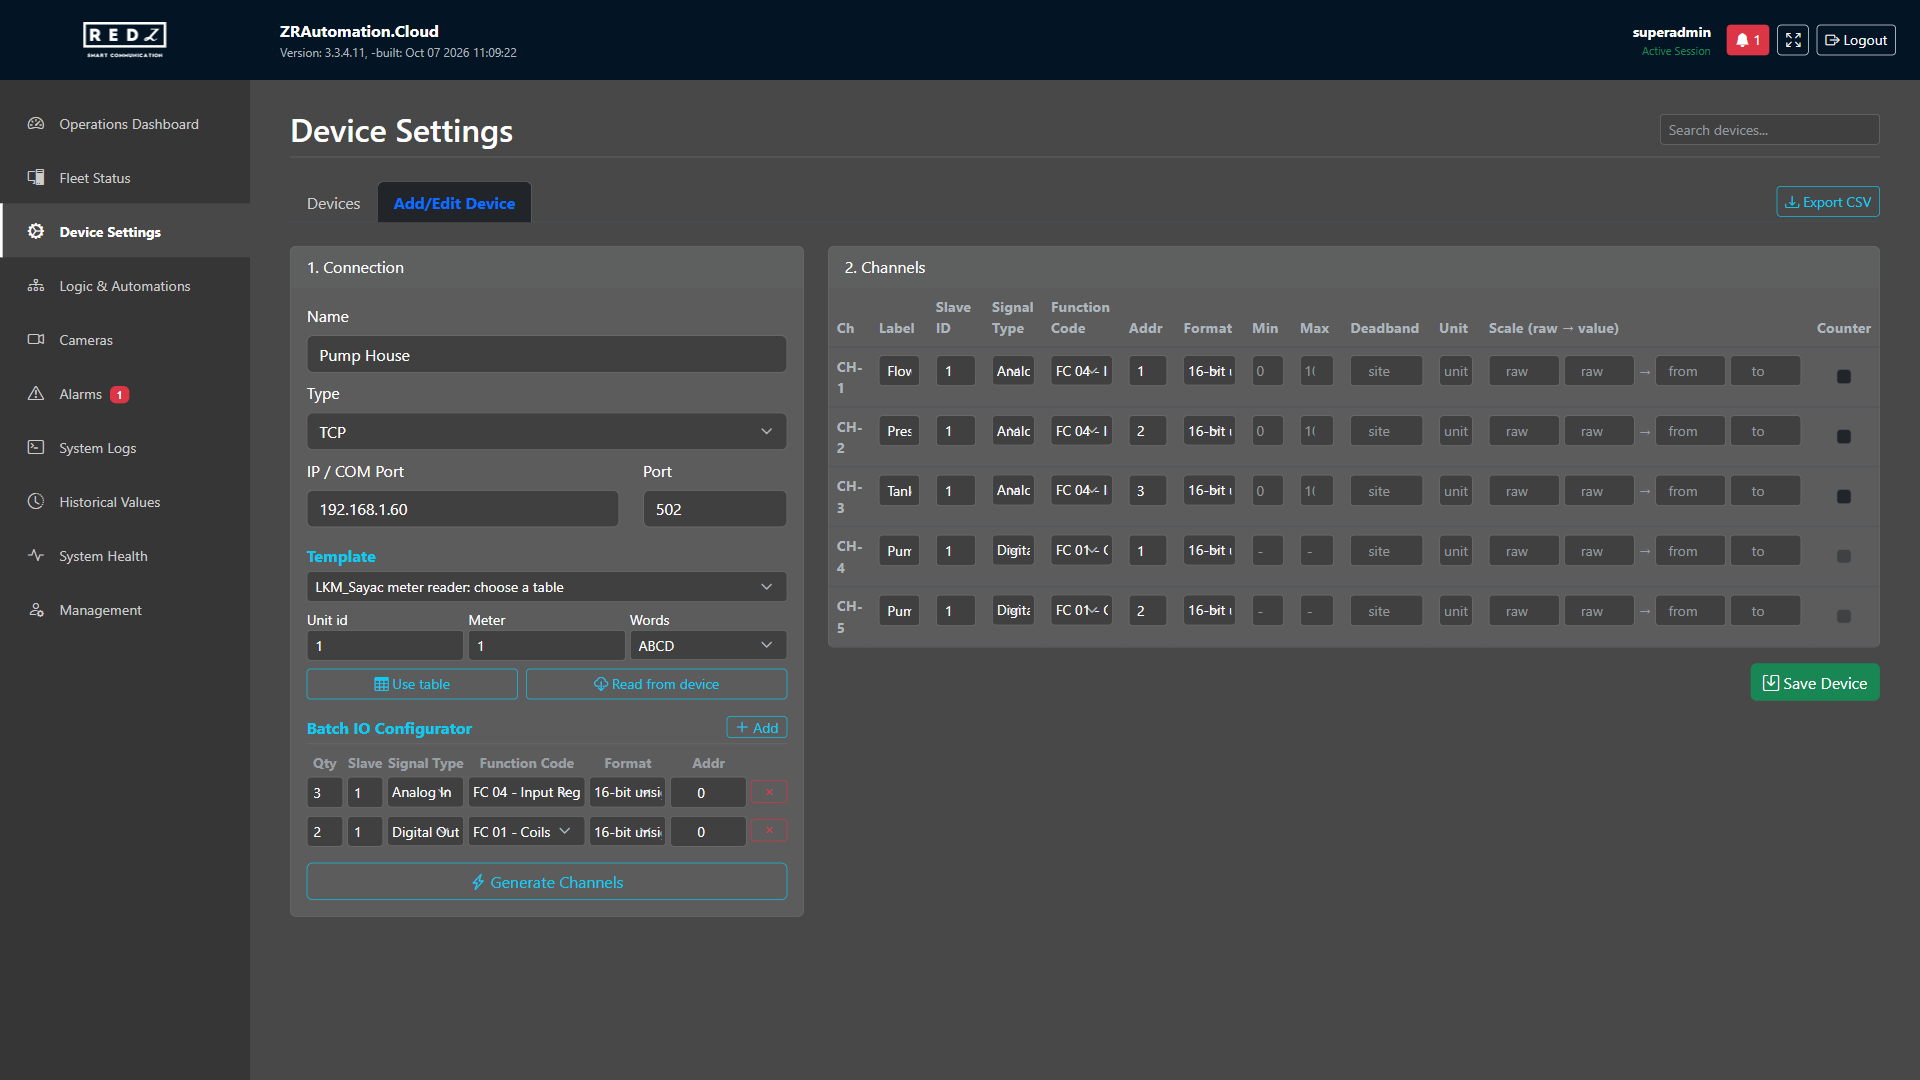
- Under 1. Connection, enter a Name, the device's address in IP / COM Port and its Port (502 unless the device uses another).
- In the Batch IO Configurator, add a row for each group of channels: how many, the unit id, the signal type, the function code, the data format and the first address. Generate Channels fills the channel table; the addresses step by the width of the format.
- Check the channels in the table and add a label, a unit and, where needed, a scale.
- Select Save Device.
The channel table
| Column | What it holds |
|---|---|
| Ch | The channel's number on this device, such as CH-1. The site gives it when the channel is created. |
| Label | A name you choose for the channel. Widgets and lists show it next to the number. |
| Slave ID | The Modbus unit id the channel is read from, 1 unless the device says otherwise. |
| Signal Type | Analog or digital, input or output. |
| Function Code | Which Modbus table the channel is in: coils, discrete inputs, holding registers or input registers. |
| Addr | The channel's address in that table. |
| Format | How the register(s) behind this channel are read. A 32-bit channel also occupies the register after its address. Writes always go out as one raw register. |
| Min | Analog min output limit |
| Max | Analog max output limit |
| Deadband | How far a reading has to move before it is kept in the channel history. Empty uses the site default; 0 keeps every change. The live value and the automations always see every reading, and readings never reach the system log at all. |
| Unit | What the value is counted in - a label only. |
| Scale (raw -> value) | The device's raw span and the span of the quantity it stands for (4-20 mA -> 0-10 bar). The site applies it when it reads, so the screen, the history, the automations and the phone all see the scaled number; a write goes back as the raw count. Values recorded before a change keep their old scale. |
| Counter | A counter only grows - an energy register, a pulse total. Historical Values can then show how much it counted in each interval. |
Data formats
A register channel (FC 03 or FC 04) is read in one of these formats. A 32-bit format uses two registers and a 64-bit format four.
| Format |
|---|
| 16-bit unsigned |
| 16-bit signed |
| 32-bit unsigned (ABCD) |
| 32-bit unsigned (CDAB) |
| 32-bit signed (ABCD) |
| 32-bit signed (CDAB) |
| 32-bit float (ABCD) |
| 32-bit float (CDAB) |
| 64-bit float (ABCD) |
| 64-bit float (GHEFCDAB) |
LKM meter readers
For an LKM meter reader the channels can be filled from a table instead. Choose the reader's table under Template, set its Unit id and which Meter it is, then select Use table. Read from device asks the meter reader which table it uses.
Copying and exporting
The Clone device button in the device list makes an inactive copy of a device. Export CSV saves every device and its channels in one CSV file.
Dashboards and widgets
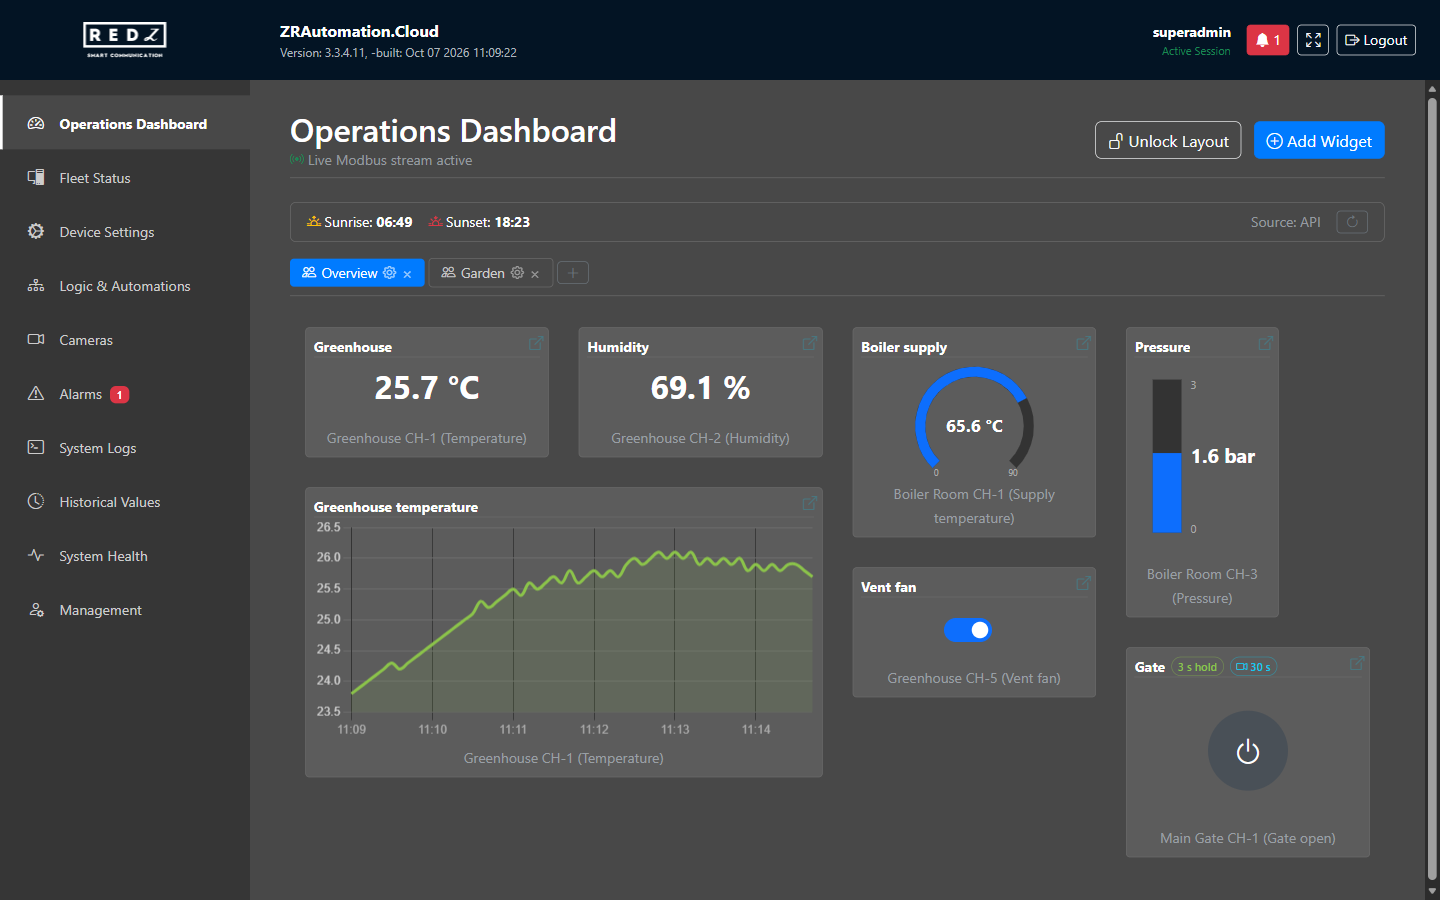
EveryoneThe Operations Dashboard shows live values from your devices as widgets, arranged on one or more pages. If your role has this page, it is the page that opens after you sign in.
Pages
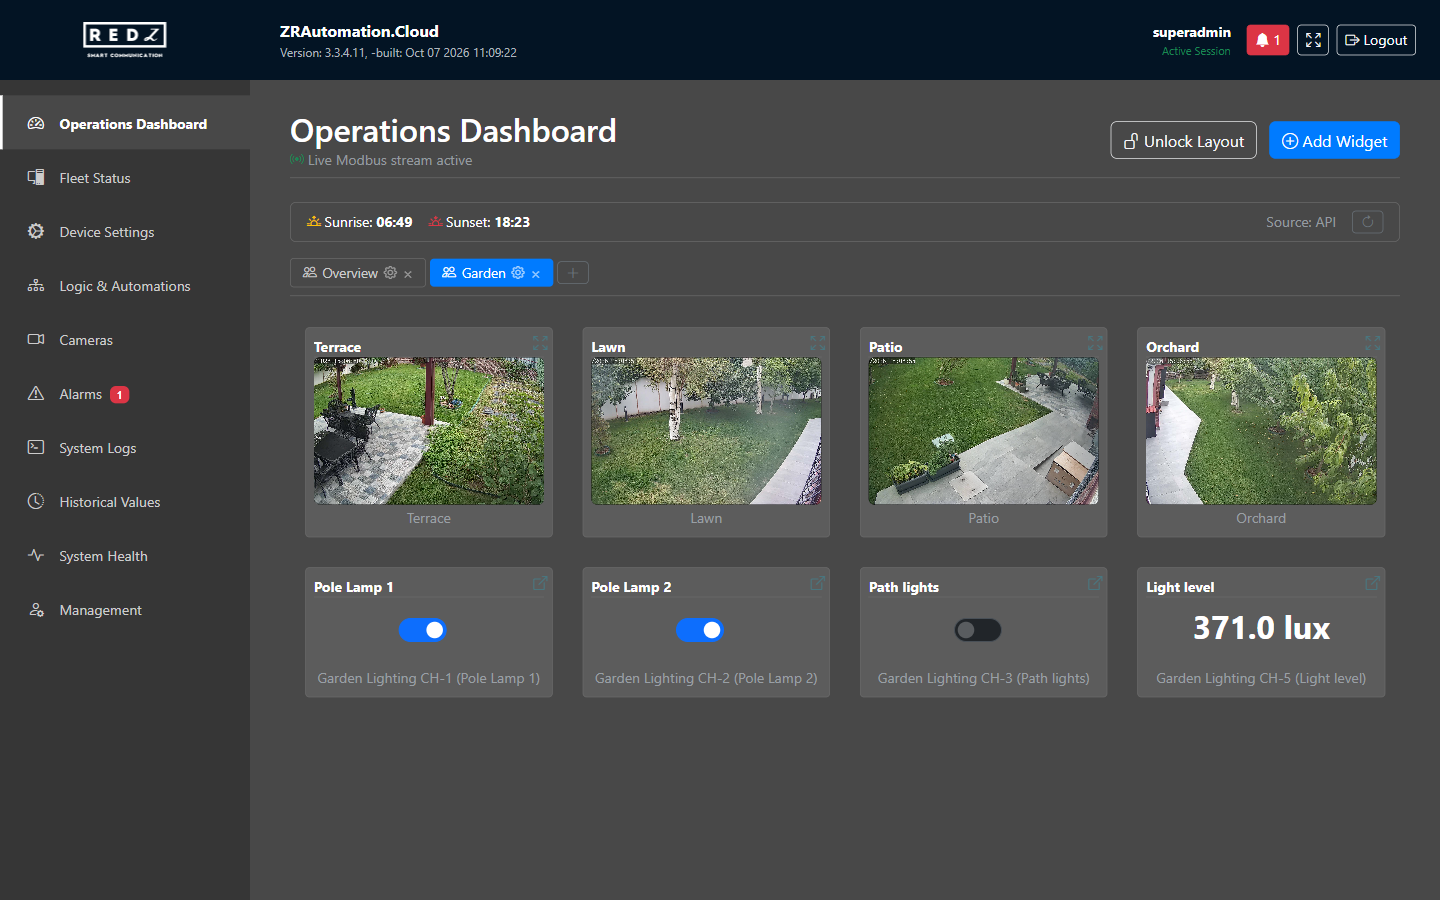
The pages are shown as tabs above the widgets. A shared page, marked with a people icon, is seen by every user. A personal page, marked with a person icon, is seen only by you.
To add a page, select + at the end of the tabs. In Page Settings, enter a Name and turn on Shared page if every user should see it. Anyone can add personal pages; adding or changing shared pages needs the Shared Dashboards permission.
On a page you may change, the gear on its tab opens its settings and the x deletes it. The last shared page cannot be deleted or made personal.
If your role cannot change a shared page, Copy to My Dashboards makes a personal copy of it that you can change.
Each browser remembers the page you looked at last and opens it the next time.
Widget types
| Type | What it shows |
|---|---|
| Value | The channel's latest value with its unit. |
| Switch | An on and off switch. Turning it on writes 1 to the channel; turning it off writes 0. |
| Trend | A line chart of the channel's recent values, updated as new values arrive. |
| Gauge | A dial showing where the value stands within a range you set. The channel's alarm limits are marked on it. Not available for digital channels. |
| Bar | The same as a gauge, drawn as a bar. |
| Camera | A camera picture. Selecting it opens the camera full screen. |
| Button | For digital outputs only. Without a duration, the output is on while you hold the button and off when you let go. With a duration, one tap turns the output on and the site turns it off after that time, even if the browser tab is closed. |
Adding a widget
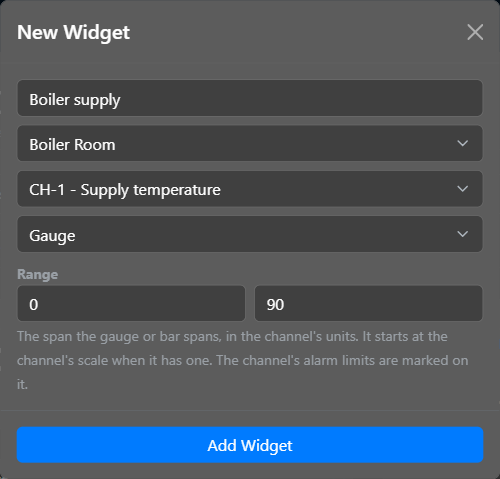
- Select Add Widget.
- In New Widget, enter a title and choose the device, the channel and the widget type. A type that does not suit the channel cannot be chosen.
- For a gauge or a bar, set the range in the channel's units. For a button, set a duration in seconds, or leave it blank to press and hold.
- For a switch or a button, you can choose a camera under Show a camera when used: using the widget then opens that camera on the screen for the number of seconds you set.
- Select Add Widget at the bottom of the window.
Arranging the page
Select Unlock Layout to move and resize widgets, delete them, or move them to another page. Select Lock Layout to save the arrangement.
When the dashboard is too narrow for its columns, for example on a phone or a tablet held upright, the widgets are shown in one column and the page cannot be arranged.
What your role allows
- A widget of a device your role does not cover is not shown. It keeps its place on the page for the users who can see it.
- A shared page whose widgets all belong to such devices is not shown at all.
- Without the Edit (Update) action, switches and buttons are marked view only: you can watch the channel but not change it.
- Without the Cameras permission, a switch or button linked to a camera still works, but no camera picture opens.
- On a shared page you cannot change, Unlock Layout and Add Widget are not shown.
Cameras
EveryoneThe site shows the cameras of its video recorder. The pictures come through the site, so a browser or a phone never connects to the recorder itself. Seeing cameras needs the Cameras permission.
The Cameras page
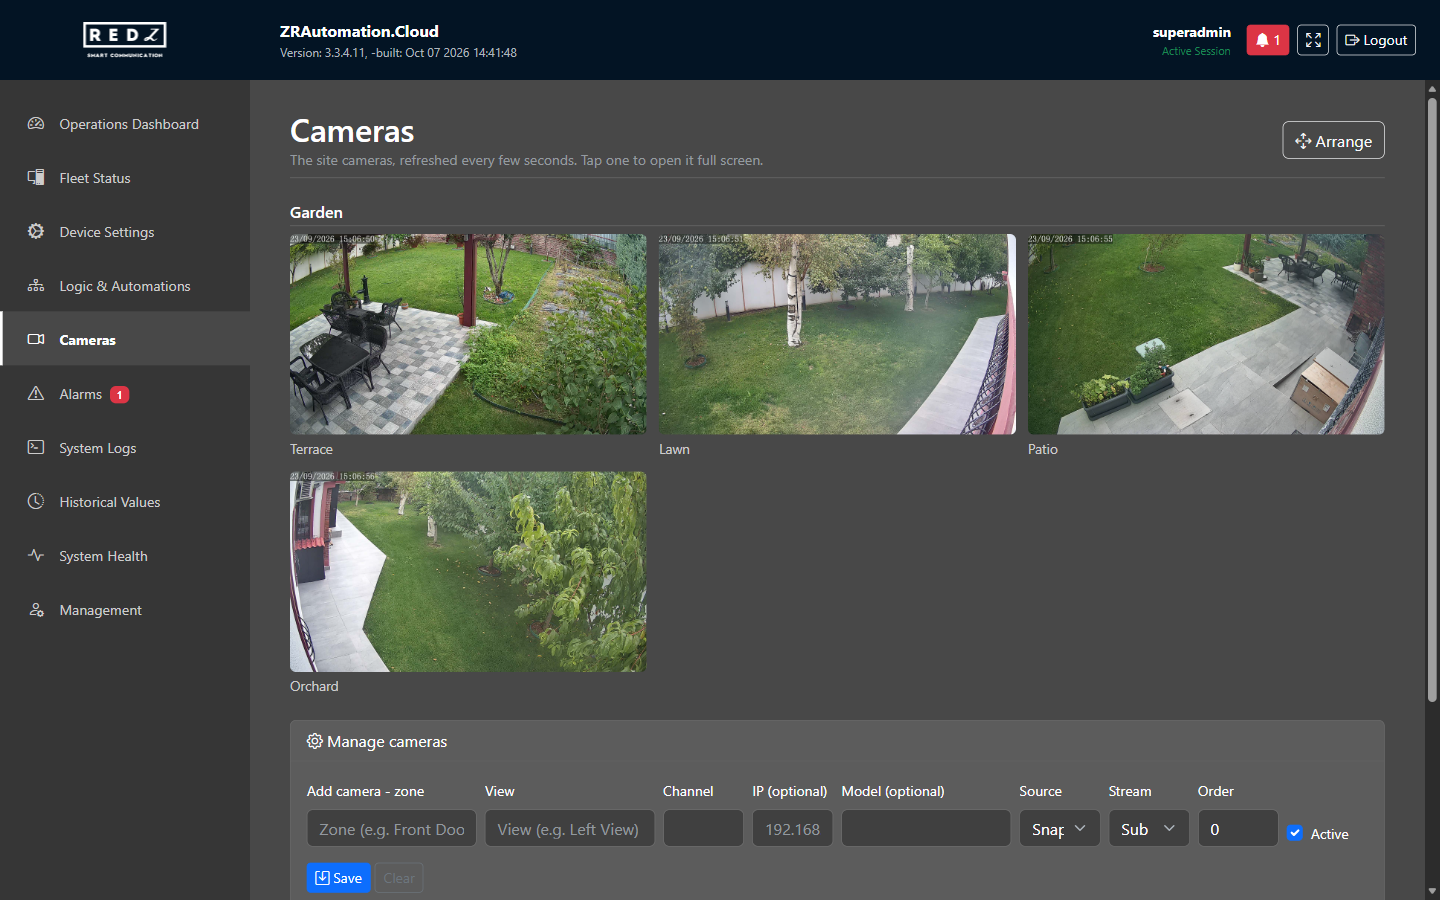
The Cameras page shows the cameras grouped by zone, each picture renewed every 4 seconds. Cameras without a zone are listed last, under Other. A camera that gives no picture shows No picture.
Select a camera to open it full screen. Full screen shows the camera's main stream as video. The site sends video for up to 2 cameras at a time; past that, or when a camera cannot send video, the picture is shown as a quick series of still pictures instead.
A camera widget on a dashboard opens the same full screen view.
Arranging the cameras
With the Edit (Update) action, Arrange puts arrows on each camera to move it within its zone, and on each zone to move it up or down. Each move is saved at once. Select Done to leave.
A camera when a control is used
A switch or button widget can open cameras when it is used, for example the gate camera when the gate button is pressed.
- On the dashboard, select Unlock Layout.
- Select the camera symbol on the switch or button.
- In Camera on use, choose up to 4 cameras and the number of Seconds they stay open, from 5 to 600; 30 unless changed.
- Select Save, then Lock Layout. Remove takes the cameras off the widget.
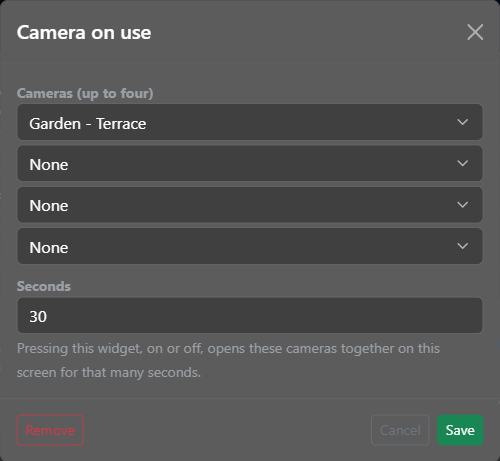
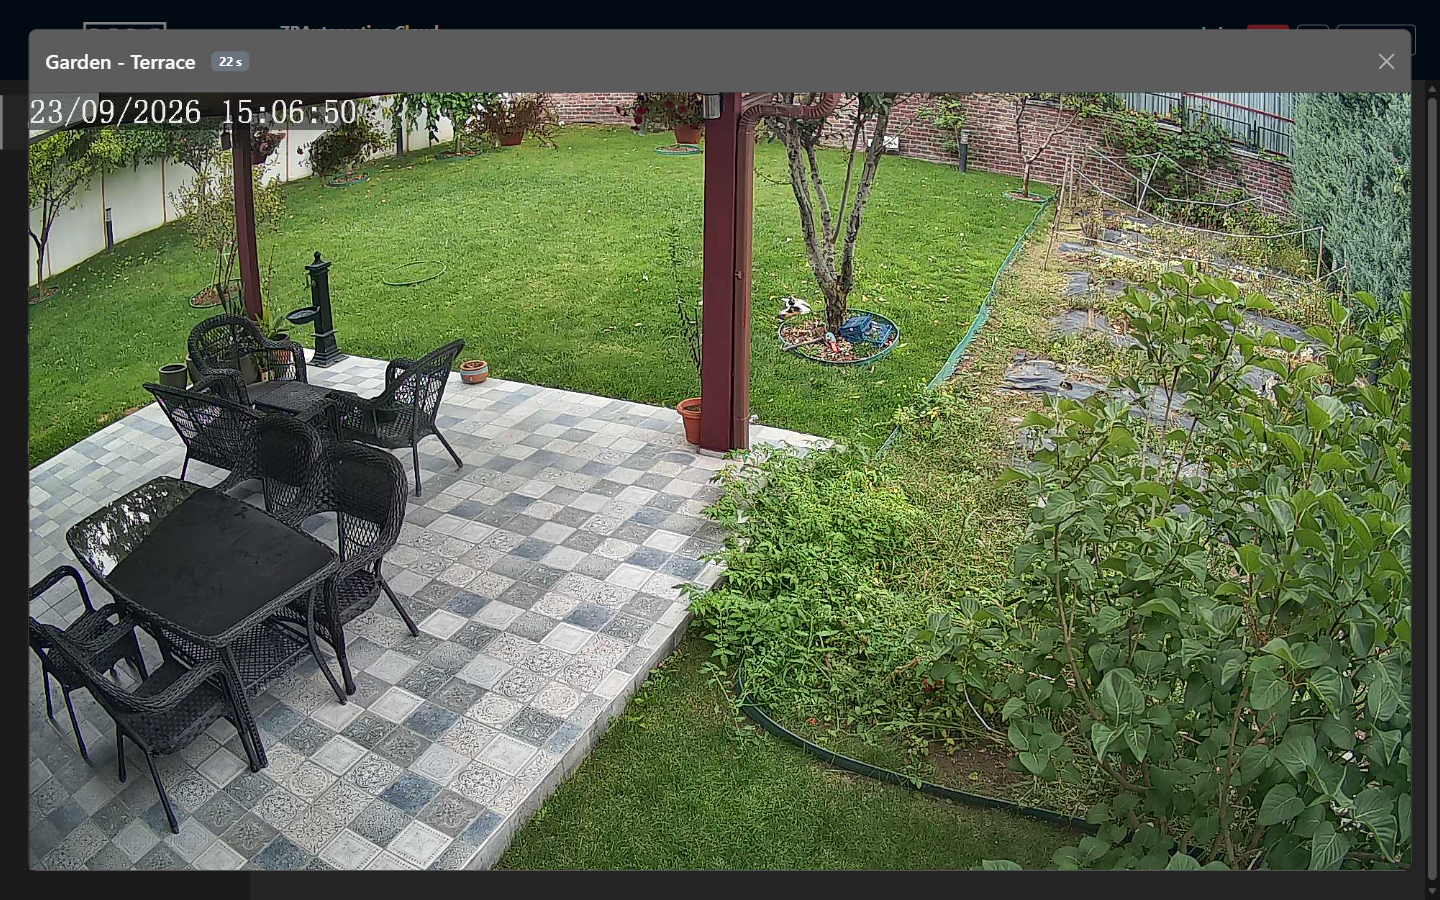
Using the widget, on or off, then opens those cameras together on the same screen, with the seconds counting down; the window closes by itself. The widget shows a camera symbol and the seconds. Without the Cameras permission the widget still works, but no camera opens.
Adding cameras
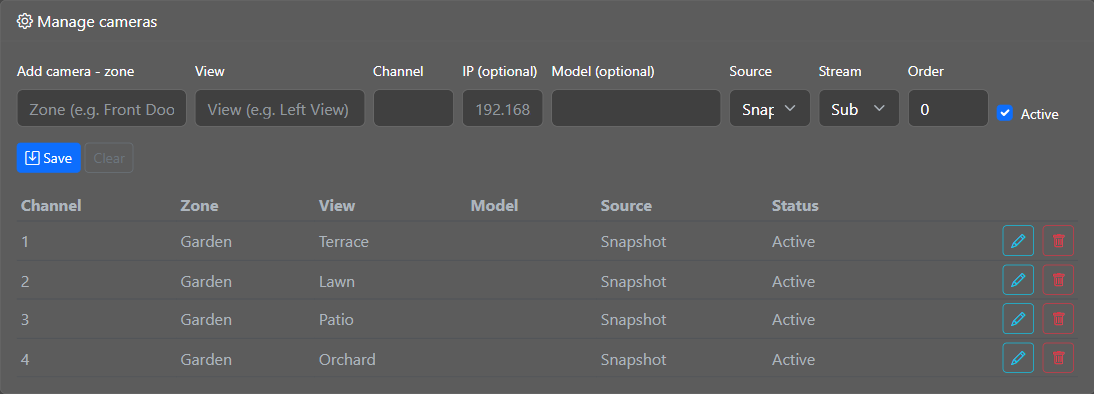
Cameras are added under Manage cameras at the bottom of the Cameras page. Besides the Cameras permission, adding a camera needs the Add (Create) action, changing one Edit (Update) and removing one Delete.
- Under Add camera - zone, enter the zone, such as the area the camera watches, and under View the camera's own name. Screens show the two together.
- Enter the recorder's Channel for this camera, 1 to 64. Each channel can be used by one camera only.
- IP (optional) and Model (optional) are notes for you; the site does not use them.
- Under Source, choose Snapshot if the recorder gives a still picture for the channel, or RTSP to take the picture from the channel's video stream. Use RTSP for a camera that shows No picture with Snapshot.
- Under Stream, choose which stream the page uses for its picture: Sub is smaller and faster, Main is sharper. Full screen always uses the main stream.
- Order sets the camera's place. A camera that is not Active stays in the list but is not shown.
- Select Save.
The recorder
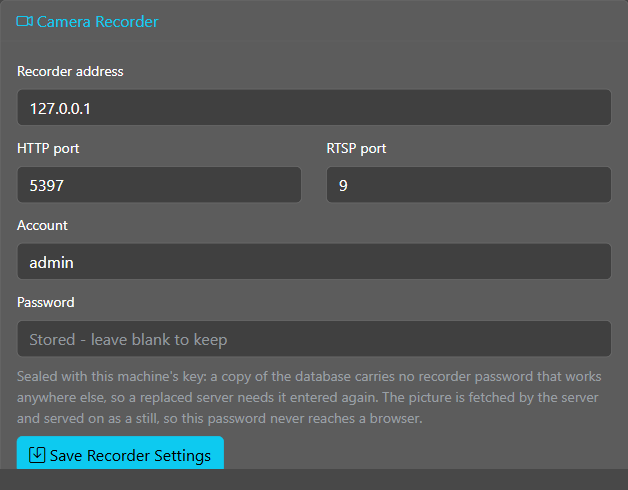
The site's connection to the recorder is set on the Management page, System Settings tab, in Camera Recorder: the Recorder address, its HTTP port and RTSP port, and the recorder's Account and Password. Changing it needs the Management permission and the Edit (Update) action.
Leave the password blank to keep the stored one. The password is kept sealed with the site server's own key: after the site moves to another server, it has to be entered again. It is never sent to a browser.
If the recorder refuses the password, the site stops asking it for pictures, so that the recorder does not lock its account, and every camera shows No picture. Pictures come back after the right password is saved.
Alarms
EveryoneThe Alarms page lists what is in alarm now and what was. An alarm is raised when a value crosses a limit, when a digital channel is in a given state, or when a device stops answering.
You see the alarms of the devices your role covers. The page, the bell and the alarm sound need the Alarms permission.
Active alarms
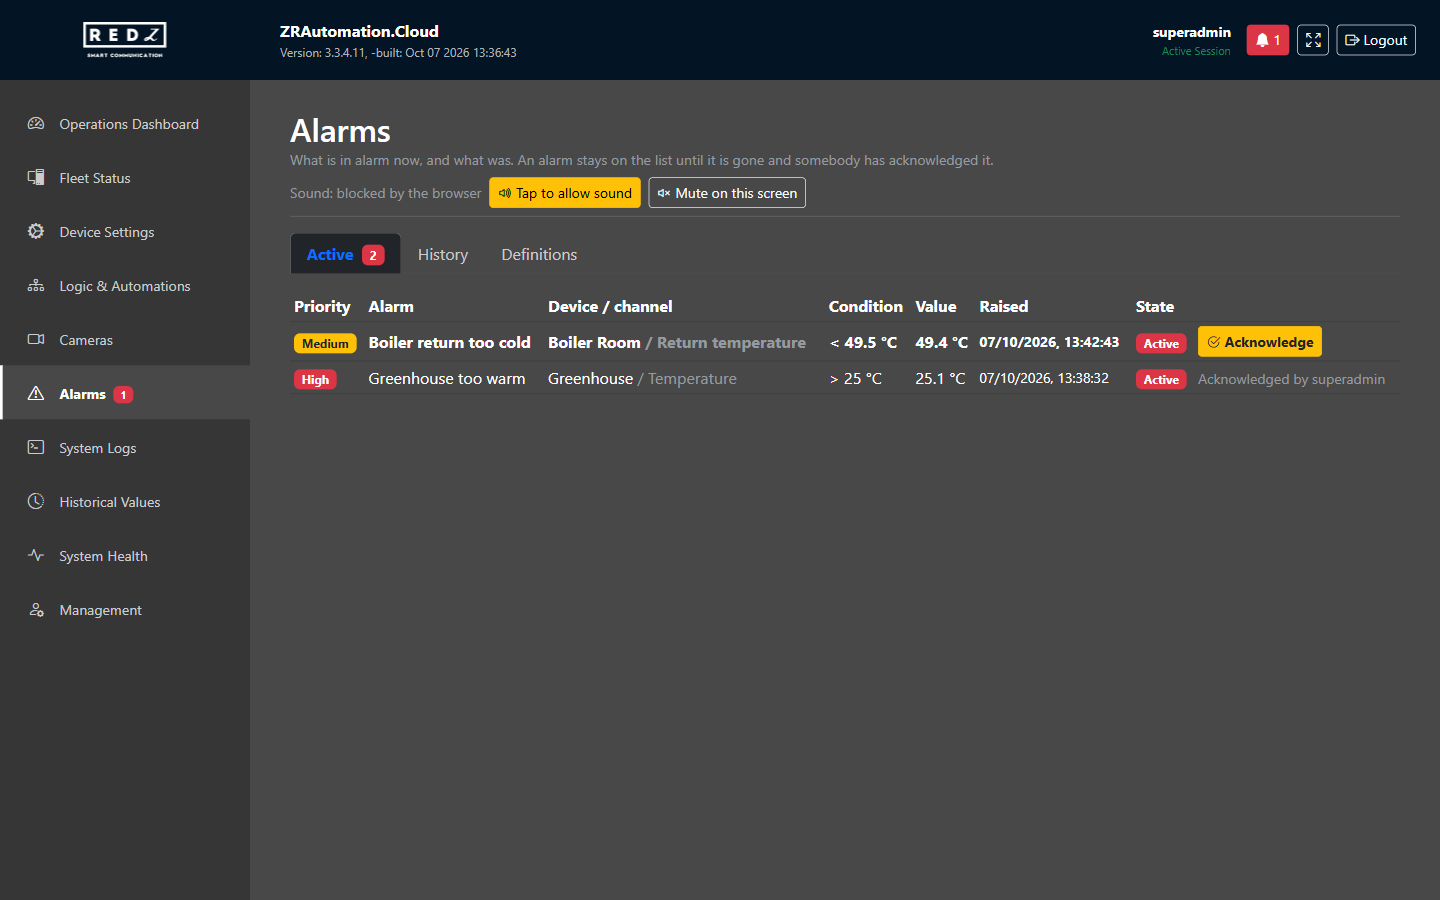
The Active tab shows each alarm with its priority, its text, the device and channel, the condition, the value when it was raised and the time. An alarm stays on this list until it is gone and someone has acknowledged it, so an alarm that came and went while nobody was watching is not missed.
Alarms nobody has acknowledged come first, then by priority (High, Medium, Low), newest first. An alarm that is still on and not acknowledged is shown in bold. When an alarm is over, its state shows the time it went.
- Select Acknowledge on the alarm's row.
- In Acknowledge alarm, add a note if you wish under Note (optional), such as what you checked. A note can be up to 200 characters.
- Select Acknowledge in the window.
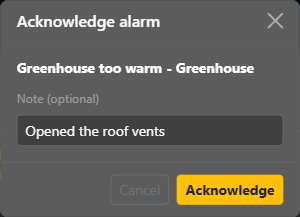
The row then shows who acknowledged the alarm. Each acknowledgement is written to the System Logs with its note. If two people acknowledge the same alarm, the first one counts.
The bell and the sound
While an alarm waits to be acknowledged, a bell with the number of such alarms is shown at the top of the screen, and the Alarms entry in the sidebar shows the same number. Selecting the bell opens the Alarms page.
The screen plays an alarm sound while an alarm is still on and nobody has acknowledged it. The sound stops when the last such alarm is acknowledged or gone.
Mute on this screen silences only the browser you are using, for example a wall tablet, and not the other screens. Sound on this screen turns it back on.
A browser may refuse to play sound until someone has touched the page. The page then says so and shows Tap to allow sound; selecting the bell does the same.
On a gauge or bar widget the channel's alarm limits are marked, and while one of them is in alarm the widget takes the colour of its priority.
Alarm history
The History tab lists the alarms raised in the window you choose, from Last 24 hours to Last 90 days, newest first, with when each one went and who acknowledged it, when and with what note.
Alarms that are gone and acknowledged are kept for the number of days set in Alarms (days) in System Settings, 90 unless changed. An alarm nobody has acknowledged is kept however old it is.
Defining alarms
Alarms are defined on the Definitions tab. Besides the Alarms permission, adding an alarm needs the Add (Create) action, changing one needs Edit (Update) and deleting one needs Delete. The form for a new alarm is shown only to a role that may add alarms.
- Choose the Device and the Kind of alarm.
- For Limit (a value), choose a register channel, the comparison under When and the Limit in the channel's units. Hysteresis is how far back past the limit the value has to come before the alarm counts as gone; with 0 it is gone as soon as the condition no longer holds.
- For State (on / off), choose a digital channel and the State that raises the alarm.
- For Device not answering no channel is needed: the alarm is raised when the device has not answered for the seconds in After (s), at least 10.
- Delay (s) is how long the condition has to hold before the alarm is raised; 0 raises it at once.
- Choose the Priority and write the Alarm text people will see. Without a text, the site writes one from the channel and the condition.
- Leave Tell the phones ticked to notify the mobile app, and On ticked for the alarm to be watched.
- Select Save alarm.
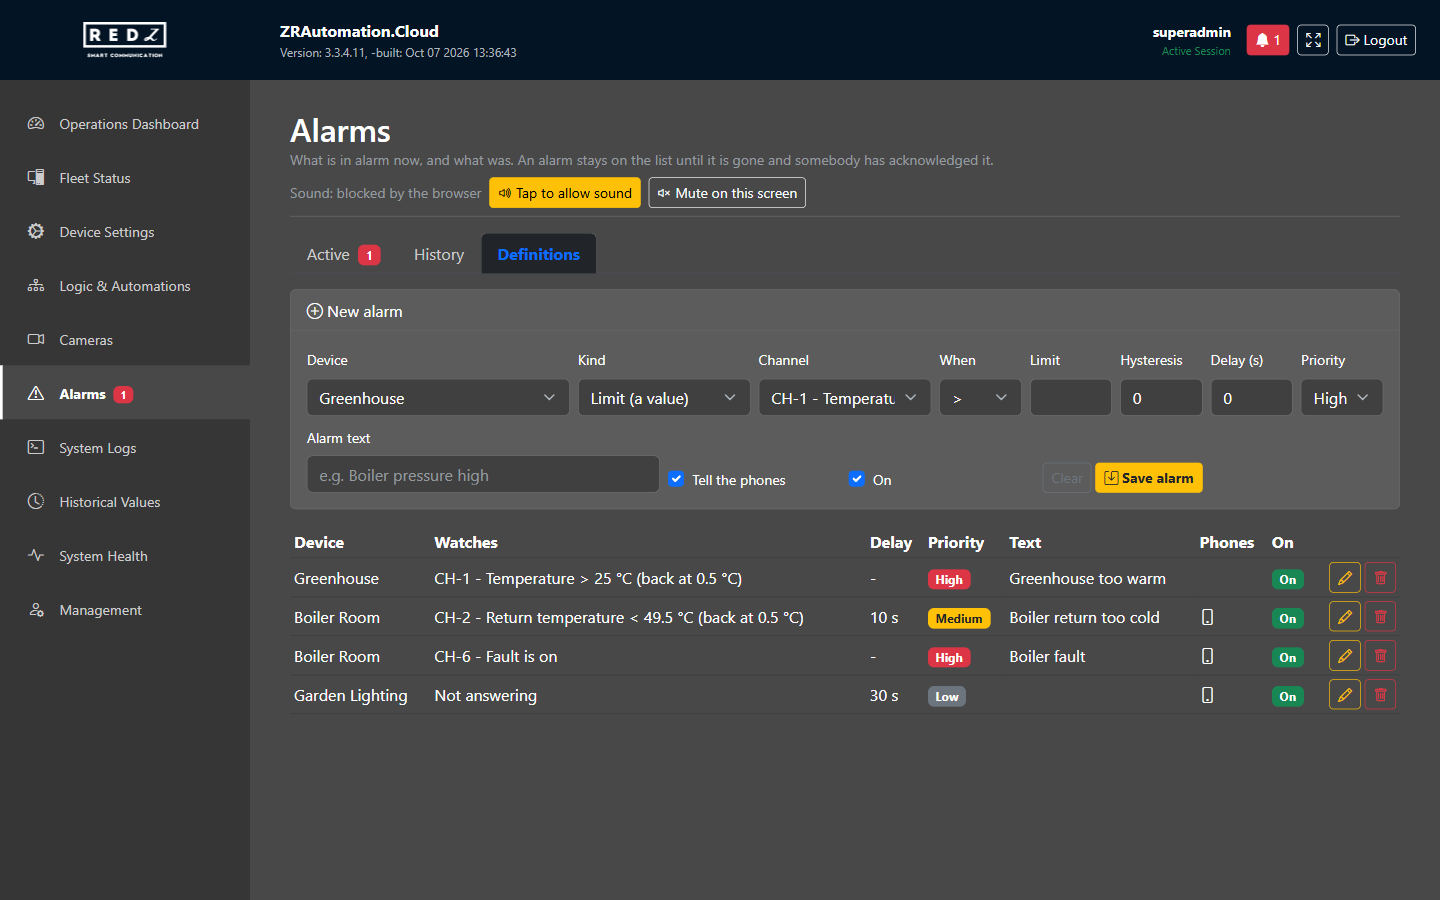
The list shows what each alarm watches. The pencil changes an alarm and the bin deletes it. An alarm that is on when its definition is deleted or switched off is closed, and the history keeps it.
A limit or state alarm is judged on fresh readings only: while a device is not being read, its alarms neither rise nor clear. A Device not answering alarm tells you about that time.
Notifications on the phone
When an alarm with Tell the phones is raised, the mobile app is notified on the phones of the accounts whose role has the Alarms permission and covers the device. The notification names the device and shows the alarm text.
Notifications travel through remote access. While remote access is off or not connected, no notification is sent, and none is sent later.
Logic and automations
AdministratorsThe Logic & Automations page sets what the site does by itself: Time Blocks switch outputs at set times, Scenarios act when a channel reaches a value, and Holidays are the days time blocks can skip. The site checks them every 3 seconds, whether or not a screen is open. The page needs the Logic & Automations permission.
You see the time blocks and scenarios whose devices your role covers. Adding one needs the Add (Create) action, changing one Edit (Update) and deleting one Delete, and your role has to cover every device it uses.
Time blocks
A time block writes one value to an output at its start time and another at its end time, on the days you choose. In between, the site does not hold the output: if someone switches it, it stays so until the block's next time.
The start and the end are written in their own minute. If that minute is missed, because the device did not answer or the site was not running, the site writes it as soon as the device answers, until the block's other time comes, and the System Logs say it was late. When both a start and an end were missed, only the end is written.
- Enter a Routine Name and choose the Device and the Channel. Only outputs are offered.
- Tick the Active Days.
- Leave Do not run on Holidays ticked for the block not to run on the days on the Holidays tab.
- Under Start Action, choose Fixed Time and a time, or Sunrise or Sunset and the minutes after it (with a minus sign, the minutes before it). Then choose the value: Turn ON or Turn OFF for a digital output, a number for an analog one.
- Set the End Action the same way.
- Select Save Routine.
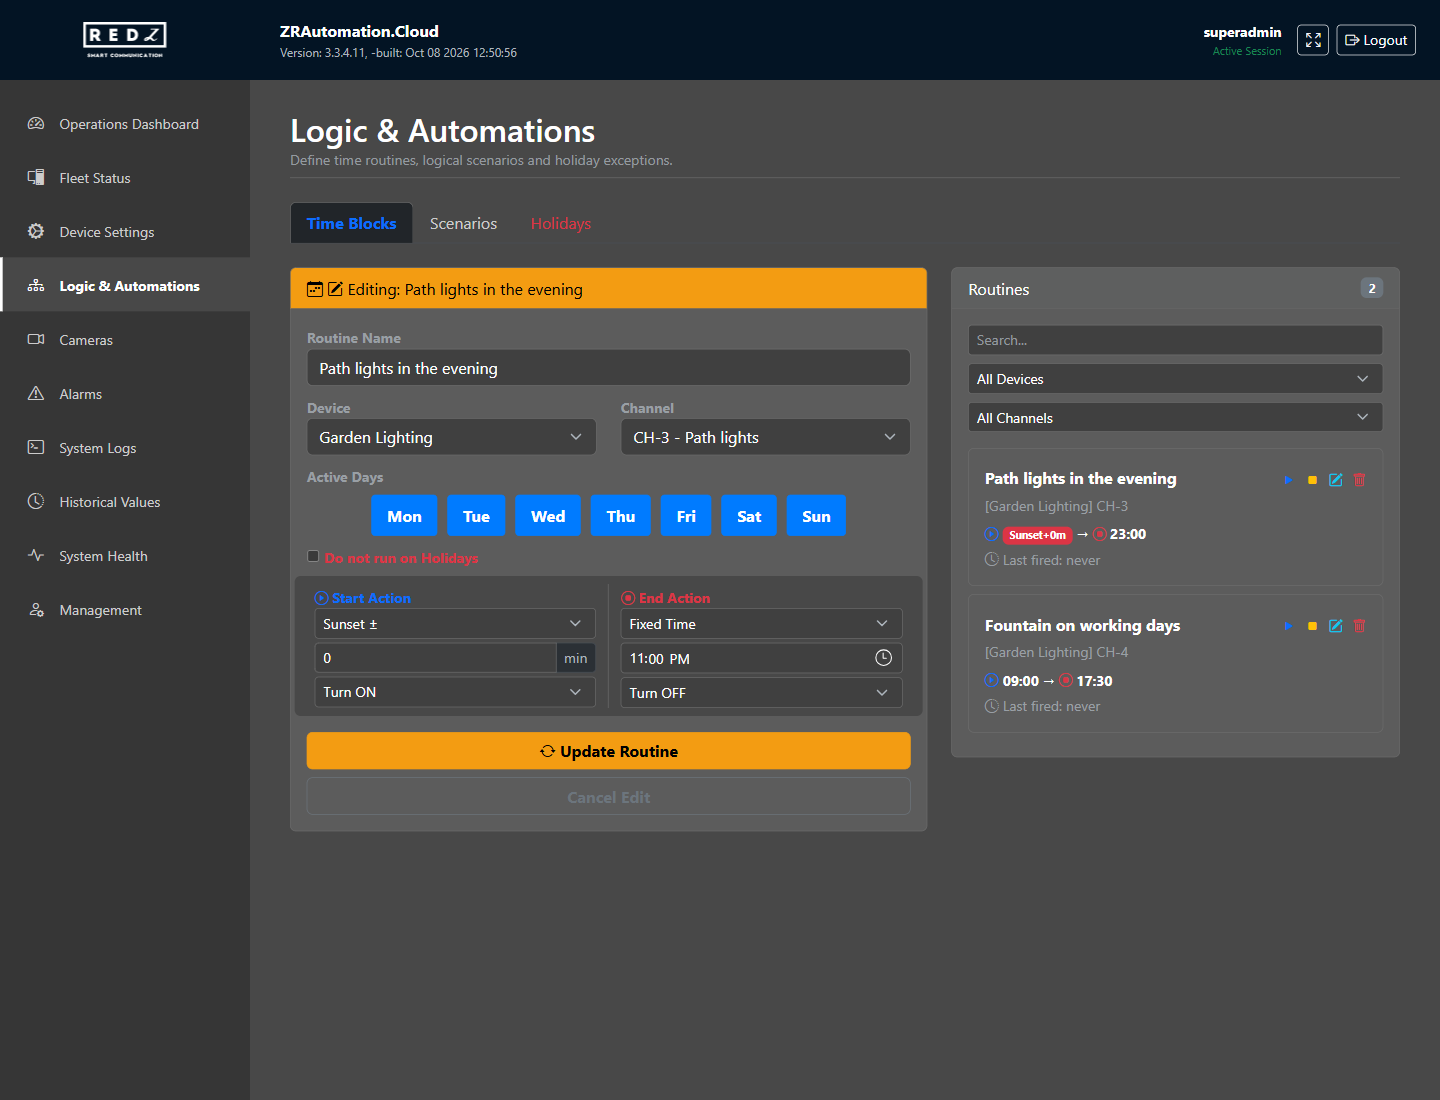
The list shows each block's device and channel, its start and end, and when it last started. With the Edit (Update) action, the play and stop buttons write the block's start or end value now, after you confirm; the block's own times are not changed.
Sunrise and sunset are the times the site uses for the day (see Location and sun times in System logs, health and settings). When it has none, a block that follows them does nothing.
Scenarios
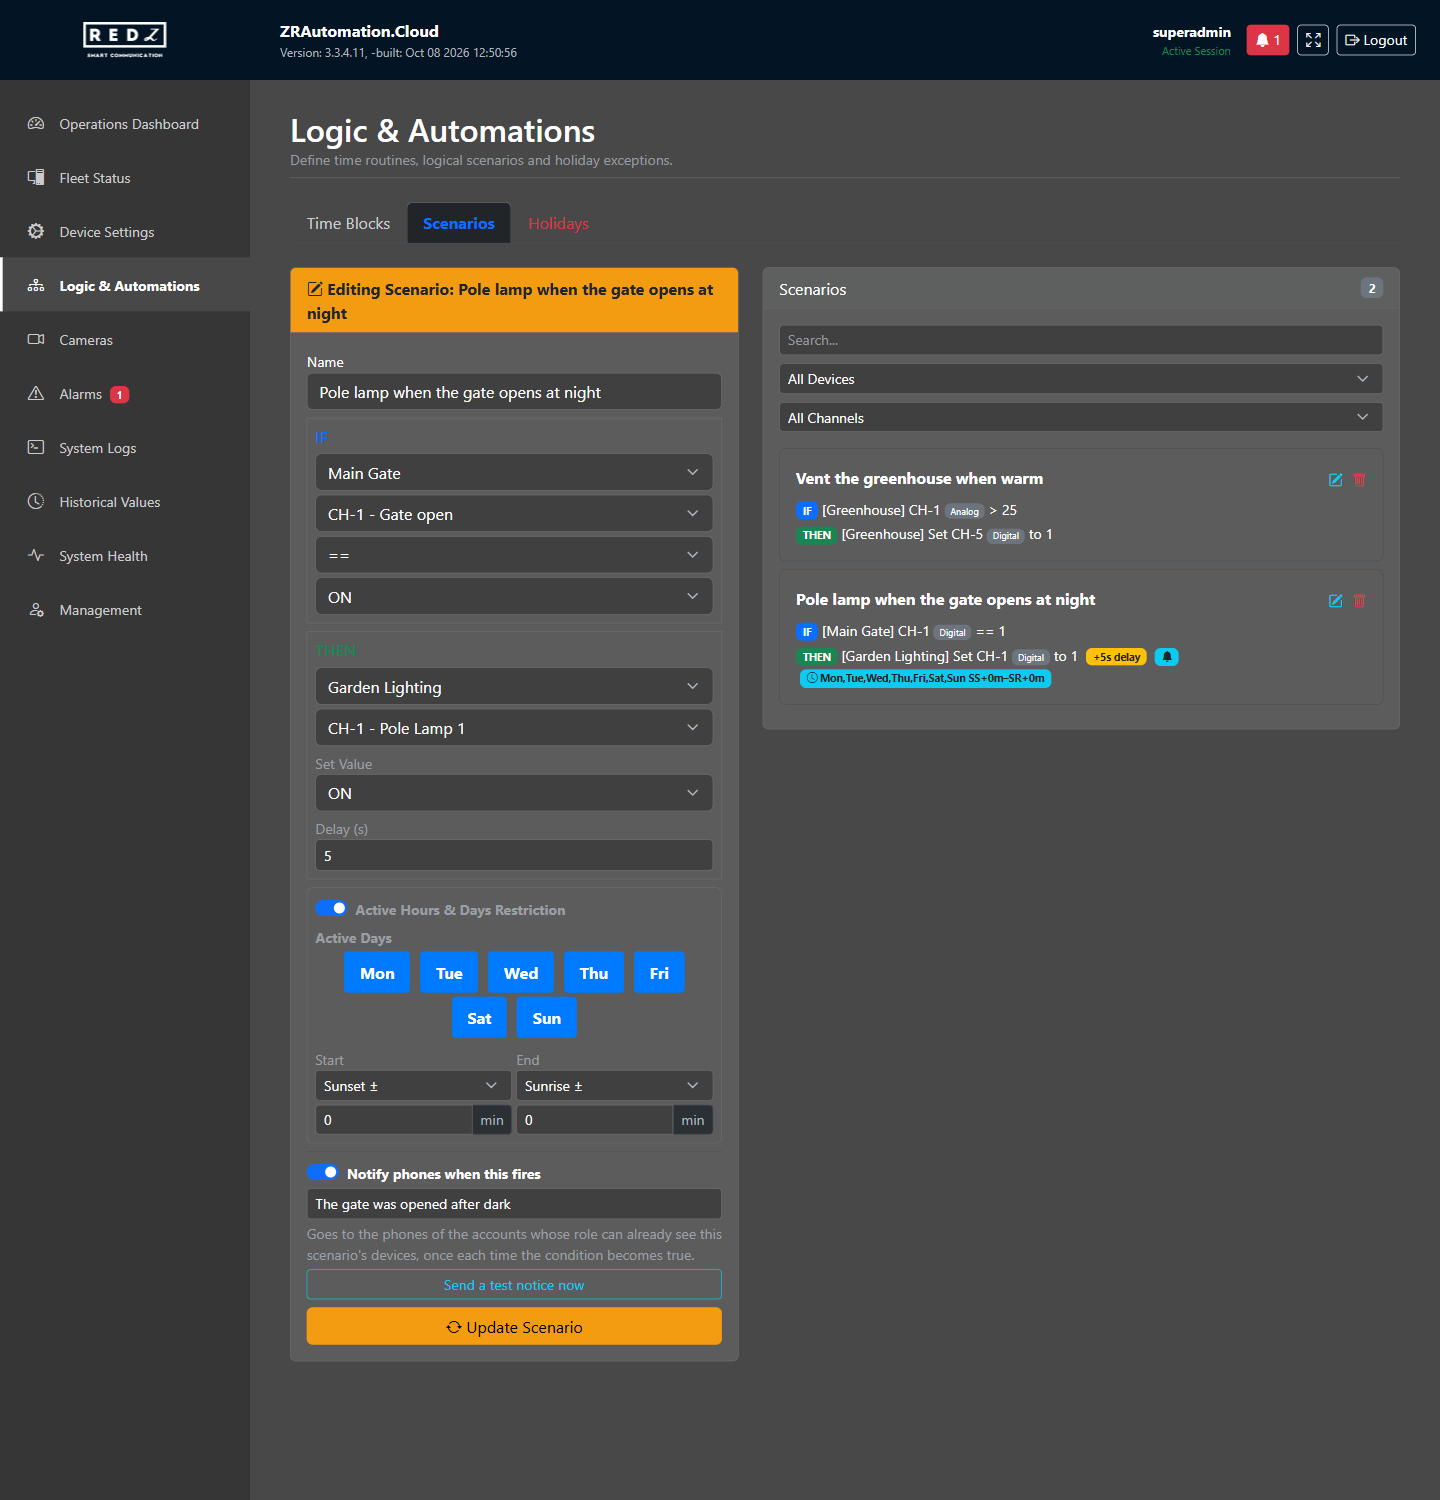
A scenario watches one channel and writes a value to an output when a condition holds: if a channel is above, below or equal to a value, then set an output.
- Enter a Name.
- Under IF, choose the device, the channel, the comparison and the value; for a digital channel the value is ON or OFF.
- Under THEN, choose the device and the output, the Set Value and, if the output should wait, a Delay (s).
- To limit the scenario to some days and hours, turn on Active Hours & Days Restriction and set the days, the start and the end. The end can be after midnight, for example from sunset to sunrise.
- To be told on the phone, turn on Notify phones when this fires and write the message, up to 160 characters.
- Select Save Scenario, or Update Scenario when changing one.
Without a delay, the site keeps the output at the value for as long as the condition holds: if someone changes the output, the site sets it back at its next check. When the condition ends, the output is left as it is. To switch it back, add a second scenario with the opposite condition.
With a delay, the value is written once, the given number of seconds after the condition became true, even if the condition has ended by then.
A button press on the dashboard counts even when it is over before the site's next check.
Outside its days and hours a scenario does nothing. A button press that it ignores for that reason is written to the System Logs.
A channel that gives no value is not compared with anything; the scenario waits.
The list shows each scenario's IF and THEN, its delay, a bell when it notifies phones and its days and hours. Each scenario has an on and off switch, the same one the mobile app shows; a scenario switched off does nothing, keeps its settings and is marked Disabled. Switching it needs the Edit (Update) action.
Notifications from a scenario
A scenario that notifies phones does so once each time its condition becomes true. The notice goes to the phones of the accounts whose role covers the scenario's devices, with your message, or without one with the scenario's name.
Send a test notice now sends the notice of a saved scenario at once, so you can see that it arrives. Like the alarm notifications, these travel through remote access.
Holidays
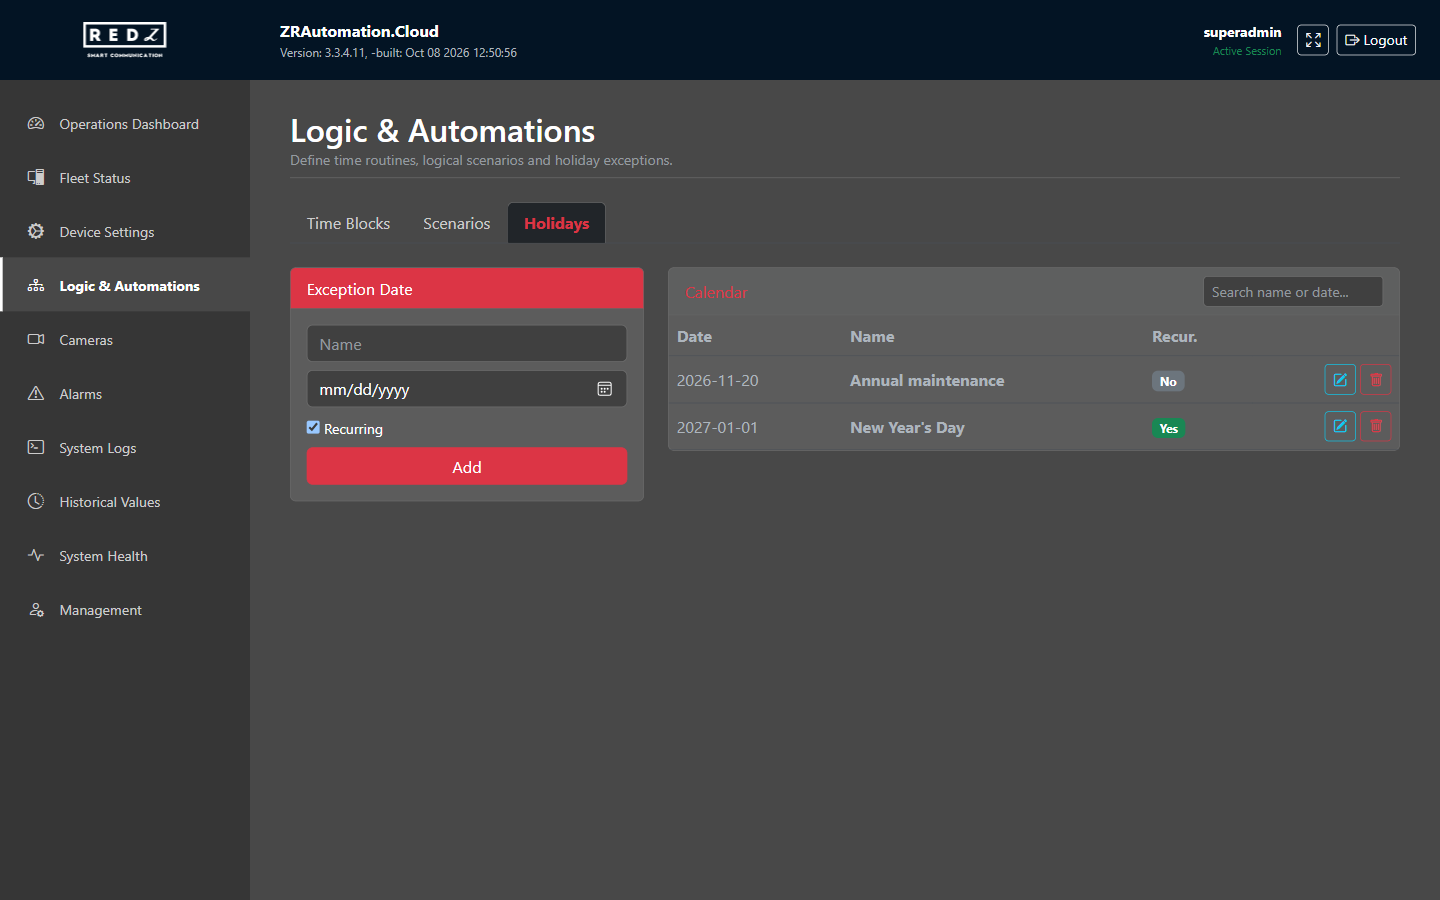
The Holidays tab lists the days on which time blocks with Do not run on Holidays do not run. Holidays do not affect scenarios.
- Enter the name and the date.
- Leave Recurring ticked for a day that comes back every year on the same date.
- Select Add.
History, analysis and export
EveryoneThe Historical Values page shows how channels changed over time, as a chart, a summary and a table, and saves the same analysis as an Excel workbook. It needs the Historical Values permission, and it offers the devices your role covers.
Choosing what to show
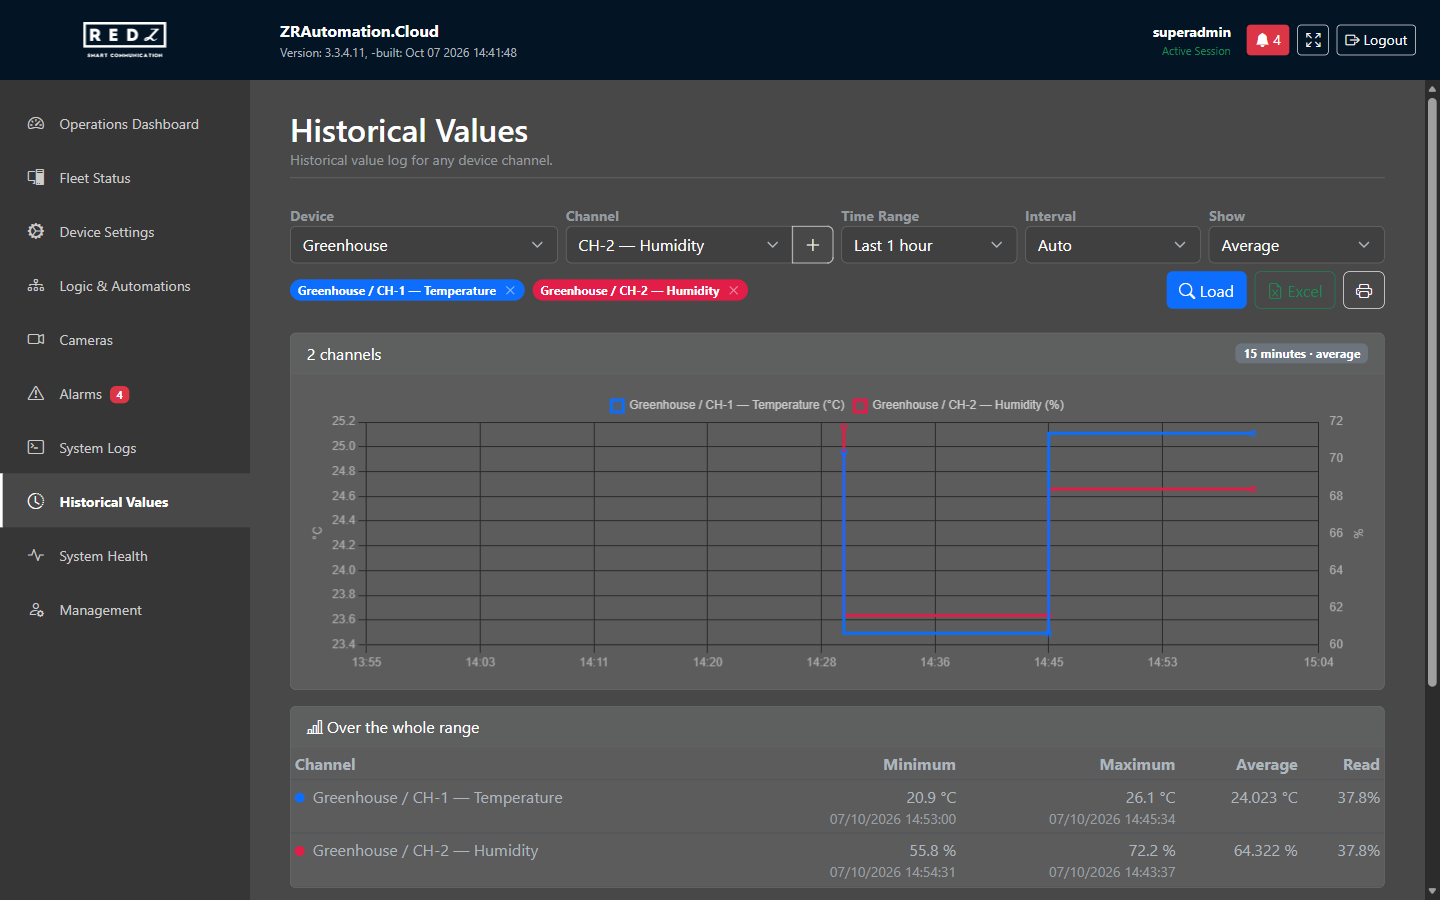
- Choose a Device and a Channel. To compare channels, select + after each one; up to 8 channels, from any of your devices. Without +, the channel chosen is the one shown.
- Choose the Time Range, from Last 1 hour to Last 90 days.
- Choose the Interval. Auto uses 15 minutes up to 48 hours, 1 hour up to 7 days and 1 day beyond. Raw shows every recorded change instead of intervals.
- Under Show, choose what each interval shows: its Average, Minimum or Maximum.
- Select Load.
The channels added are listed under the controls, each in its colour on the chart; the x on one removes it.
Reading the chart
The site records a channel when its value changes, and a value holds until the next change. The averages are therefore taken over time: a busy ten minutes does not outweigh ten quiet hours. Time in which a device was not being read is left out, and the chart shows a gap there.
Channels with different units get their own scale, the first on the left and the second on the right. One chart takes at most 2 units.
A change smaller than the channel's deadband is not recorded, so the lowest and highest values can differ from the real ones by up to that amount.
Raw shows at most 10,000 changes of a channel; for more, choose an interval or a shorter range.
The summary and the table
Over the whole range, the summary gives each channel's Minimum and Maximum with the time they were reached, its Average, and Read: how much of the range the device was being read.
The table below lists every interval, or for Raw every recorded change, newest first. The page shows the newest 2,000 rows; the Excel workbook has them all.

Consumption of a counter
When every chosen channel is a counter, such as an energy meter, Show also offers Consumption: how much the counter counted in each interval, drawn as bars. An interval in which the counter went back, or whose start or end was not read, has no consumption. The summary adds a total of the intervals that have one and says how many they are.
A channel is a counter when Counter is ticked for it in the channel table (see Devices and channels).
Excel and printing
Excel saves the analysis on screen as a workbook: the channels side by side, one row per interval, or for Raw one per recorded change, with the lowest, highest and average above the table.
The printer button prints the chart and the tables, or saves them as PDF from the browser's print window.
Users, roles and permissions
AdministratorsAccounts and roles are managed on the Management page, which needs the Management permission. Each account has one role; the role decides which pages, actions and devices the account has. What each permission allows is listed in Appendix A.
Accounts
The Users tab lists the accounts with their e-mail address, role and status.
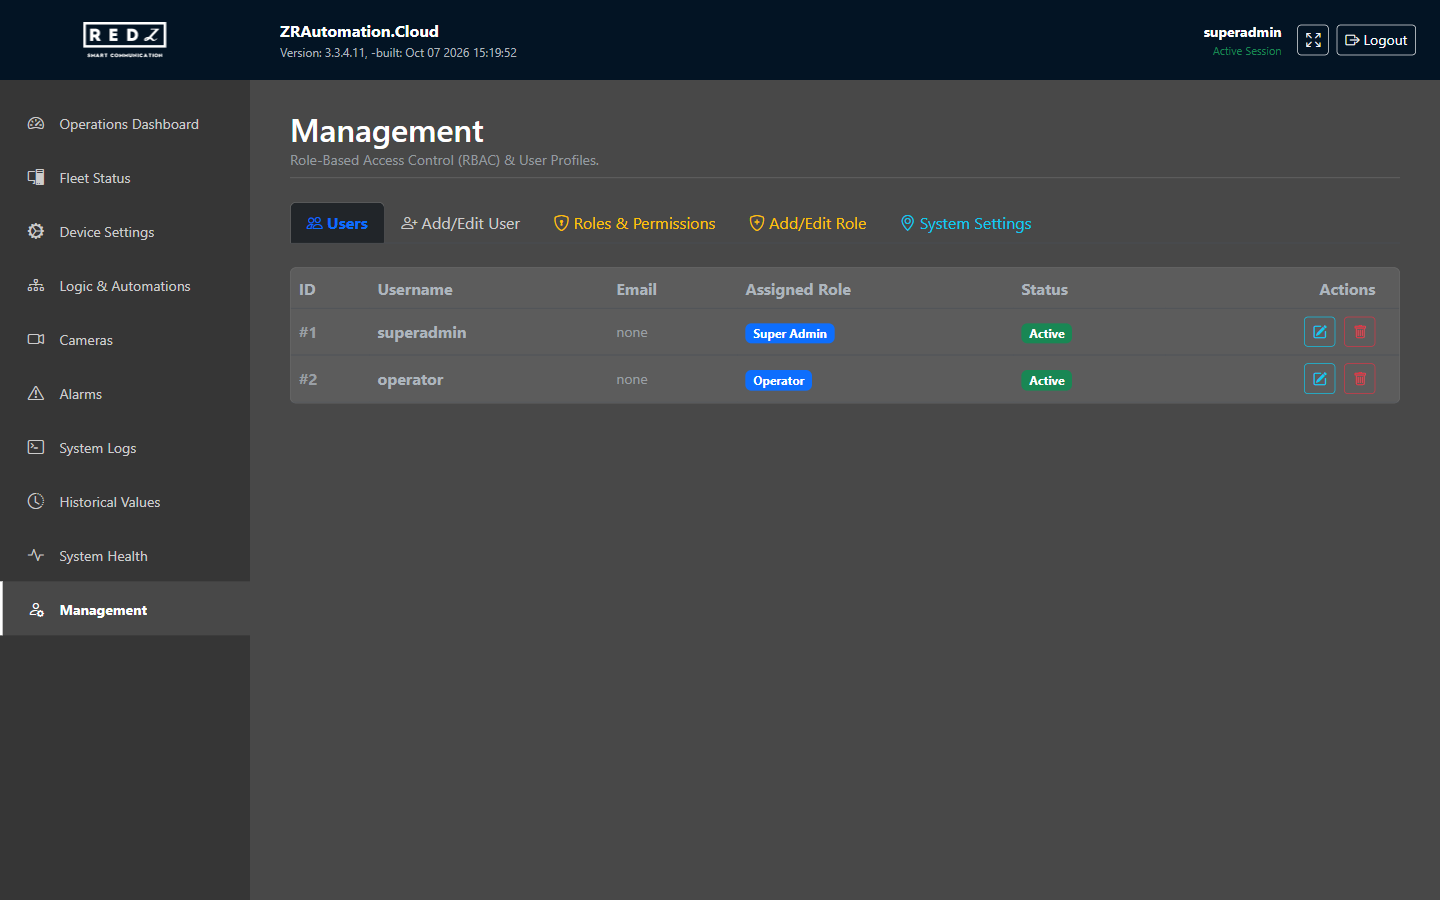
- Open the Add/Edit User tab, or the pencil of an account in the list to change it.
- Enter the Username and a Password of at least 10 characters. When changing an account, leave the password blank to keep it.
- Email is optional. It is where sign-in codes are sent when they are required for sign-ins from outside the local network; without it, the account cannot sign in from outside then.
- Choose the role under Assign Role. Turn off Account is Active to stop the account signing in without deleting it.
- Select Save User.
Adding an account needs the Add (Create) action, changing one Edit (Update) and deleting one Delete.
A new password or a disabled account takes effect at once: that account is signed out everywhere, and its remembered phones are asked for a sign-in code again.
Deleting an account also deletes its personal dashboard pages.
Roles
The Roles & Permissions tab lists the roles with their pages, devices and actions. A role is set on the Add/Edit Role tab.
- Enter the Role Name.
- Under 2. Menu Access Permissions, tick the pages the role may open.
- Under 3. Action Permissions, tick what the role may change. A role without actions can watch but not change anything; without Edit (Update) it cannot switch outputs.
- Under 4. Device Permissions, tick the devices the role covers, or Select All. The Full access switch covers every device, including devices added later, and every page and action.
- Select Save Role, or Update Role when changing a role.
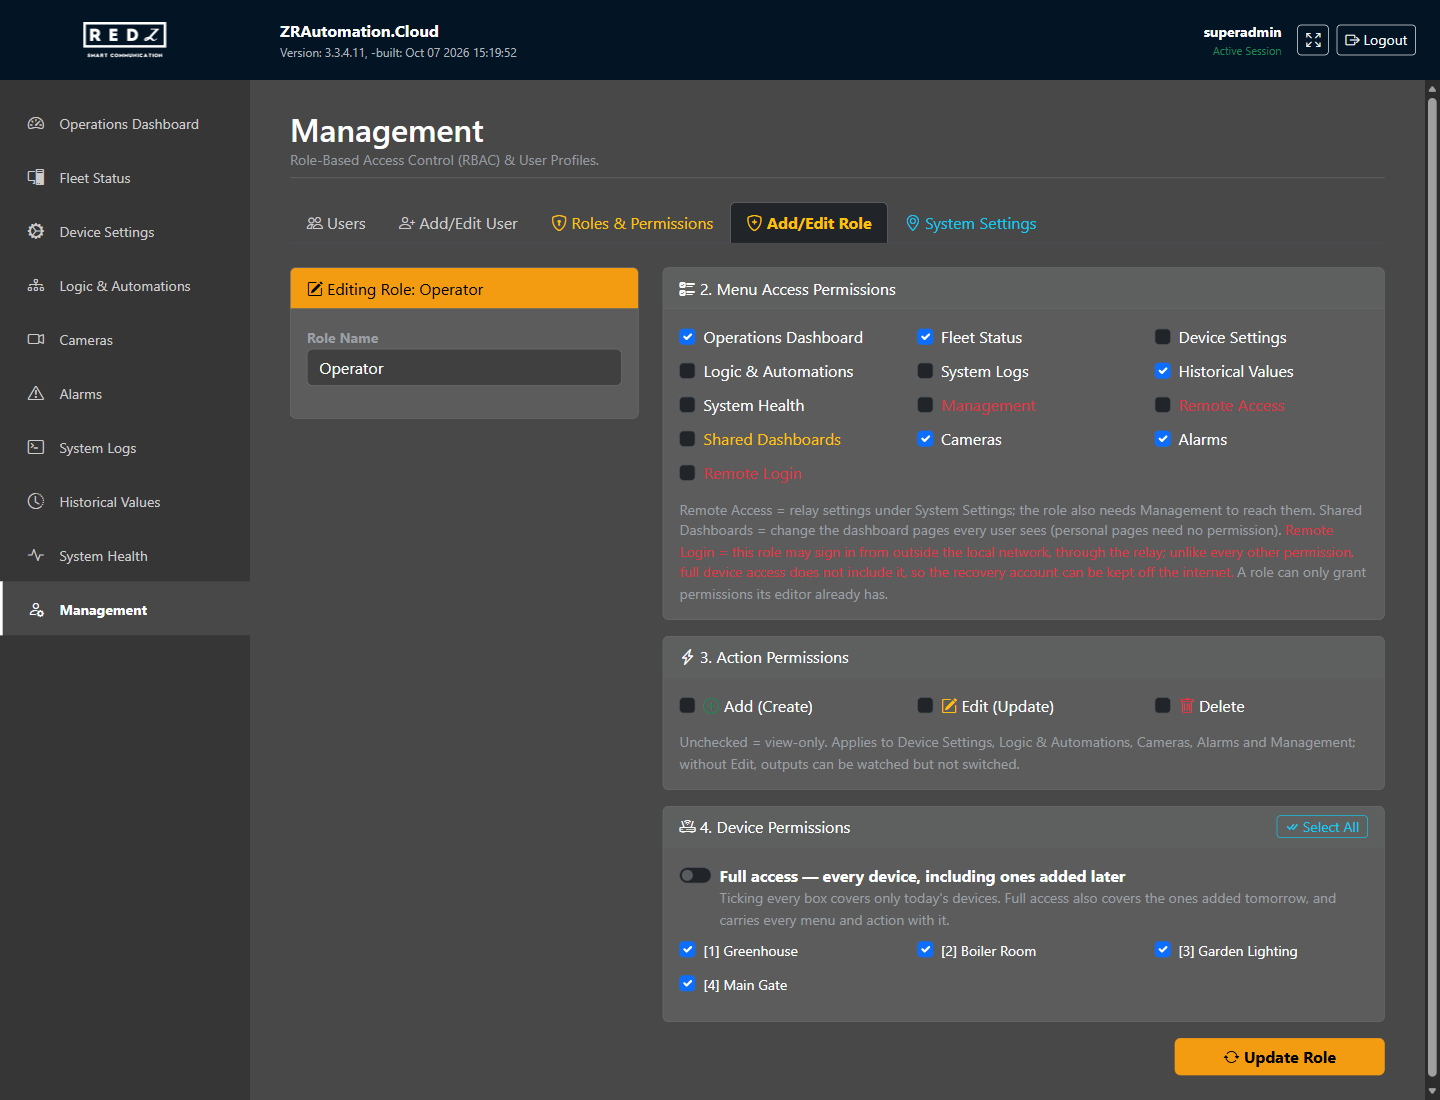
Remote Login is never included in full access: it has to be ticked for every role that may sign in from outside the local network.
What an administrator can change
- Nobody can give a role a permission their own role does not have.
- Nobody can change a role, or an account of a role, that has permissions their own role does not have.
- Nobody can change their own role, or disable or delete their own account.
- A role that still has accounts cannot be deleted: move the accounts to another role first.
- A changed role applies at once to every account that has it.
Remote access and the mobile app
Everyone, with administrator partsRemote access lets the mobile app reach the site from outside its local network, through REDZ's relay. The site connects out to the relay, so no port has to be opened on the site's router. On the local network the web screen works as before.
Turning remote access on
Remote access is set in Remote Access on the System Settings tab of the Management page. The card is shown to a role with access to all devices, or to a role with both the Management and the Remote Access permissions.
- Ask REDZ for the relay address, the site name and the site key of your site.
- Turn on Enable remote access and enter the Relay URL, the Site Slug and the Site Key.
- Select Save Remote Access. The site applies the settings within 15 seconds.
The badge on the card shows the connection: Connected, with the time since when, or Connecting, Reconnecting, Disconnected or Disabled. While it is not connected, the reason is shown under the fields.
The site key is never shown again once saved. Leave the field blank to keep it.
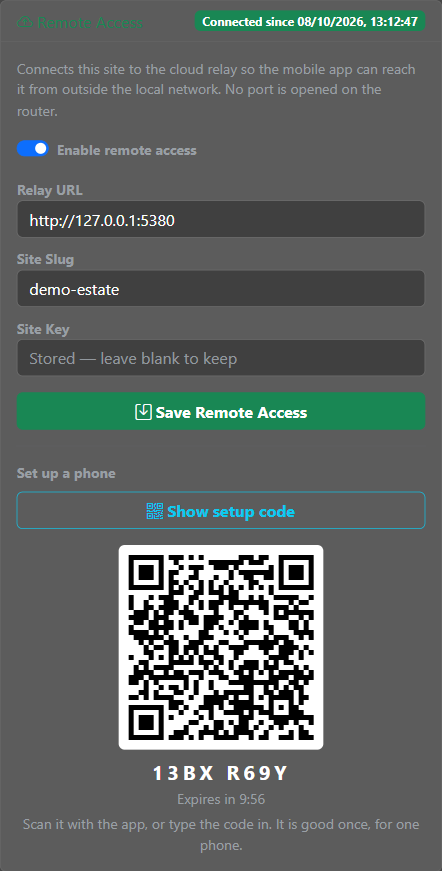
Setting up a phone
Show setup code on the same card shows a QR code and the same code as 8 characters. A code is good for 10 minutes and for one phone, and disappears from the screen when it expires. The site key itself never leaves the site: each phone receives a key of its own.
- Install the ZRAutomation app from Google Play and open it.
- On Site setup, select Scan setup code and point the camera at the QR code. The app fills in the site and exchanges the code at once.
- Check the site name and select Save.
Without a camera, choose the relay under Server (or Other address...), enter the Site name and type the code into Client key or setup code, then select Save.
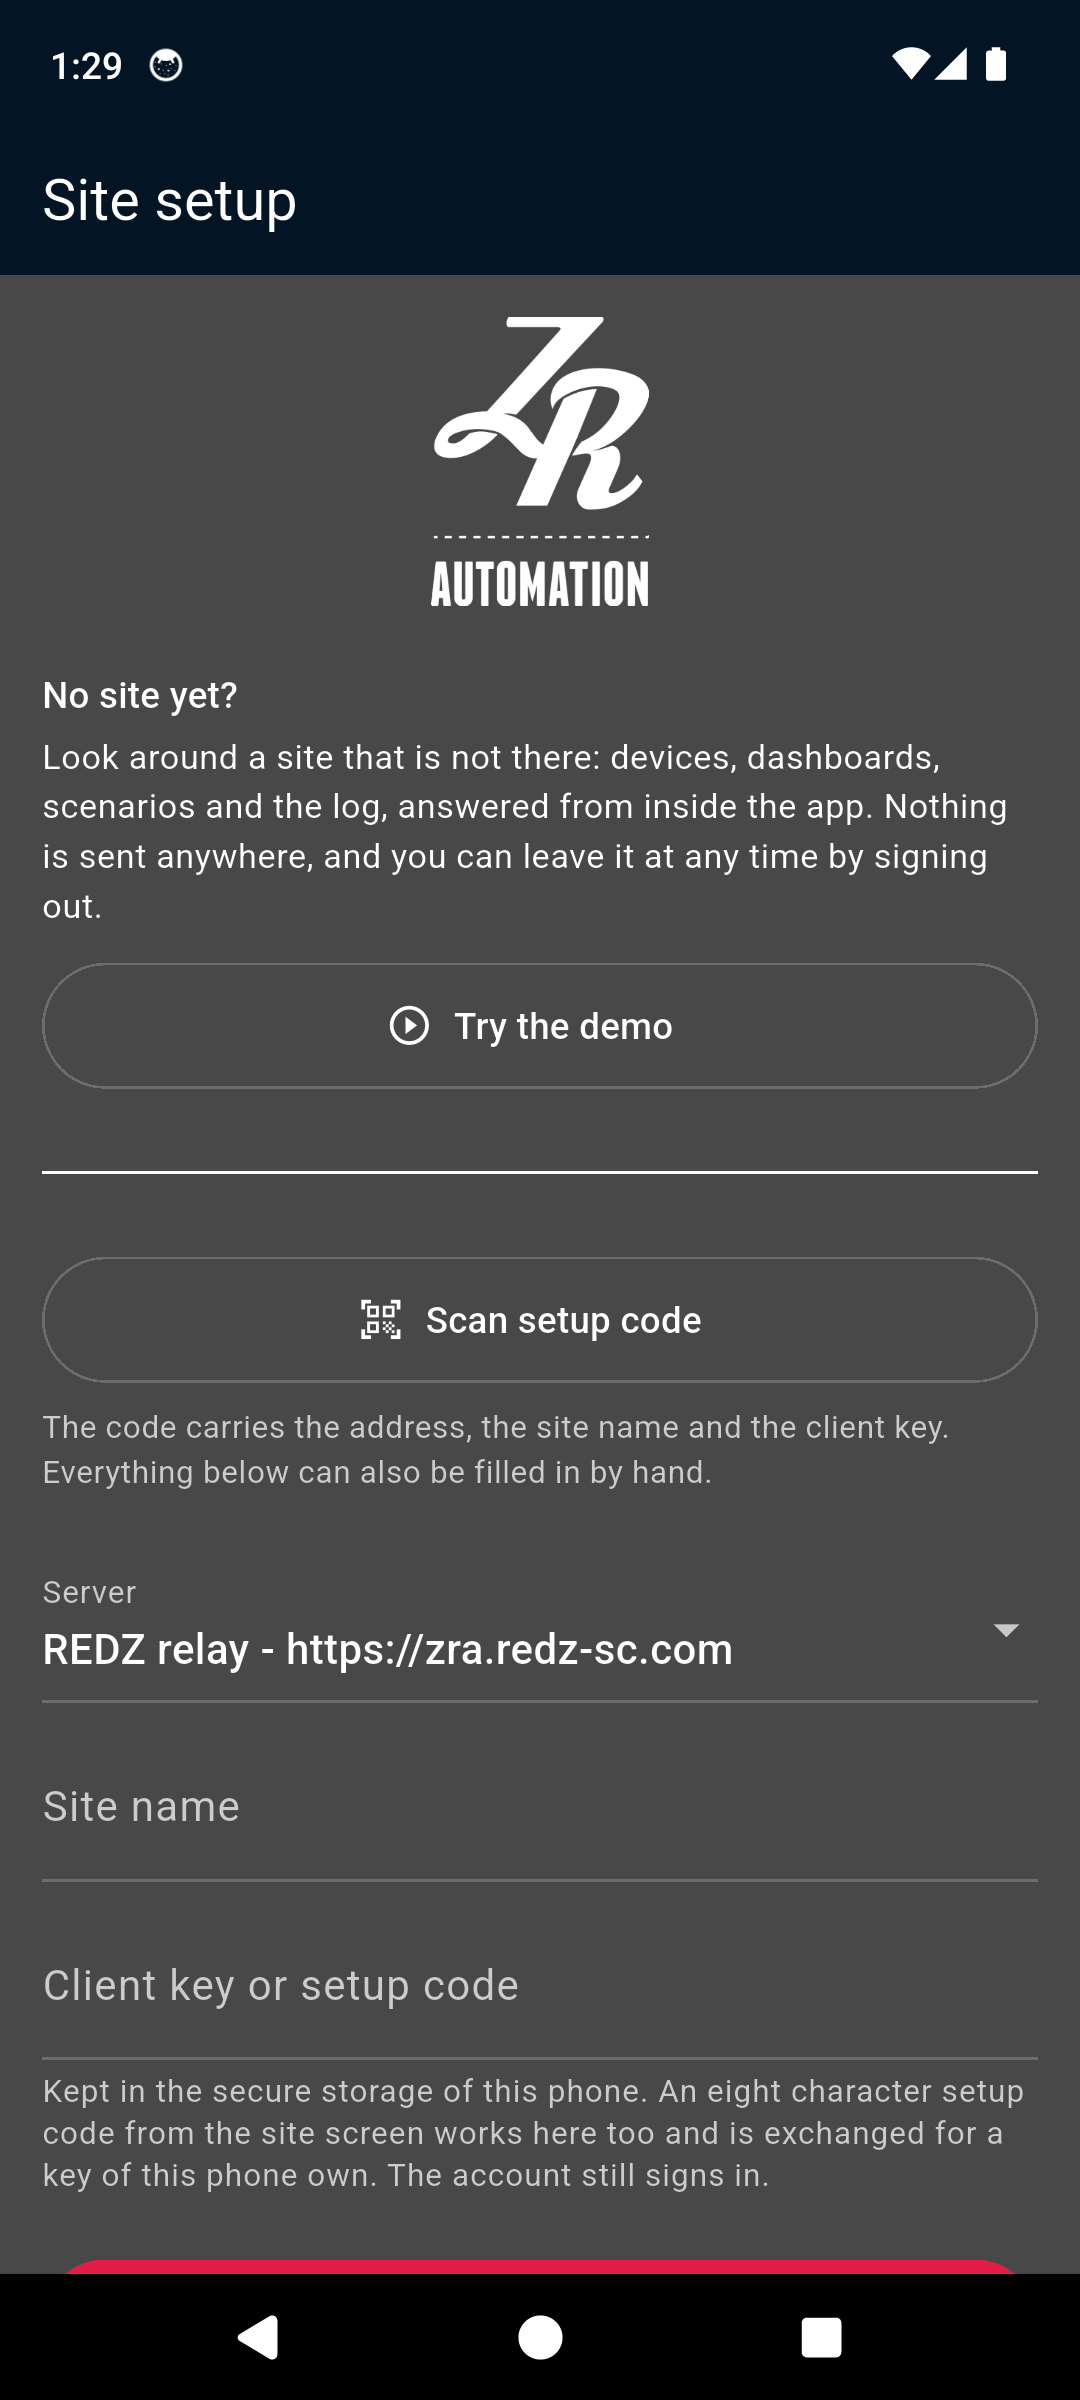
Try the demo opens an example site inside the app, to look around before a site is set up. Nothing is sent anywhere; the screens are marked DEMO, and signing out leaves the demo.
Signing in on the phone
The Sign in screen shows the site's name and address. Sign in with your account's User name and Password; your role needs the Remote Login permission. When sign-in codes are required, the app asks for one, and Remember this device skips it for a while on that phone (see Signing in).
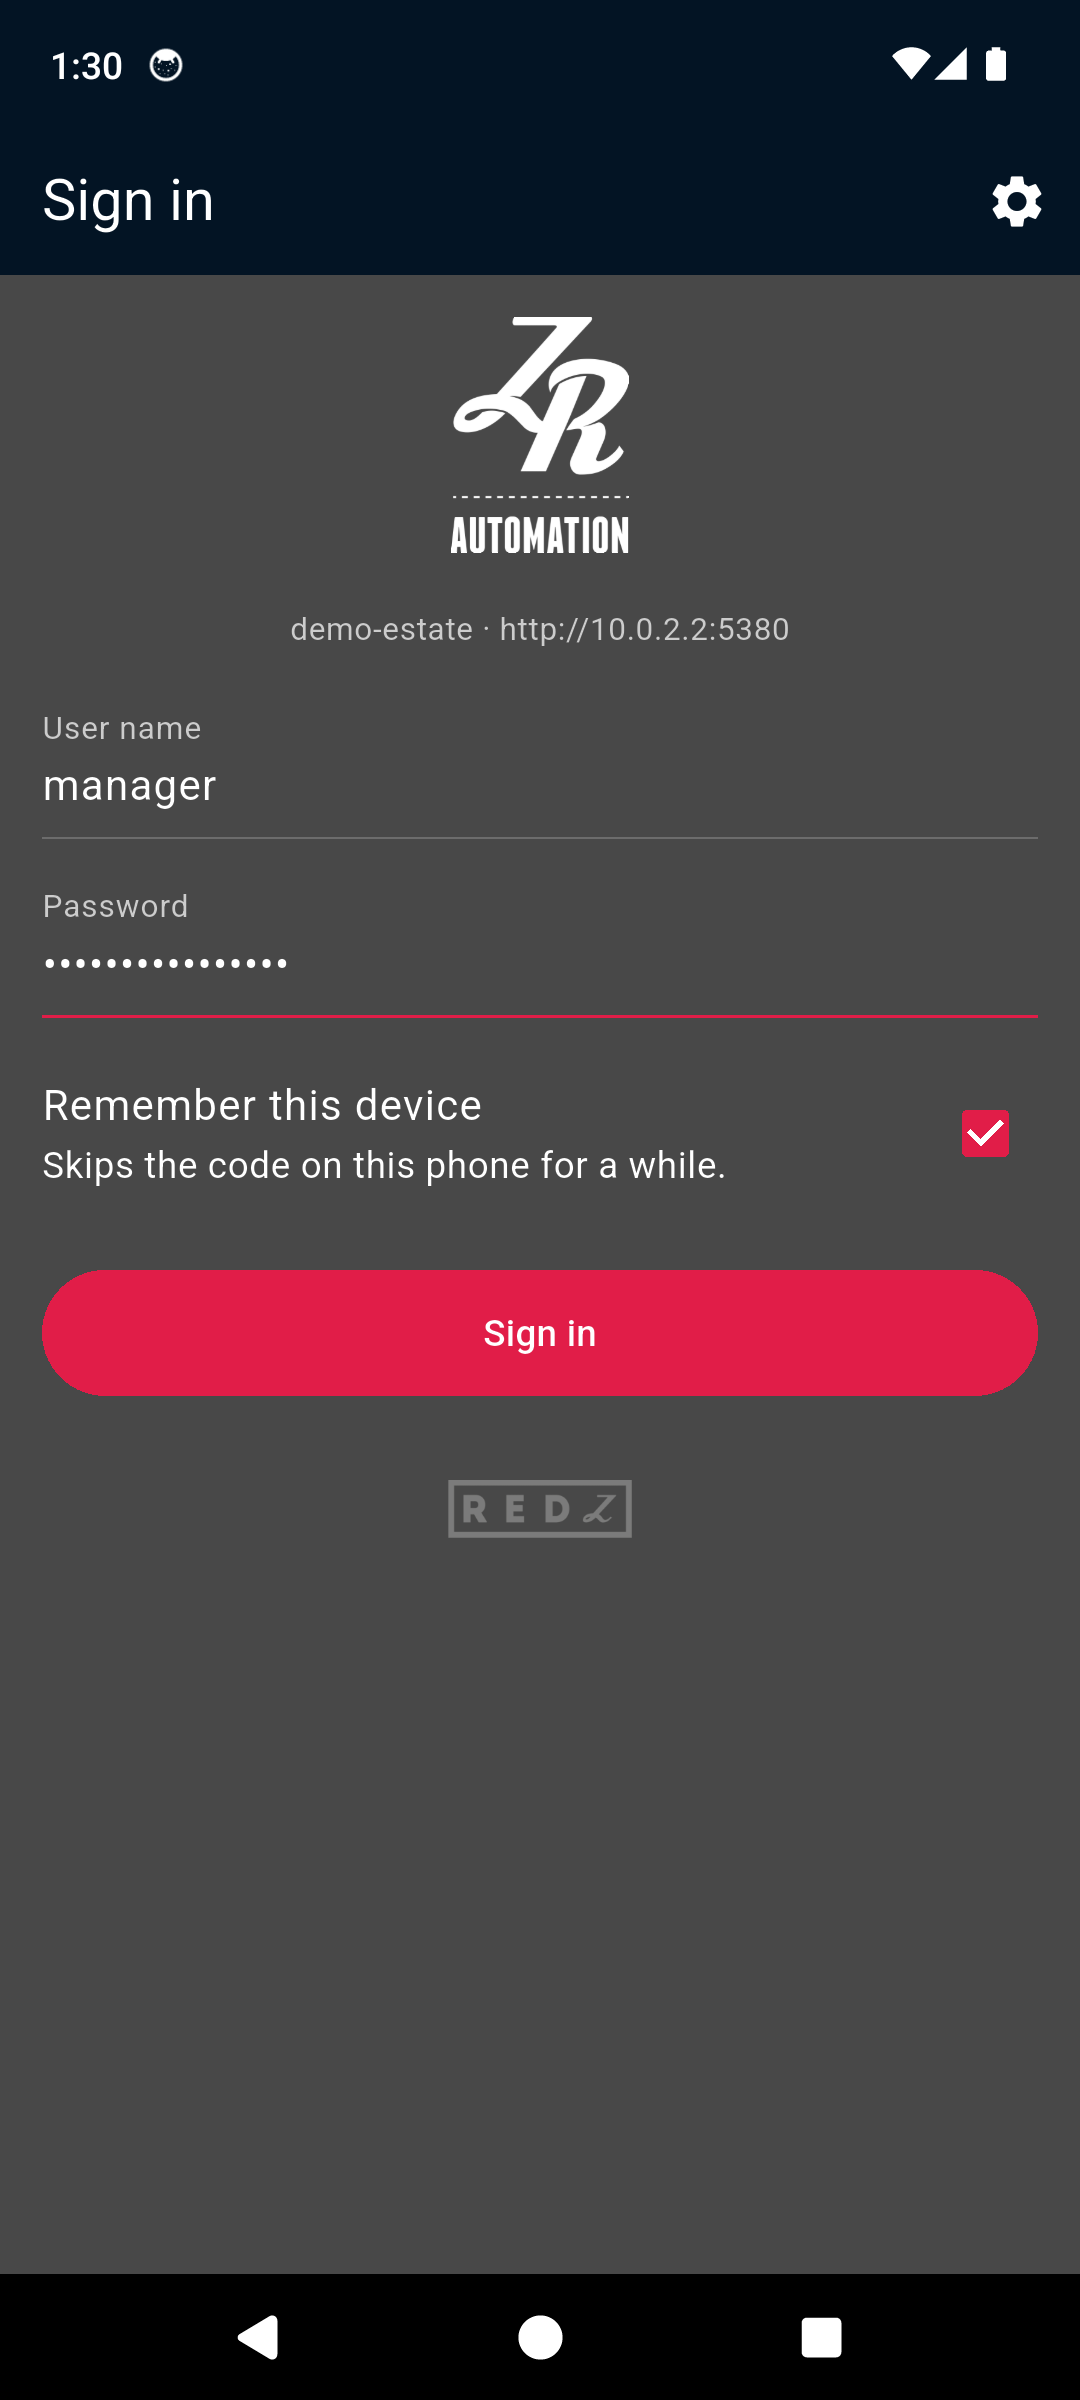
On Android 13 and later the phone asks once whether the app may send notifications. Allow it, or alarms cannot reach you when the app is closed.
The app's tabs
- Dashboard: the dashboard pages, as on the web.
- Fleet: the devices with their state, and each device's channels.
- Cameras: the cameras, for a role with the Cameras permission.
- Notifications: alarms waiting to be acknowledged and the notices from the site. Every account has it.
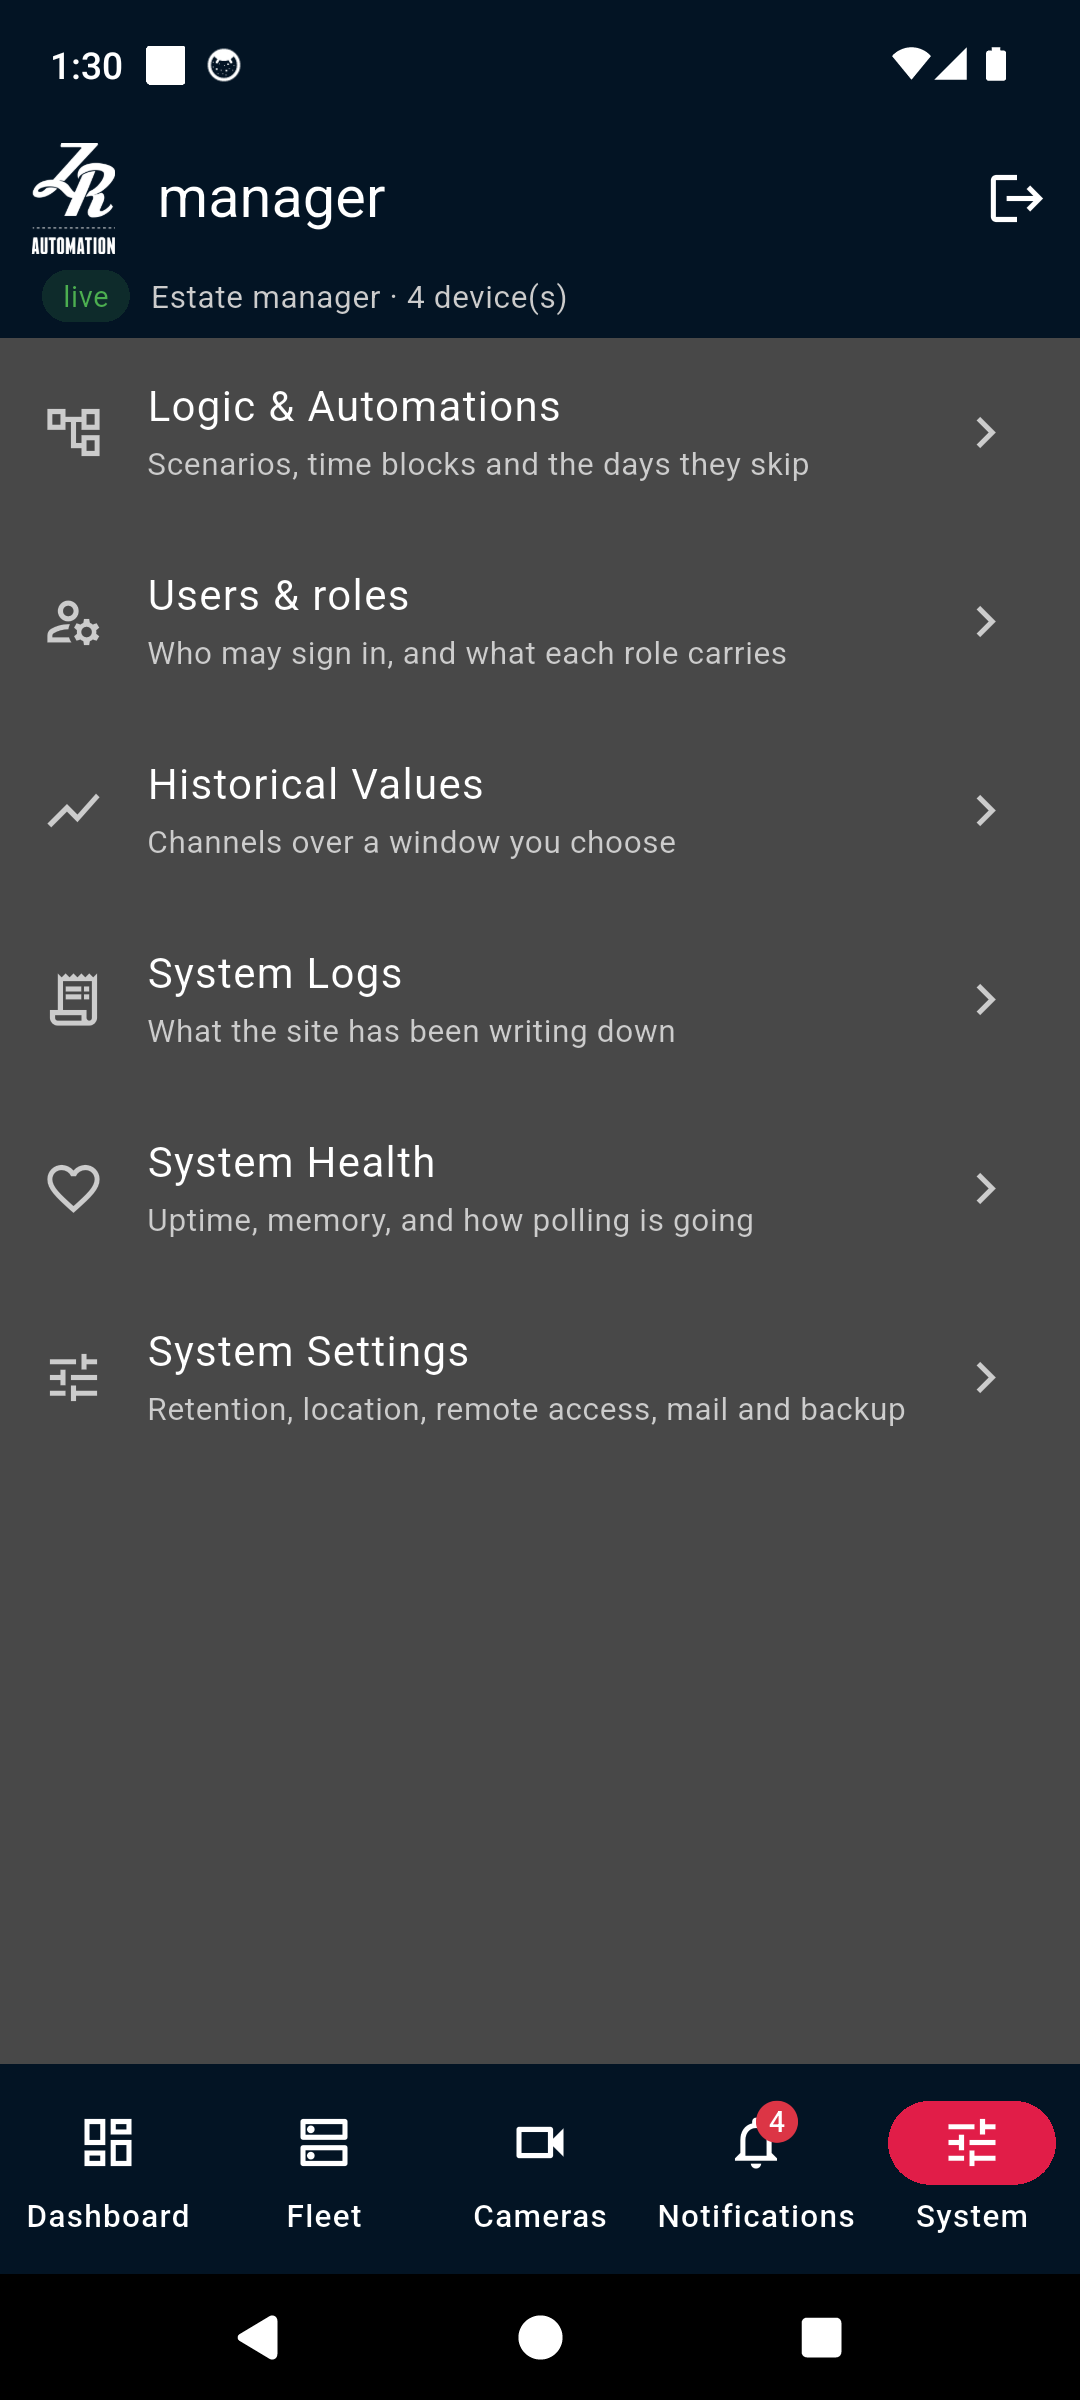
- System: the web's other pages, as far as your role has them: Logic & Automations, Users & roles, Historical Values, System Logs, System Health and System Settings.
The top of every tab shows your account, whether the app is connected (live), your role and the number of devices it covers. The sign-out button offers Sign out and Sign out and forget this device; after the second one, the next sign-in from that phone asks for a code again when codes are required.
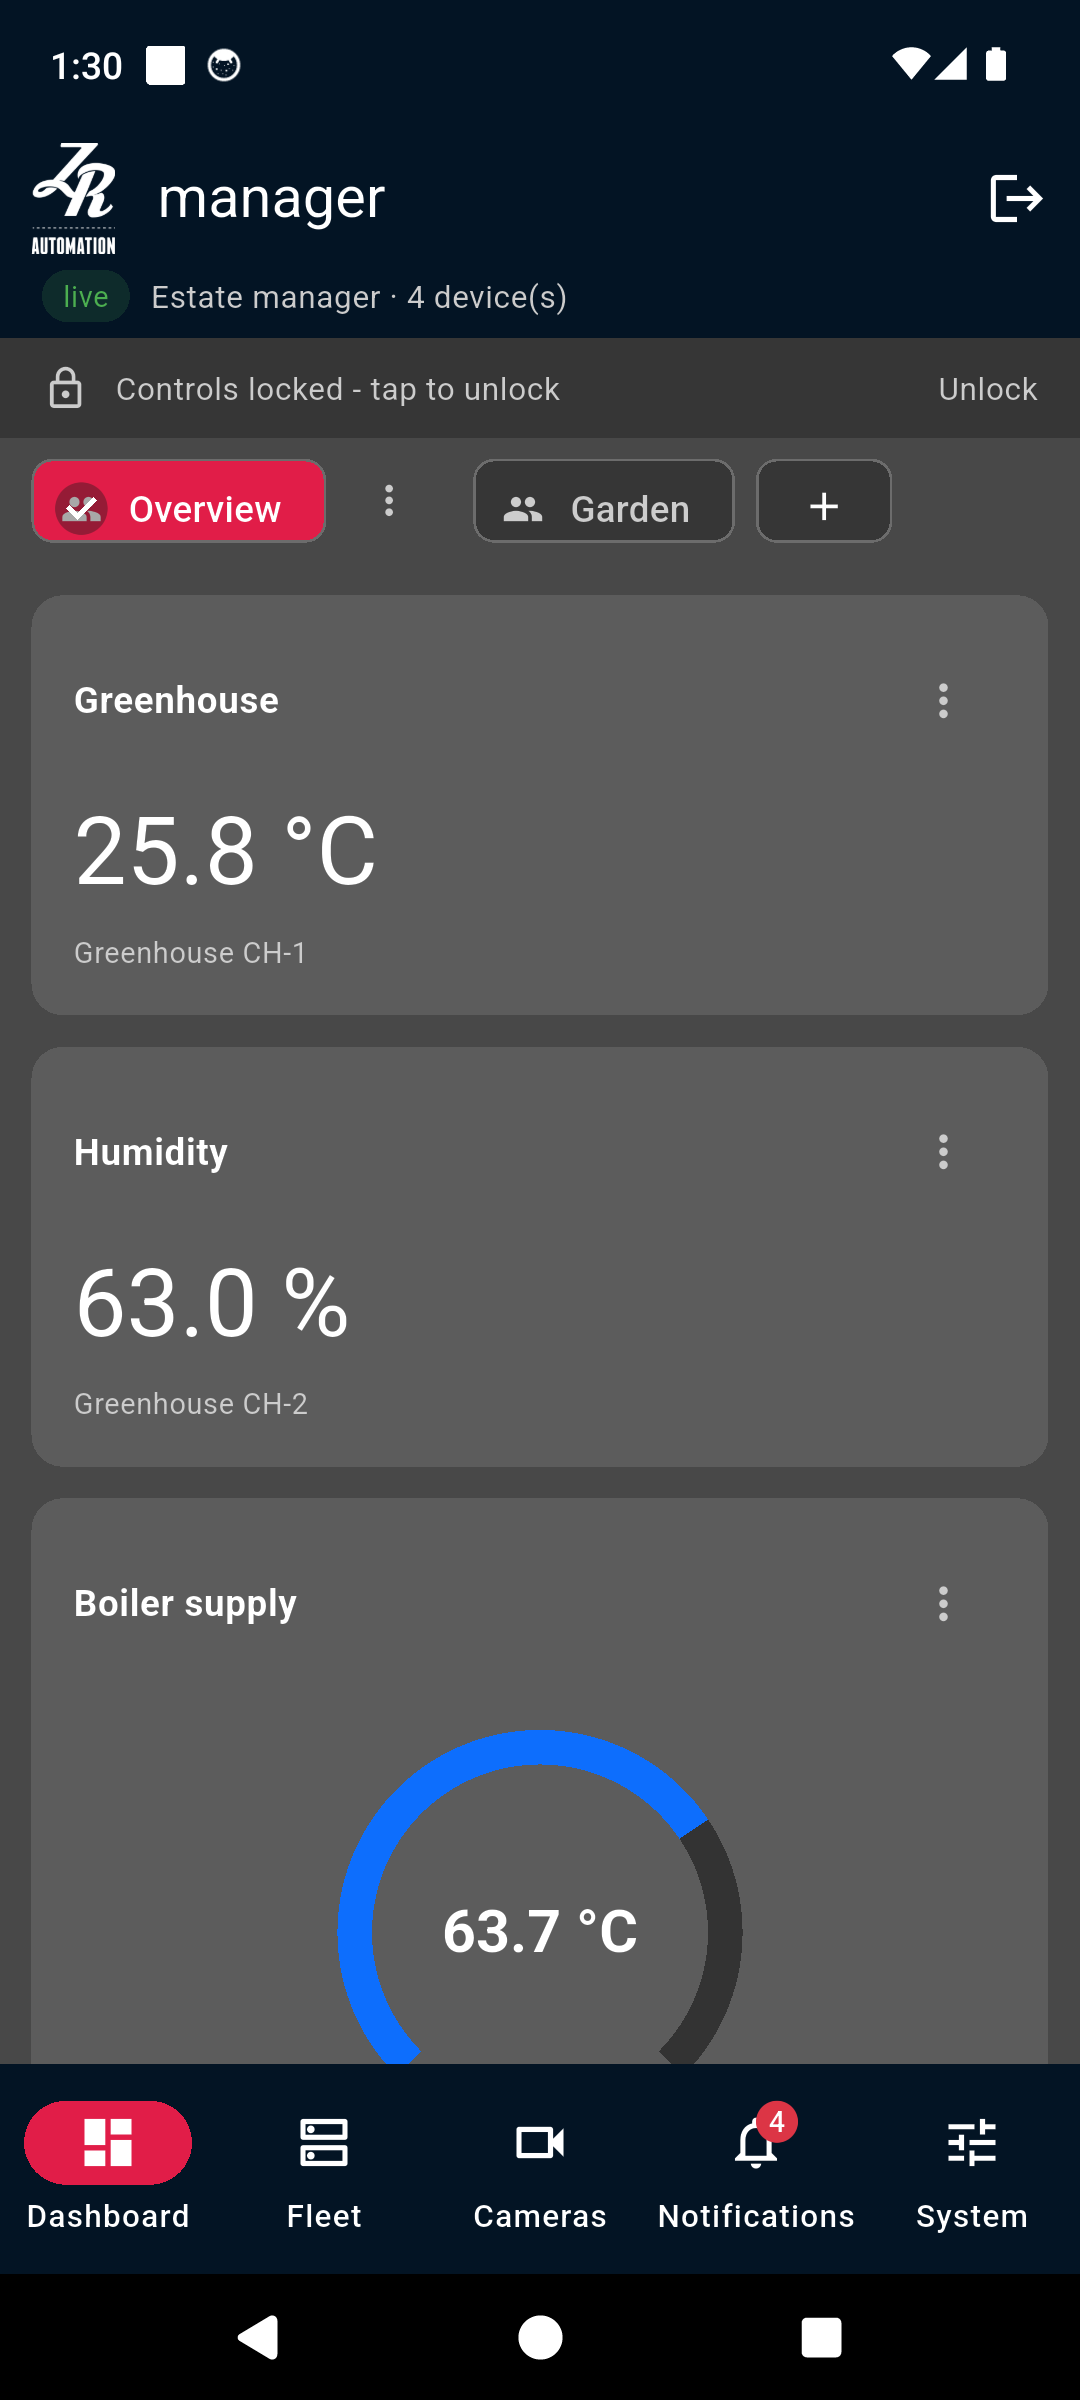
The control lock
In the app, switches, buttons and outputs are locked so that a phone in a pocket cannot switch anything. Tap Controls locked - tap to unlock to unlock them for 2 minutes; they lock again by themselves, or at once with Lock now. One lock covers the dashboard and the device pages.
The lock is shown only when there is something to unlock: a role without the Edit (Update) action can watch but not switch, and sees no lock. Removing a dashboard page also needs the controls unlocked.
Notifications
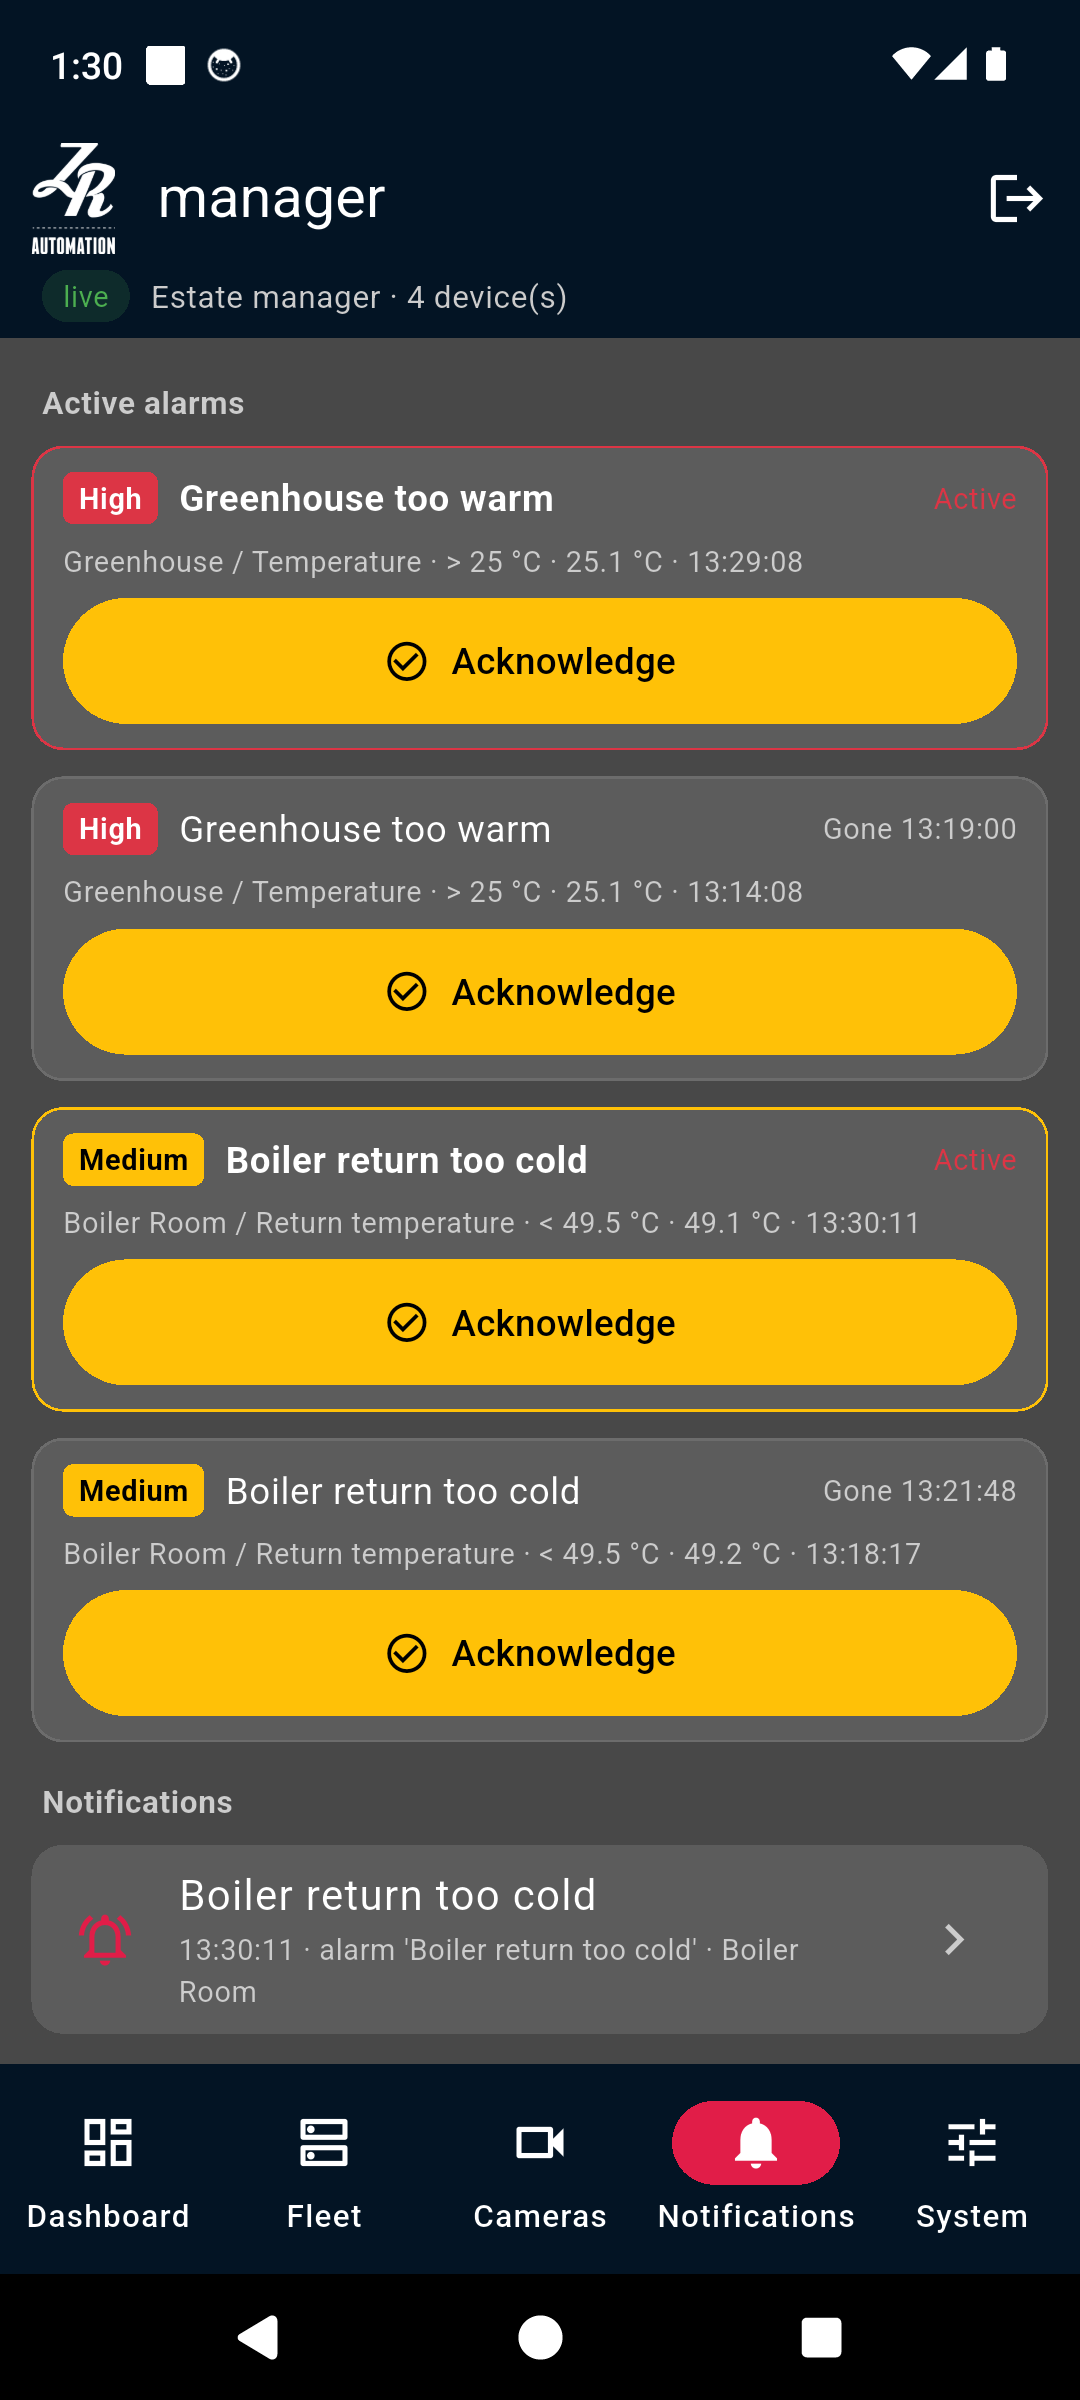
The Notifications tab lists the alarms waiting to be acknowledged, each with Acknowledge and an optional note as on the web, and then the notices, newest first. The tab's badge shows how many alarms are waiting. Tapping a notification on the phone opens this tab.
An alarm notification plays the same alarm sound as the web screen. The words of a notification are read from the site when it arrives, so a phone that was switched off finds what it missed in this list.
Alarm definitions and the alarm history are on the web screen only.
System logs, health and settings
AdministratorsThree places look after the site itself: the System Logs page, the System Health page and the System Settings tab of the Management page.
System logs
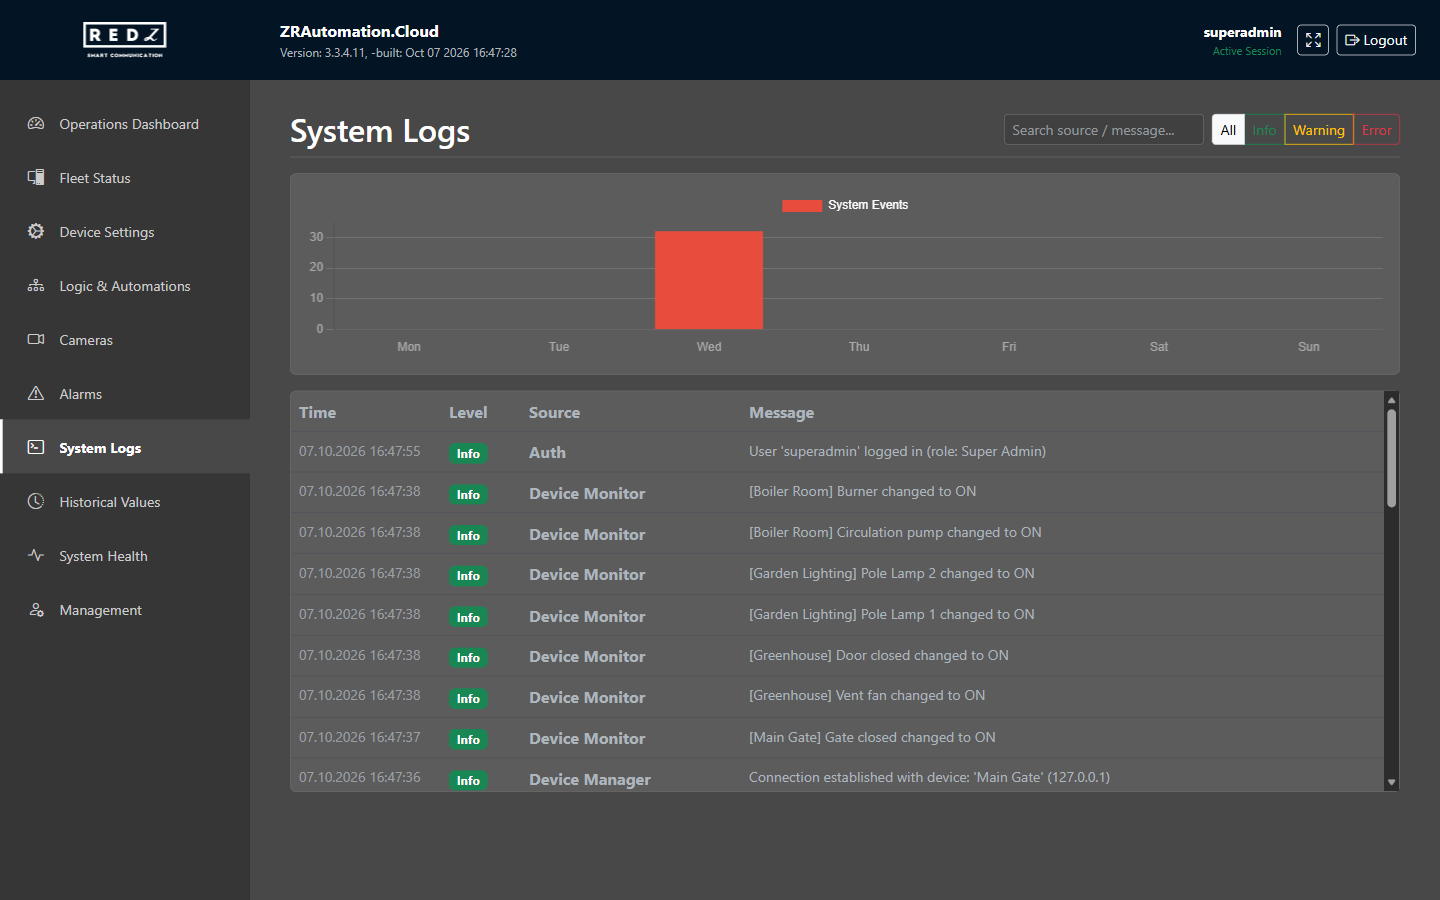
The System Logs page is the site's record of what was done, by a person, by a scenario or by the site itself: sign-ins, changes to devices, settings and accounts, acknowledged alarms, a device that stopped answering, a digital input or output that turned on or off. The values of analog channels are not written there; they are in the channel history. The page needs the System Logs permission.
Each entry has its time, its level (Info, Warning or Error), its source and its message. When a person did it, the source ends with that person's account name in brackets.
The page lists the newest 500 entries, newest first, and adds new entries as they happen.
All or one level shows the entries of that level. The Search source / message... box keeps the entries whose source or message contains what you type.
The chart above the list shows how many entries each of the last 7 days holds, today included. The site counts them, among the entries your role may see; the level buttons and the search box do not change it. New entries are added as they happen.
The entries about the devices themselves (their connections, outputs switched, digital channels turning on or off, and changes to their settings) are shown only to a role with access to all devices; other roles see the rest.
Entries are kept for the number of days in System Log (days) in System Settings, 30 unless changed.
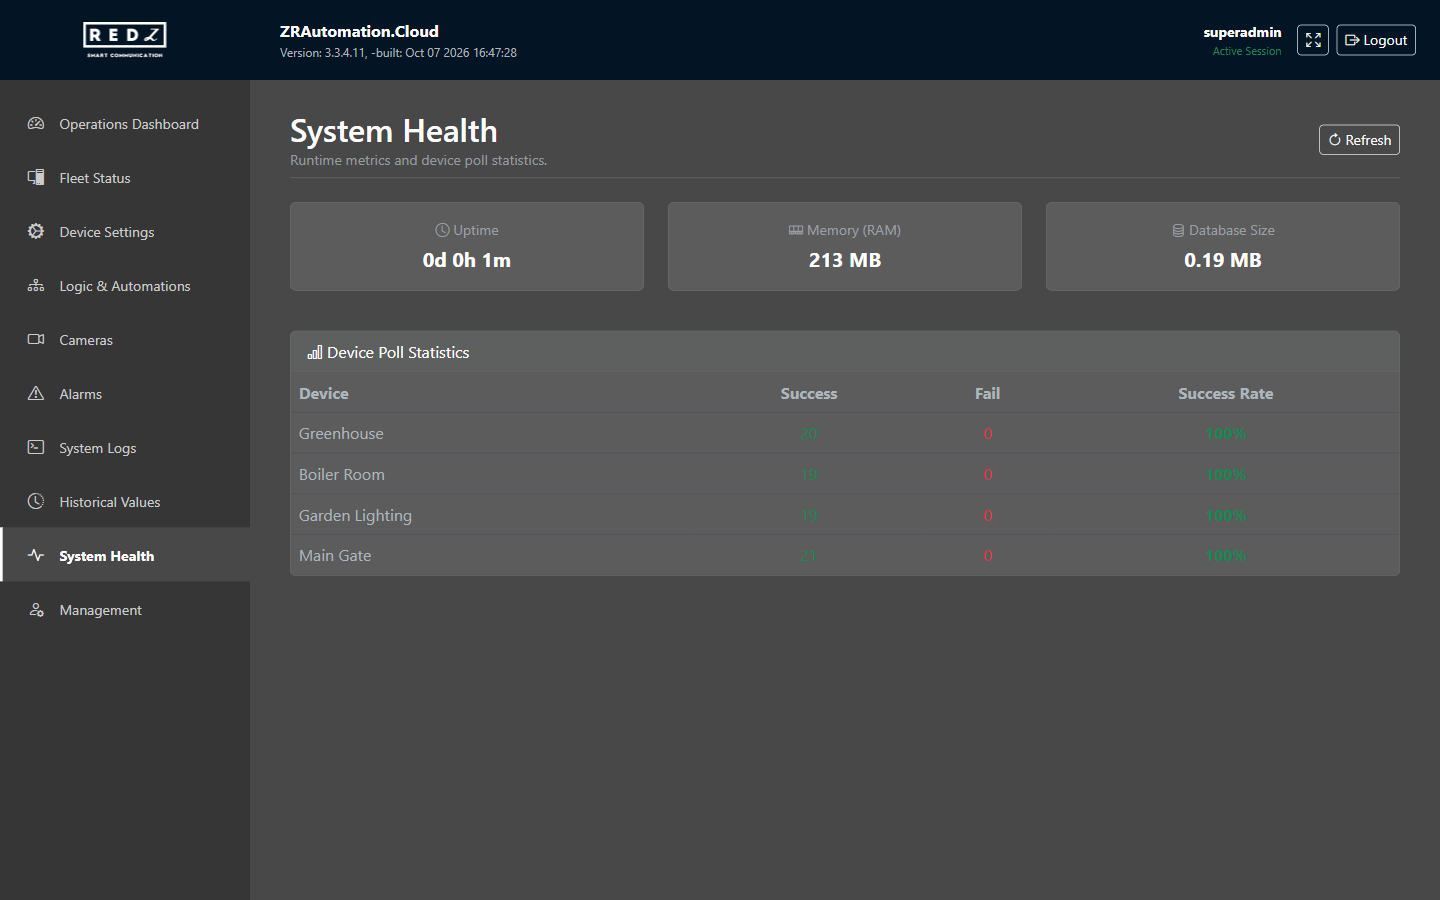
System health
The System Health page shows how the site is running. It needs the System Health permission. It is read when the page opens; Refresh reads it again.
- Uptime: how long the site has been running since it last started.
- Memory (RAM): the memory the site is using.
- Database Size: the size of the site's database file.
Device Poll Statistics lists each active device your role covers with its successful and failed reads since the site last started, and the success rate: green from 95%, yellow from 70%, red below.
System settings
The System Settings tab is on the Management page, which needs the Management permission. Changing a setting there also needs the Edit (Update) action. Backup & Restore and the e-mail settings are shown only to a role with access to all devices. The Remote Access settings are described in Remote access and the mobile app, and the Camera Recorder in Cameras.
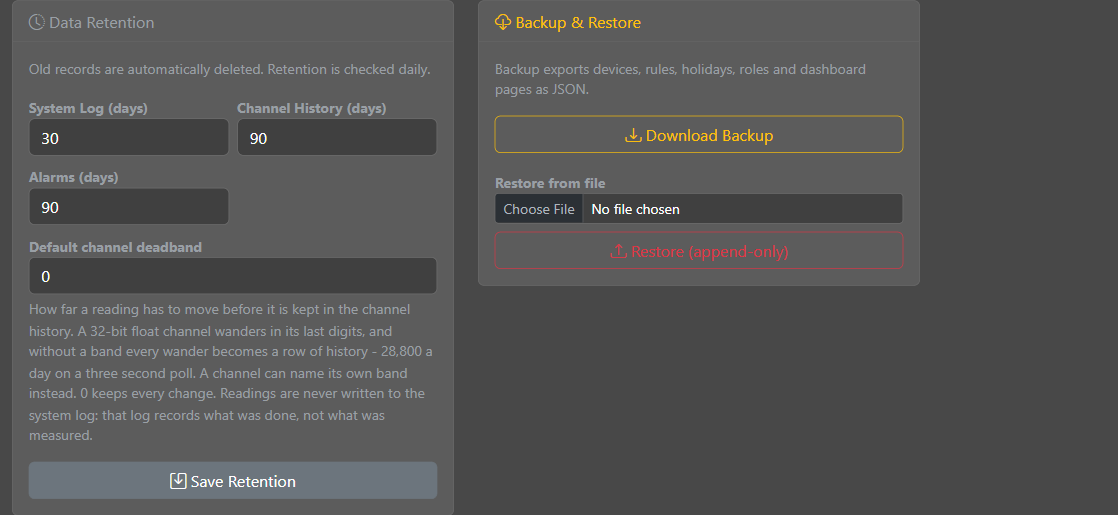
How long records are kept
Under Data Retention, old records are deleted once a day:
- System Log (days): system log entries, 30 days unless changed.
- Channel History (days): the recorded values of the channels, 90 days unless changed. A channel's last value from before that time is kept, so a channel that has not changed since still shows its value.
- Alarms (days): alarms that are gone and acknowledged, 90 days unless changed. An alarm nobody has acknowledged is kept.
Default channel deadband is how far a reading has to move before it is recorded in the channel history, for every channel that does not set its own. 0 records every change. Select Save Retention.
Location and sun times
Time blocks can follow sunrise and sunset. Enter the site's Latitude and Longitude under Location & Sun Time; the site works out each day's sunrise and sunset from them by itself, without the internet. A site with no location uses the Fallback Sunrise and Fallback Sunset times. Select Save & Refresh; Today's Sun Times shows the times in use.
Backup and restore
Download Backup saves a file with the devices and their channels, the scenarios and time blocks, the alarm definitions, the holidays, the roles, the shared dashboard pages, the cameras and the settings someone has set up.
Accounts, personal dashboard pages, passwords and the remote access settings are not in a backup, and neither is the switch that requires sign-in codes.
- Under Restore from file, choose a backup file.
- Select Restore (append-only) and confirm.
A restore only adds: what the site already has, by its name, is left as it is, and a setting is restored only where the site has none. A scenario, time block or alarm definition whose device is not on the site is not restored, and neither is a camera whose name or recorder channel the site already uses. The widgets of a restored page are matched to this site's devices and cameras by name; a widget whose device or camera is not on the site shows nothing. When it is done, the restore says what it added and what it left out.
E-mail and the sign-in code
The site sends e-mail for two things: the codes for signing in from outside the local network, when they are required, and notices to an account's own address when its password is changed, when it is locked after failed sign-ins and when a new device is remembered for it.
- Turn on Enable sending email and enter the mail server's SMTP Host and Port. Keep Use TLS on: with it off, the password travels unencrypted.
- Enter the mail account's Username and Password. Leave the password blank to keep the stored one. It is kept sealed with the site server's own key: after the site moves to another server, the page says so and it has to be entered again.
- Enter the From Address and, if you wish, a From Name.
- Enter your address next to Send Test, select it, and check that the message arrives.
- To require codes, turn on Require a mailed code for sign-ins from outside the local network and set Remember a device for (days), from 1 to 365; 30 unless changed.
- Select Save Email Settings.
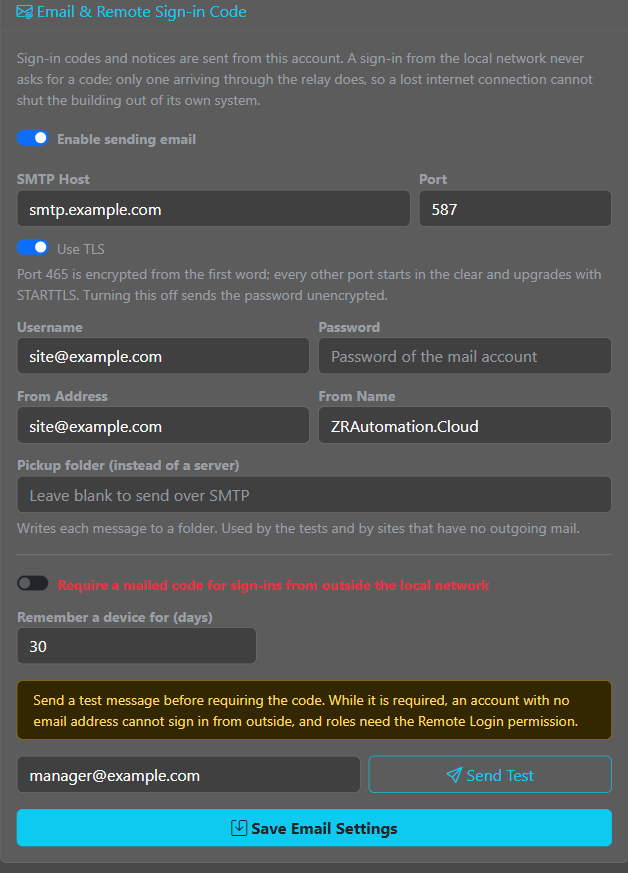
Codes can be required only while e-mail is on and able to send. A sign-in from the local network never asks for a code. While codes are required, an account without an e-mail address cannot sign in from outside, and its role also needs the Remote Login permission (see Signing in).
Pickup folder (instead of a server) writes each message to a folder on the site server instead of sending it, for a site without outgoing mail.
Troubleshooting
EveryoneEach part below starts from what you see. The System Logs page usually says why; the entries about the devices themselves are shown only to a role with access to all devices.
The web screen does not open
- Check the address: it is the server's address followed by :5000.
- Check that the server is switched on and that the Windows service ZRAutomation.Cloud is running on it. The service starts with Windows; if it has stopped, the server's administrator can start it again in Windows.
- Check that the computer or tablet is on the site's local network and that nothing between it and the server blocks the port.
The screen says the live stream is not connected
Live stream reconnecting... means the screen has lost its live connection to the site and is trying again by itself. When it gives up, it says Live stream not connected - values may be stale: the values on the screen may be old. Check the site as in the part above, then reload the page.
A device is OFFLINE
A device is OFFLINE when the site cannot read it. Its card in Fleet Status shows when it was last seen, and System Health counts its failed reads.
- In the device list of Device Settings, check that the device is Enabled. A Disabled device is not read. A copy made with Clone device starts disabled.
- Check that the device is powered and on the network, and that its IP / COM Port and Port are right.
- When the connection is lost, the System Logs get an entry with the device's name, its address and the reason.
- While a device is not read, its limit and state alarms neither rise nor clear and the history leaves the time out. A Device not answering alarm tells you about it (see Alarms).
A value shows a dash or looks wrong
- A dash means the channel read no number. The dash stays until it reads one again, and the System Logs note both moments.
- A value that is far off can come from its Format: a 32-bit value read in the wrong word order (ABCD or CDAB), or as the wrong kind of number, gives a very different value. Check the format against the device's documentation, then the scale.
- A value that changes on the screen but not in the history is moving less than the channel's deadband (see Devices and channels).
A camera shows No picture
- If every camera shows No picture, check Camera Recorder in System Settings: the recorder's address, ports, account and password. When the recorder refuses the password, the site stops asking it for pictures, so that the recorder does not lock its account, and the System Logs say so. Pictures come back when the right password is saved.
- After the site has moved to another server, the recorder password has to be entered again.
- If one camera shows No picture, check its Channel. For a camera that gives no still picture, choose RTSP under Source.
The phone cannot be set up
- A setup code is good for 10 minutes and for one phone. If the app says the code is not valid any more, show a new one on the web screen.
- If the app says This relay does not know that site name., check the site name against the Site Slug on the Remote Access card.
The phone cannot sign in
- The site is not reachable through the relay right now. The site is not connected to the relay. Check the badge on the Remote Access card; while it is not Connected, the reason is shown under the fields. The site also needs its internet connection.
- This account may not sign in from outside the local network. The account's role needs the Remote Login permission.
- If the app says the account has no e-mail address, an administrator adds one on the local network: while sign-in codes are required, an account needs one to sign in from outside.
- A one-time password is still in place. It has to be changed on the local network. Sign in once on the web screen and set a new password.
- The site could not send the code. Its email settings need attention. Check the e-mail settings with Send Test (see System logs, health and settings).
- The relay refused the client key, or does not know this site name. Set the phone up again with a new setup code.
Notifications do not arrive
- Notifications travel through remote access: while it is not connected, none are sent, and none are sent later.
- On Android 13 and later the app needs the phone's permission to send notifications.
- An alarm notifies only when Tell the phones is ticked, and only the accounts whose role has the Alarms permission and covers the device.
- Send a test notice now on a saved scenario shows whether notices reach the phones.
No alarm sound
A browser may refuse to play sound until someone has touched the page; select Tap to allow sound. Check also that the screen has not been muted with Mute on this screen.
A time block did not switch
A start or an end missed in its own minute is written late, as soon as the device answers, but only until the block's other time; the System Logs show the failed attempts and the late write. A block that follows sunrise or sunset does nothing on a day the site has no sun times for, and a block with Do not run on Holidays skips the days on the Holidays tab (see Logic and automations).
Nobody can sign in
- After 5 failed attempts an account is locked for 15 minutes. It can sign in again after that time.
- If no administrator can sign in, REDZ or the server's administrator can run ZRAutomation.Cloud.exe --reset-admin-password from an administrator command prompt on the server. It unlocks the superadmin account, shows a one-time password in the window, signs the account out everywhere and makes its remembered phones ask for a sign-in code again. The one-time password must be replaced at the first sign-in.
Moving from ZR Automation
EveryoneZR Automation was a Windows program made of five modules. ZRAutomation.Cloud does the same work on a server at the site, with a web screen and a mobile app. This chapter takes each module of ZR Automation and says where its work is now, and what this version does not have.
Device Registration and Configuration
Devices are registered on the Device Settings page, with their channels (see Devices and channels). The site reads Modbus TCP devices on its network, from any maker. How a value is shown is chosen on the dashboard, as a widget (see Dashboards and widgets).
Read Data and Instantaneous Data Monitoring
There is no reading to start or schedule: the site reads every device every 3 seconds, all the time. The values are followed on the Operations Dashboard, in Fleet Status and on each device's page, on the web screen and in the mobile app. Outputs are switched there too, by a role with the Edit (Update) action.
Detailed Data Analysis
The Historical Values page shows the recorded values as a chart, a summary and a table, over the range and interval you choose, and saves them as an Excel workbook. For a PDF, print the page and save it as PDF from the browser's print window (see History, analysis and export).
Alarm Management
The Alarms page holds the alarms: limits on a value, the state of a digital channel, and a device that stops answering, each with its own text. Alarms are acknowledged with a note, and the screen shows a bell and plays a sound while one waits (see Alarms).
Instead of an SMS, an alarm is sent as a notification to the mobile app, on the phones of the accounts that may see it. A scenario can send a notice of its own (see Logic and automations).
Settings
The site's settings are on the Management page, with the accounts and roles (see System logs, health and settings, and Users, roles and permissions). The version is shown in the banner at the top of the web screen.
Not in this version
- Serial connections and the GPRS, 3G, 4G and radio (RF) modems: the site reads devices over its network only.
- SMS messages. Alarms are not sent by e-mail either; e-mail is used for sign-in codes and account notices.
- A Turkish interface: the web screen and the app are in English.
- Licence types: every installation has every part, and each person's role decides what they see.
- Windows XP, 7 and 8, and 32-bit Windows. The server needs a Windows version listed in Installation and updates.
Moving a site
ZR Automation's devices and readings are not carried over. The devices are added again on the Device Settings page, where the Batch IO Configurator fills many channels at once; the history starts when the site first reads them.
Appendix A. Permissions
Generated from the productA role is a set of page permissions, action permissions and devices. A role with access to all devices has every page and every action, except Remote Login, which must be ticked.
Pages
| Permission | What it allows | Web sidebar | Mobile app |
|---|---|---|---|
| Operations Dashboard | Shows the Operations Dashboard page. | Operations Dashboard | Dashboard |
| Fleet Status | Shows the Fleet Status page. | Fleet Status | Fleet |
| Device Settings | Shows the Device Settings page. | Device Settings | Fleet |
| Logic & Automations | Shows the Logic & Automations page. | Logic & Automations | System: Logic & Automations |
| System Logs | Shows the System Logs page, including new entries as they arrive. | System Logs | System: System Logs |
| Historical Values | Shows the Historical Values page. | Historical Values | System: Historical Values |
| System Health | Shows the System Health page. | System Health | System: System Health |
| Cameras | Shows the cameras. Without it, a control linked to a camera still works but shows no picture. | Cameras | Cameras |
| Alarms | Shows the alarms of the role's devices and allows acknowledging them. Adding, changing or deleting an alarm also needs the matching action. | Alarms | - |
| Management | Shows the Management page. Changing System Settings also needs the Edit action. | Management | System: Users & roles, System: System Settings |
| Remote Access | Shows and changes the remote access settings, and creates the setup code for a phone. | - | - |
| Shared Dashboards | Allows changing the shared dashboard pages that every user sees. | - | - |
| Remote Login | Allows signing in from outside the site through remote access. Full access does not include it: it must be ticked. | - | - |
The app's Notifications tab is shown to every account. Its System tab is shown when at least one of its rows is.
Actions
| Permission | What it allows |
|---|---|
| Add (Create) | Creating devices, alarms, automations, users and roles. |
| Edit (Update) | Changing devices, alarms, automations, users and roles. |
| Delete | Deleting devices, alarms, automations, users and roles. |