Introduction
abcZ Network Tool finds REDZ devices on your network, shows which product and firmware version each one runs, and updates their firmware over the network, one device at a time or a whole list of devices. It knows the REDZ device families TLM-LM, TLM-LW, HUR, STG, CKL and LKM.
The tool talks to each device's built-in web server, as a web browser does, on port 80 unless you choose another. It reads the product name, firmware version and build date from the device's start page, and it sends the user name and password of the device's web interface with every request.
The window has three tabs. Discovery searches a range of addresses for devices; from its list you can also restart a device, restore its factory configuration or give it a fixed IP address. Its Assign Address at Factory IP... button gives a new address to a device that waits at its factory address 192.168.1.1 while your PC is in another network; see the chapter Assigning an address at the factory IP. Single Device Update updates one device. Fleet Update updates every device of a list; if you name a pilot device, it is updated first and the others only if it succeeds.
Typical application
The tool runs on a Windows PC and reaches the REDZ devices over your network, also devices behind a router, as long as the PC can reach their addresses.
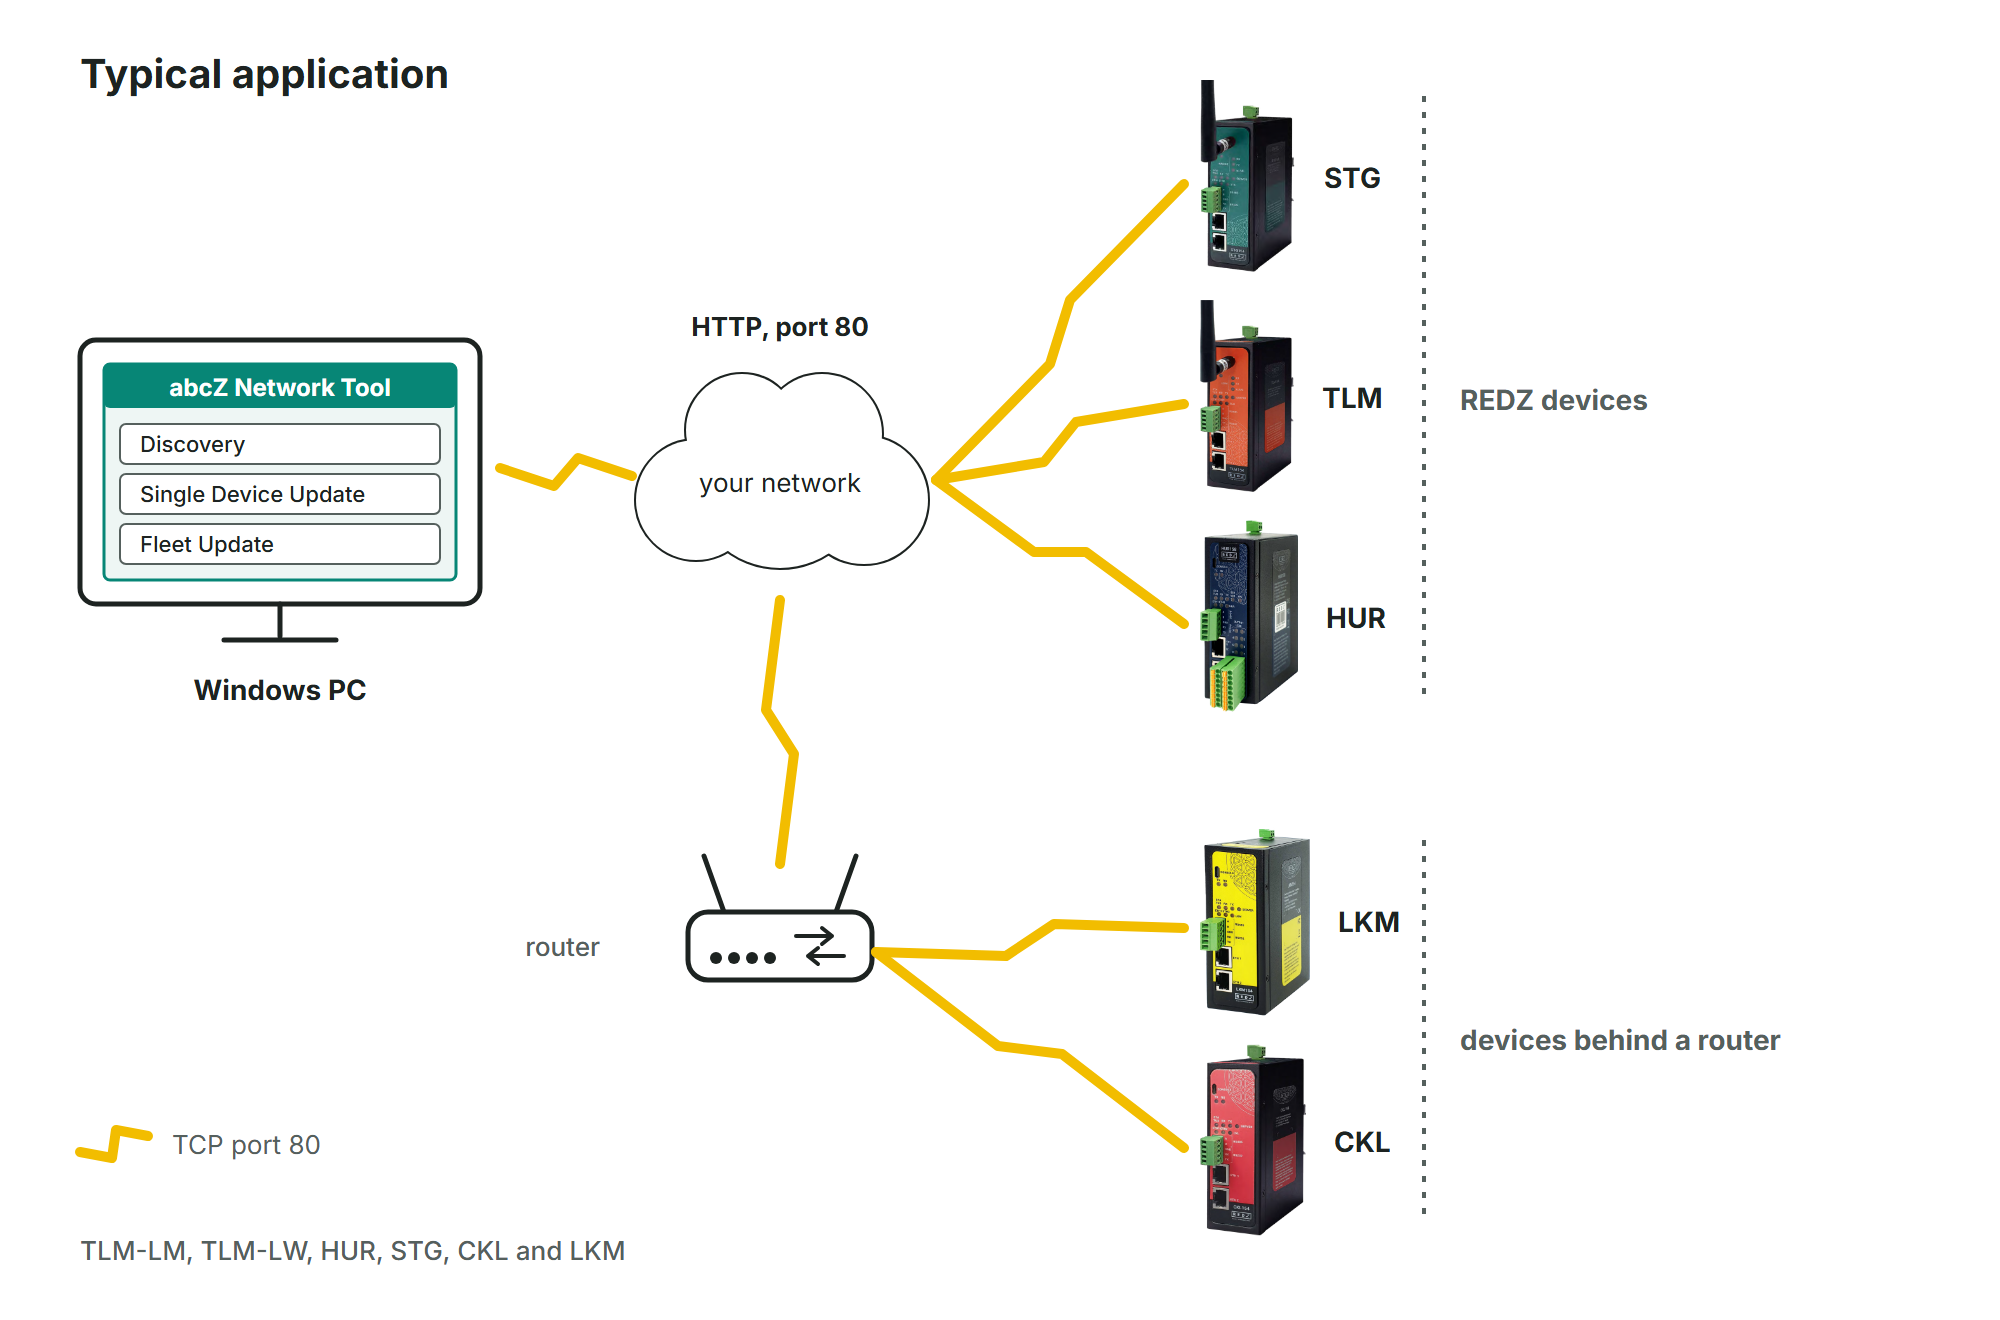
When you give the product you expect, the tool compares it with the product name read from the device before it writes a firmware image. If they differ, the update stops, and Force (flash even if version matches) does not change that. The chapter Safety checks describes this check and the others.
abcZ Network Tool is a single Windows program file, abcZ_Network_Tool.exe. Started without arguments it opens its window; started with arguments it works from the command line, as the chapter Command line reference describes. This manual describes version 1.1.0.
What is new in version 1.1.0
Version 1.1.0 is the first published version of abcZ Network Tool. The chapter Appendix: version history will list the changes of every later version.
Requirements and installation
What you need
abcZ Network Tool is a single Windows program file, abcZ_Network_Tool.exe. It has no installer: copy the file into a folder and double-click it to open its window.
Started with arguments, the same file works from the command line (see the chapter Command line reference). The window title and the top right corner of the window show the version and the build date of the program.
Put the file into a folder where you may create files, for example a folder in your documents. The tool keeps its settings file and its reports folder next to the program file.
- A Windows PC that can reach the devices' addresses, in the same network or through routers. Discover (UDP) works only in the PC's own subnet.
- The address of the devices, or the range of addresses they are in.
- The user name and password of the devices' web interface (see below).
- For an update, the firmware image file (.binimg) of each device model and, if the firmware package has one, the release file (RELEASE_v*.json) from the same package, kept in the same folder as the image.
Administrator rights on the PC are needed for one feature only: Assign Address at Factory IP... on the Discovery tab, which changes a network adapter of the PC for a short time (see the chapter Assigning an address at the factory IP). Windows asks for administrator permission when you use it; everything else runs without. If an earlier run of it did not finish its clean-up, the tool offers the clean-up when its window opens (and when you click the button again); if you accept, Windows asks for administrator permission for that too. From the command line, --assign-factory-address and --undo-factory-assign must be run from a command prompt opened as administrator.
If the devices' password is not admin, give that permission with the Windows account you are logged in with. Permission given with another administrator account cannot use the password, and the feature then stops before it changes anything.
Network
The tool talks to each device's web server over plain HTTP on TCP port 80, as a web browser does. If your devices use another port, type it in Port on the tab you use.
Scan (HTTP) tries every address of a range and also finds devices behind a router, as long as the PC can reach those addresses.
Discover (UDP) sends a broadcast to UDP port 30303 and listens for the answers. A broadcast does not cross routers, so this finds only devices in the same subnet as the PC.
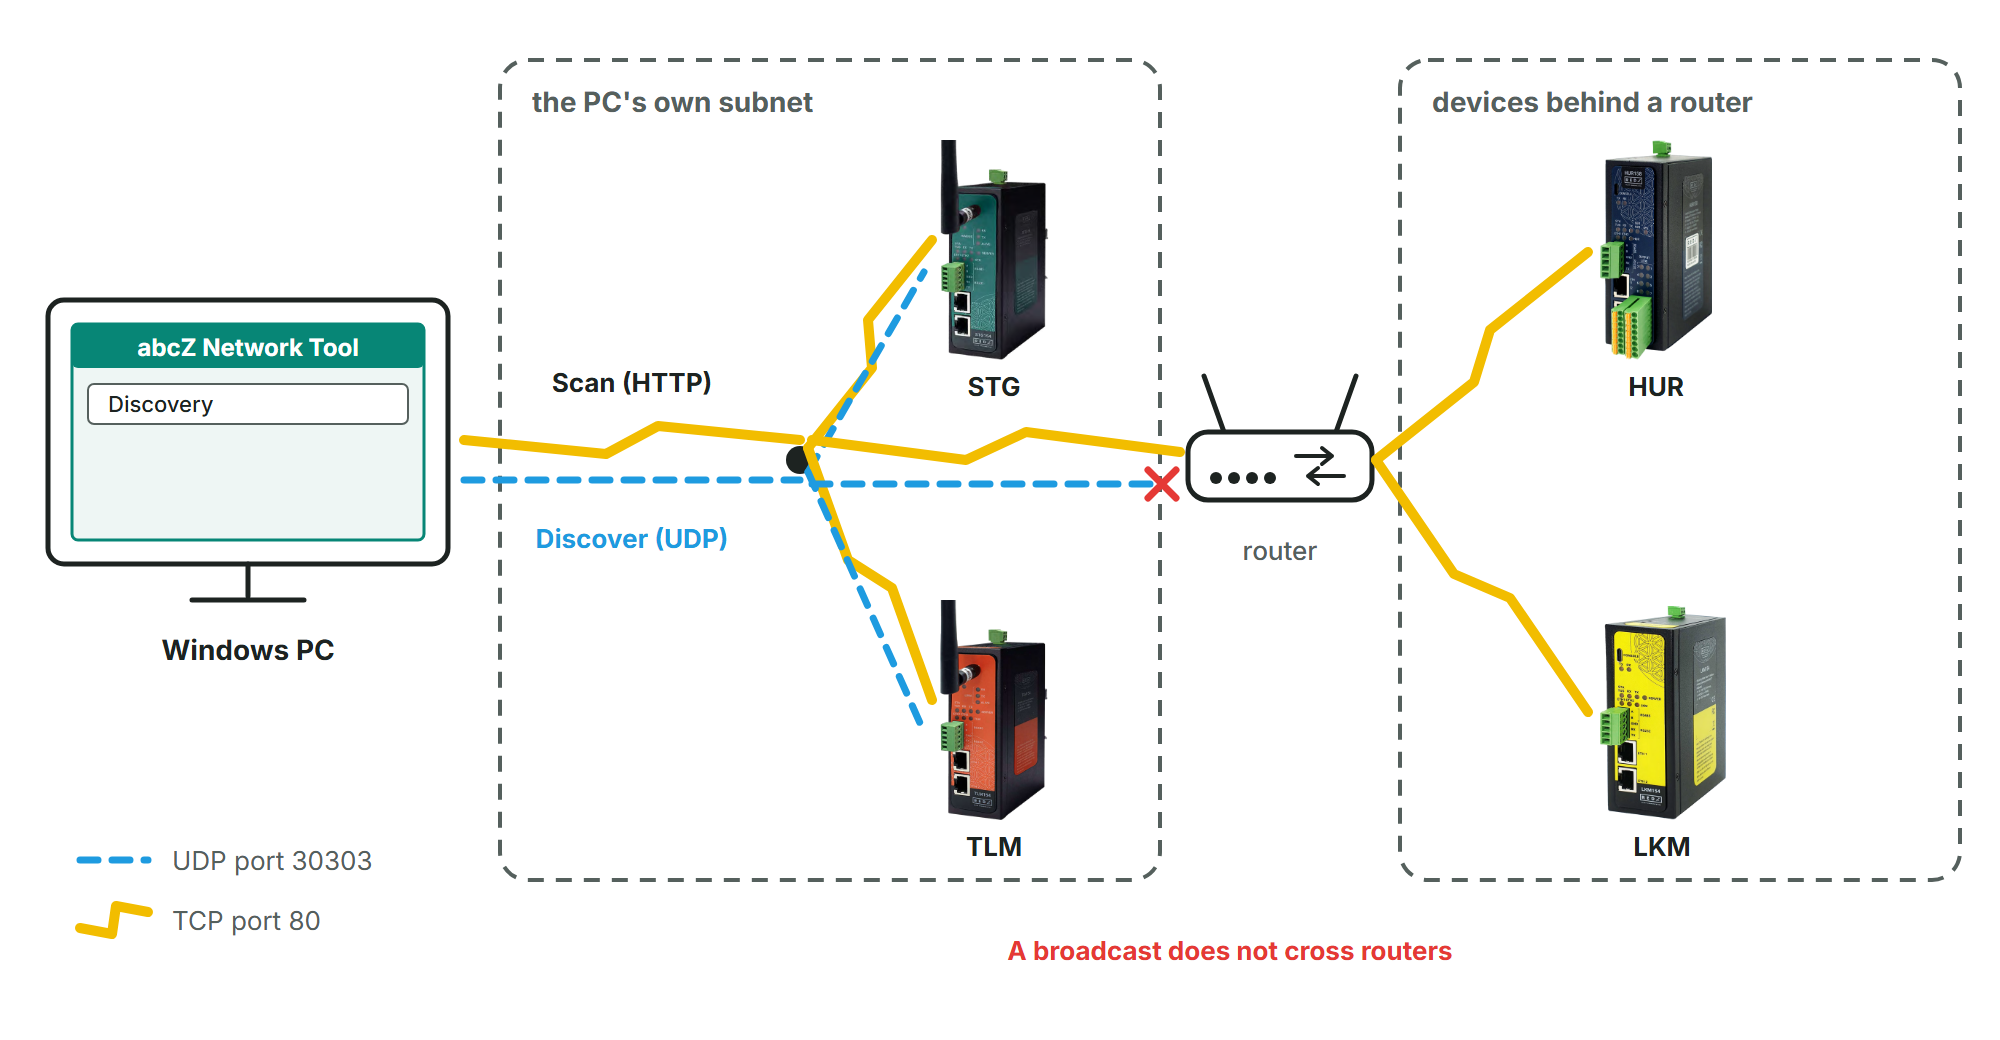
Warning
The user name and password are sent with every request. Over plain HTTP they are not encrypted, the same as when you open the device's web page in a browser.
The device's user name and password
Every page of a REDZ device asks for a user name and a password. The user name is always admin; the factory password is admin.
Each tab has its own User and Password fields. Password is filled with admin every time the tool starts, because passwords are not saved. If your devices have another password, type it on every tab you use, each time you start the tool.
A device that does not accept the password is still listed by a scan, with "auth required (password?)" in the Product column. The chapter Troubleshooting describes what to do.
Settings the tool remembers
The tool saves its settings in the file abcZ_Network_Tool_settings.json next to the program file. If it cannot write there, it uses abcZ\network_tool.json in your %APPDATA% folder instead. When it starts, it reads the file next to the program first and the other file only if that one is missing or cannot be read.
If a settings file next to the program exists but cannot be changed, the tool keeps starting with that file and your changes are lost; delete it or make it writable.
The settings are saved when you close the window. The tool remembers:
- the size and position of the window and the width of every table column;
- on Discovery: IP range, User, Port, Timeout (s) and Parallel;
- on Single Device Update: Device IP, Image (.binimg), Expected product, User and Port;
- on Fleet Update: CSV file, Parallelism (jobs), Pilot IP (opt.), User, Port and the boxes Stop on image/device mismatch and Write report CSV.
Passwords are never saved. The boxes Force (flash even if version matches), Upload only (no reboot) and Factory reset after update are not saved either: they are clear every time the tool starts.
The first line of the log names the settings file next to the program. To start again with the default settings, close the tool and delete that file (and the file in %APPDATA%, if there is one).
Display scaling
On a screen with display scaling, for example 125 % or 150 %, the tool draws its window at that scale with sharp text. The first time it starts, the window is no larger than the screen. The log then shows the scaling it detected.
The table columns keep their width when you make the window wider. If a column is too narrow, drag the right edge of its heading; the tool remembers the new width when you close the window.
The reports folder
Reports are written into the folder reports next to the program file, which the tool creates the first time it needs it. Each report is a new file named abcZ_report_ followed by the date and time, for example abcZ_report_20261014_093000.csv. If the folder cannot be created, the report is written into the folder the program was started from. If the folder exists but cannot be written, no report is written: in the window, check that "Report written:" appears in the log after the run.
The window writes a report after each Run Fleet Update while Write report CSV is ticked (it is ticked at first). An update on Single Device Update writes no report; its record is the log. From the command line a fleet update writes a report unless you give --no-report, and a single-device update writes one only with --report.
The chapter Results and reports describes the columns of the report.
Quick start
This chapter takes you once through the safest path: find a device, read its identity and update it on the Single Device Update tab. The sections after the steps name the chapters with the details.
Update one device
- Open the Discovery tab. In IP range, type the network your devices are in (for example 192.168.0.0/24) or, if you know it, the address of the one device. Click Scan (HTTP); each device appears in the table as soon as it is found.
- Find your device in the table by its Product and Version. If a row shows "auth required (password?)", type the device's password into Password and scan again. To scan only that device, type its address in IP range first.
- Click the row, then right-click it and choose Copy IP. The address is now on the clipboard. (Copy IP is available only when exactly one row is selected.)
- Open the Single Device Update tab and paste the address into Device IP, replacing any address already there. If the device does not use the factory password admin, type its password into Password.
- Click Read Identity (safe). It changes nothing on the device. The panel Device identity (last read) shows the product name, version and build date. If Expected product was empty, the tool fills it with this product name; if it already holds a name (for example from your last session) that differs from the Product line, empty the field and click Read Identity (safe) again.
- Click Browse... next to Image (.binimg) and choose the firmware image for exactly this product. Leave the image under its original file name. If the firmware package contains a release file (firmware 3 and later, for example RELEASE_v3.00.00.json), keep it in the same folder: the tool then checks the image against it before it sends anything.
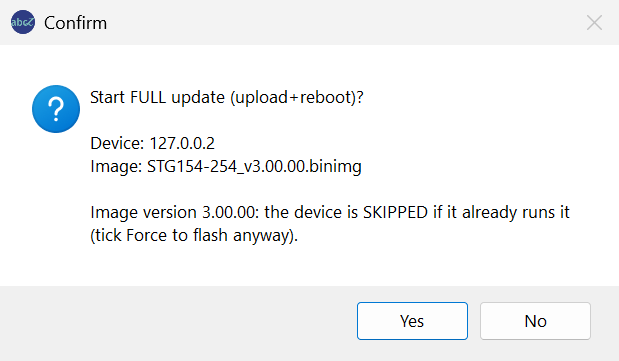
- Click Update. The Confirm window shows the device address and the image file name. Check both, then click Yes; No goes back without touching the device.
- Wait for the last log line. It starts with "RESULT:" and gives the address and the result in square brackets: SUCCESS (green) means the device runs the new firmware.
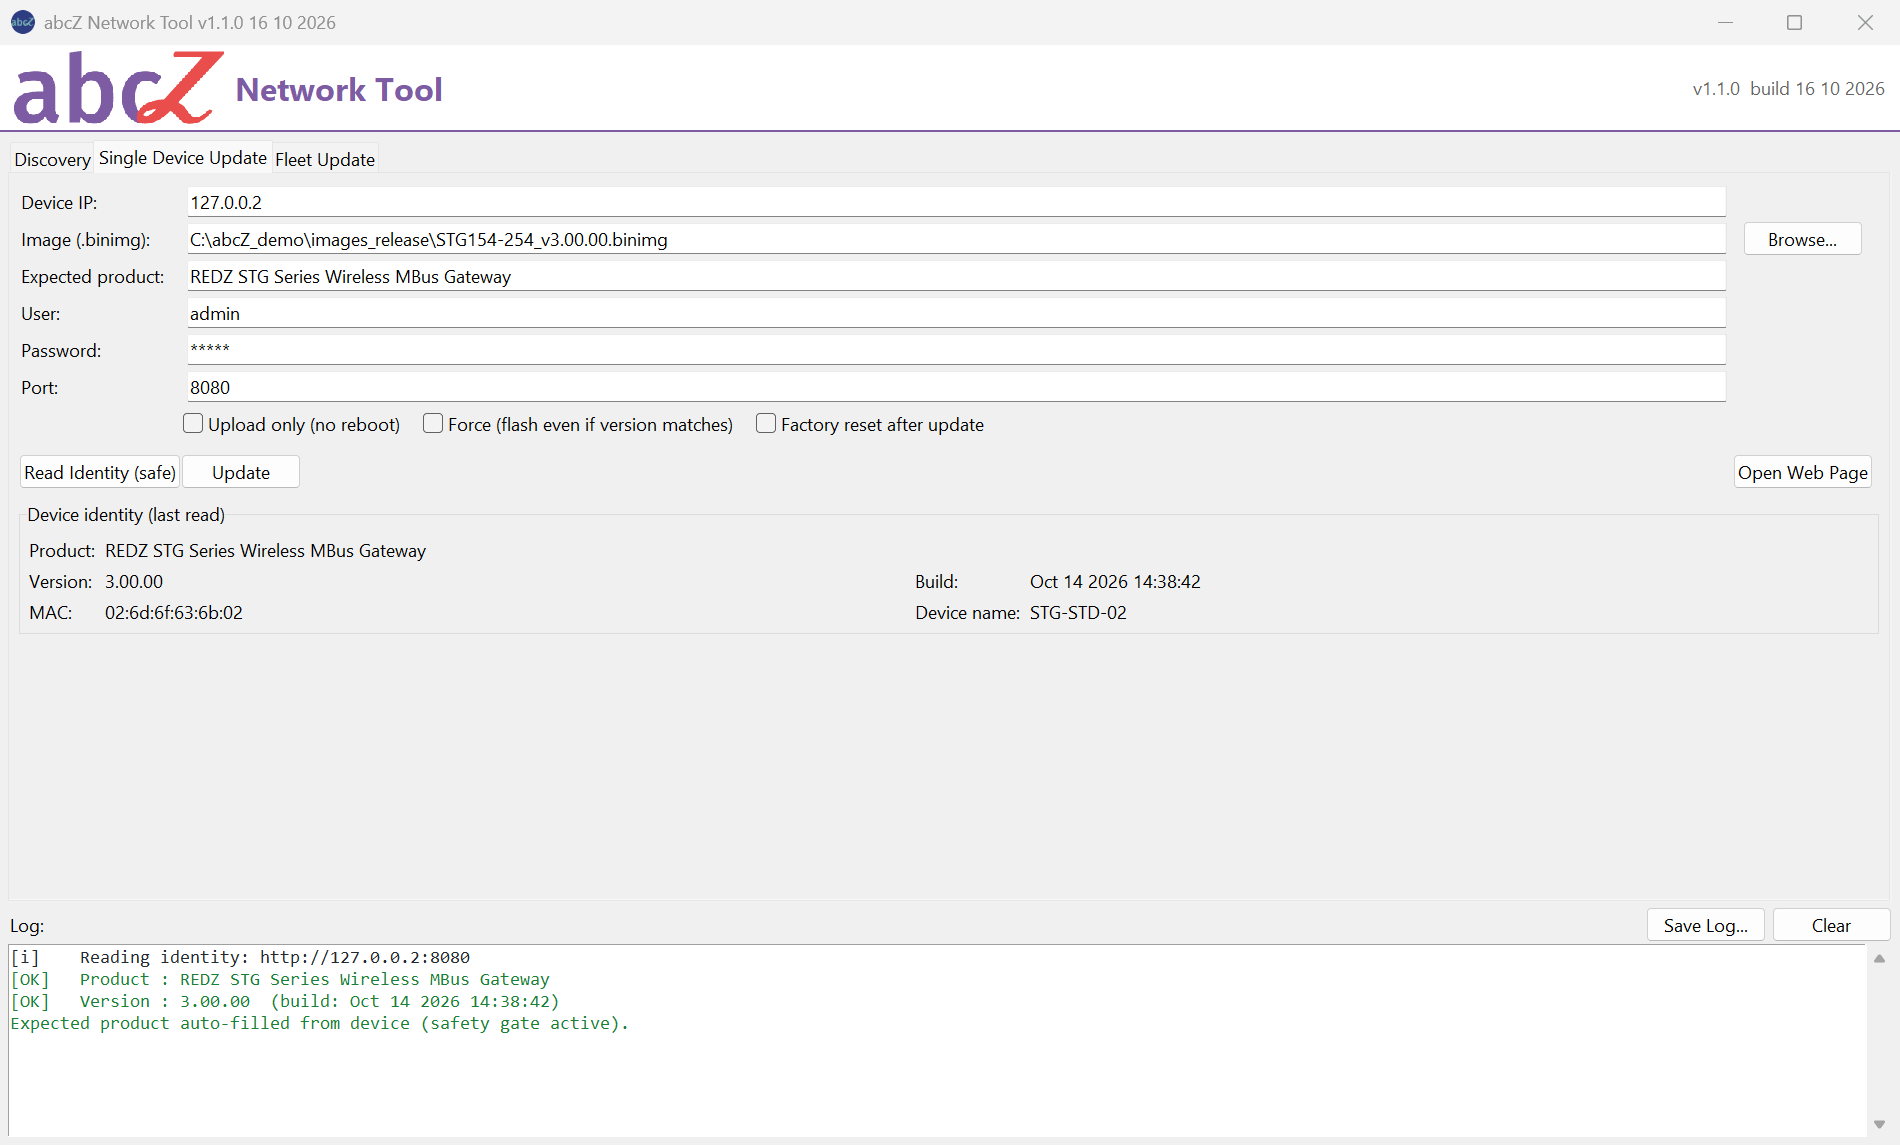
What protects the device
If Expected product is filled, the update stops before anything is sent when the device reports another name. A name that Read Identity (safe) filled in comes from the device itself, so this check then proves only that the same product is still at that address. It does not check the image; that is done by the image check below and by your choice of image.
If the image does not look right for the device, the window Image / device mismatch lists the differences. No is the preselected answer and stops the update with IMAGE/DEVICE MISMATCH; nothing is written. Answer Yes only when you are sure the image is right.
If the device already runs the version in the image file name, the result is SKIPPED (version) and nothing is written. Tick Force (flash even if version matches) only to write the same version again; Force does not override the product check or the image check.
For any other result, the chapter Single Device Update explains each step, and the chapter Results and reports lists every result and what to do next. The chapter Safety checks describes what each check catches and what it does not.
Before you update many devices
To update a list of devices, select them on the Discovery tab, click Export CSV and save the file; the list then opens on the Fleet Update tab, where you choose the images. Name one device of the list in Pilot IP (opt.): the tool updates this pilot first, alone, and the other devices only if it passes (SKIPPED (version) and UPLOADED (no reboot) also count as passed). Choose as pilot a device that does not run the target version yet, and leave Upload only (no reboot) off, so that the pilot really runs the new firmware. The chapter Fleet Update describes the list and the run.
Discovery
The Discovery tab is the first tab of the window. It finds REDZ devices on your network and lists them in a table. From that table you can export a device list for Fleet Update and send the actions described in the chapter Device actions.
The button Assign Address at Factory IP... next to Export CSV is not tied to a row of the table: it gives a new address to a device at the factory address 192.168.1.1 that your PC cannot reach. It works only on Windows, Windows asks for administrator permission, and the button cannot be clicked while another operation runs. The chapter Assigning an address at the factory IP describes it.
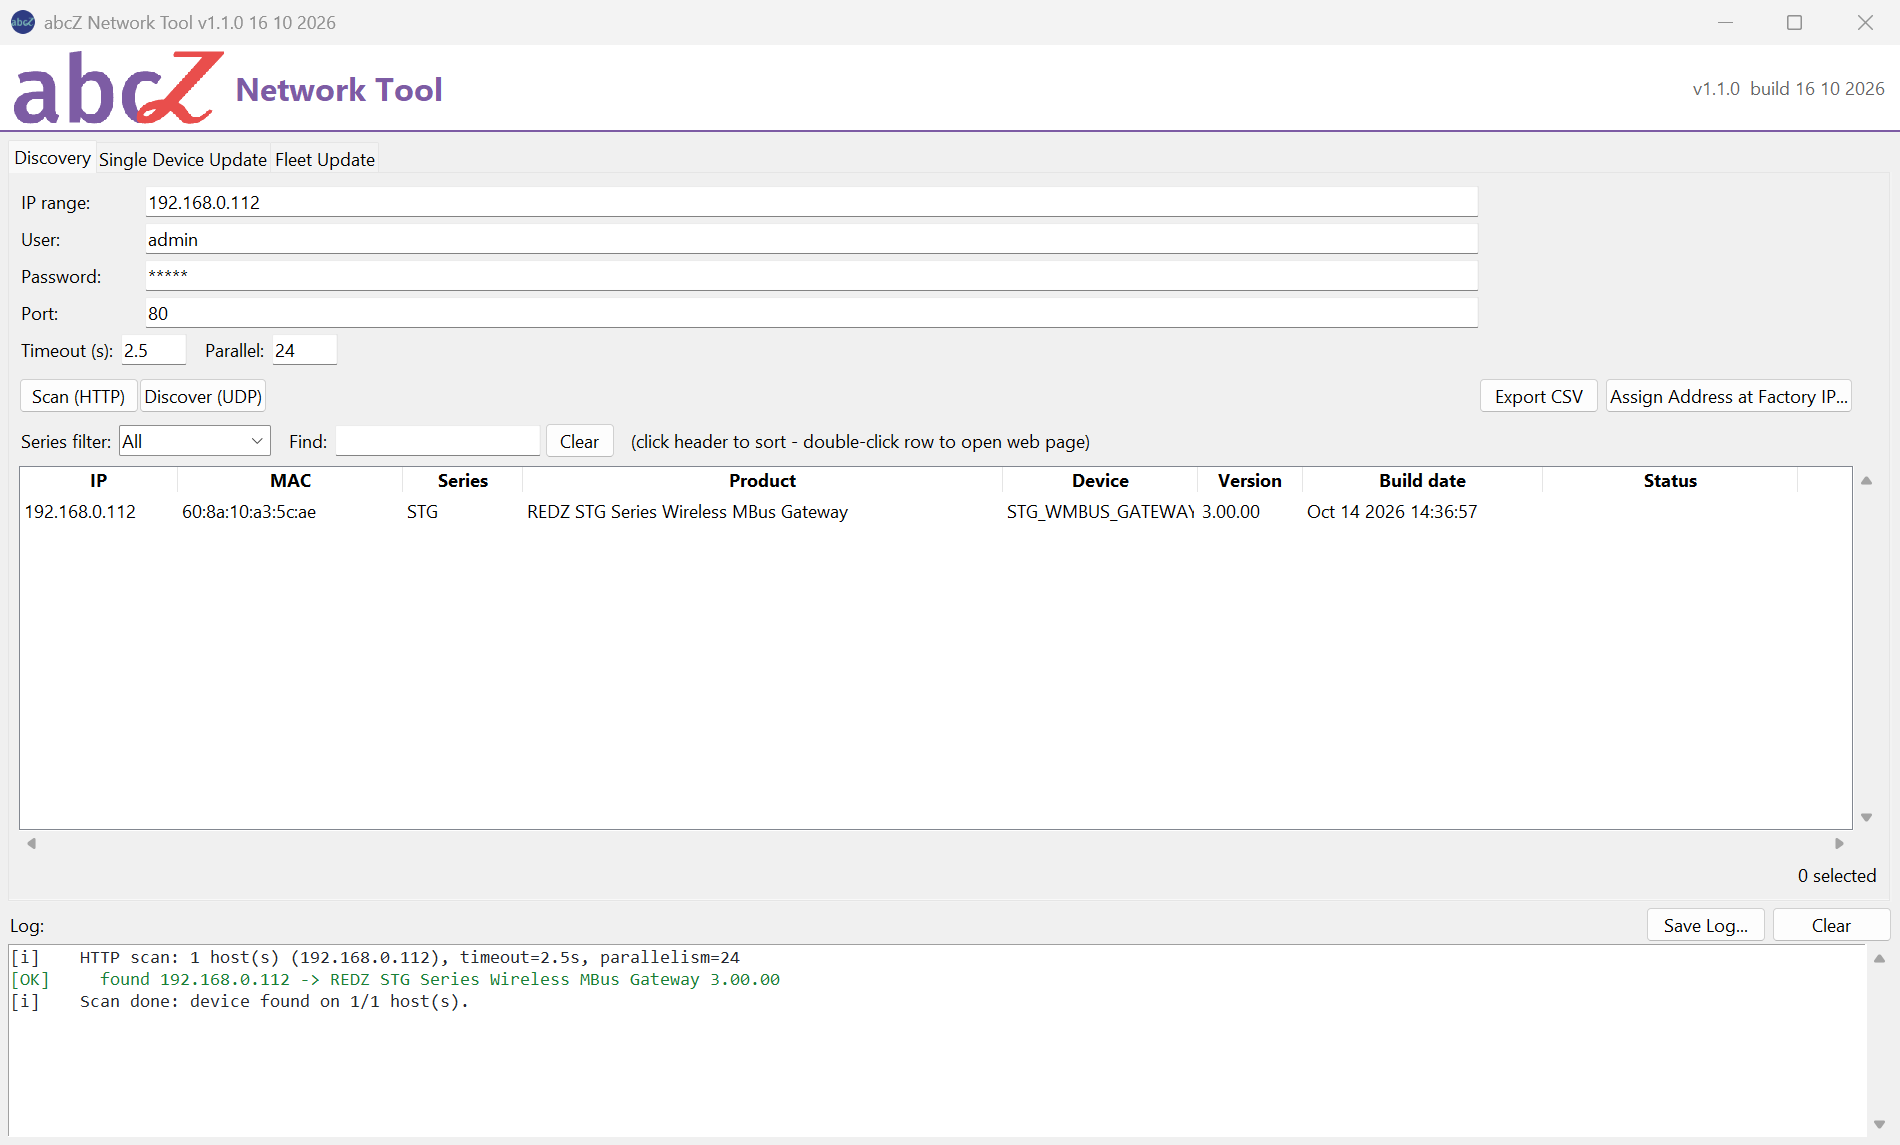
Scan (HTTP) and Discover (UDP)
There are two ways to search: Scan (HTTP) and Discover (UDP).
Scan (HTTP) asks every address in IP range for the device's start page, as a web browser would, and reads the product name, firmware version and build date from it. Because it uses ordinary web requests, it also finds devices behind a router, in another subnet.
Addresses that do not answer, and web servers that are not REDZ devices, are not listed, unless they ask for a password: any web server that refuses the user name and password in User and Password is listed with "auth required (password?)" in the Product column and no version, even when it is not a REDZ device. If it is your device, type the right password and scan again.
Discover (UDP) sends a broadcast query to UDP port 30303 and listens for 2.5 seconds. Every device that answers is then identified over HTTP in the same way as with Scan. It does not use IP range.
Note
A broadcast does not cross a router. Discover (UDP) finds only devices in the same subnet as your PC. To reach devices behind a router, use Scan (HTTP).
If a device answers the broadcast but cannot be identified over HTTP, it is still listed: the Product column shows the name from its answer (if there is one) followed by (UDP), and MAC, Series, Device, Version and Build date show -.
Each new search empties the table, including the Status column, before it starts.
IP range formats
IP range accepts four forms:
| Form | Example | Addresses searched |
|---|---|---|
| Network | 192.168.0.0/24 | 192.168.0.1 to 192.168.0.254 (the network and broadcast addresses are left out) |
| Range of the last number | 192.168.0.1-254 | 192.168.0.1 to 192.168.0.254 |
| Full range | 192.168.0.10-192.168.1.50 | every address from the first to the last, across subnets |
| One address | 192.168.0.137 | only that address |
The field starts with 192.168.0.0/24. Change it to your own network.
When the scan starts, the log shows how many addresses the range contains, with the timeout and the parallel count used. Check this number before a long scan.
If the tool cannot read the range, the log shows an unexpected error with the reason. Text without / or - is taken as one address, so a typing error can end in a scan of one address with no device found; check the host count in the first log line.
Timeout and parallel scans
Timeout (s) (default 2.5) is how long the tool waits for each address. An address where nothing answers costs the full timeout. If devices behind a router answer slowly and are missed, raise it.
The tool asks each address for two pages (/ and /index.htm) before it gives up, so an address where nothing answers can take up to twice the timeout.
Parallel (default 24) is how many addresses the tool asks at the same time. A higher number makes a large range faster.
Note
Each device accepts only about 7 web connections at a time. In a test with Parallel set to 48 and several /24 scans run one after the other, every device on the network stopped answering web requests for about one minute and then recovered by itself. Keep Parallel at 24 unless the range is large, and do not start scans back to back. If devices disappear after repeated scans, wait a minute and scan once more.
Do not leave Parallel empty: an empty field means 64 addresses at once. An empty Timeout (s) means 2.5 seconds.
Port (default 80) is the web server port the tool tries on every address.
Watching the scan
Each device appears in the table as soon as it is found, and the log adds a line for it; you do not have to wait for the end of the scan.
While a scan runs, a progress bar, the count of addresses done out of the total, and a Stop button appear next to the log heading.
Stop (or Esc) cancels the addresses that have not been asked yet; the requests already under way finish or time out first.
At the end, the log gives the number of devices found out of all addresses in the range, and the table is rebuilt in the current sort order (address order unless you sorted by another column).
The columns
| Column | Shows |
|---|---|
| IP | The device address. |
| MAC | The MAC address read from the device. |
| Series | The short family code taken from the product name: TLM-LM, TLM-LW, STG, HUR, CKL or LKM. TLM-LM and TLM-LW are different firmware families. |
| Product | The full product name read from the device. A fleet update compares against this name (upper and lower case and extra spaces are ignored). |
| Device | The device name set on the device's web page. |
| Version | The firmware version running now. |
| Build date | The build date of the running firmware. |
| Status | The result of the last action sent to this device from this table (see the chapter Device actions). |
An empty value is shown as -. Hover over a column heading to see what the column holds.
The columns keep their width when you make the window wider. Drag the edge of a column heading to widen it, or use the scrollbar under the table. The tool remembers the widths when you close it.
Filter, sort and select
Series filter shows only the devices of one family. Its list contains All and the families found in the last search.
Find filters while you type: only rows that contain the text in any column stay visible, for example part of an address, a MAC address, a product name or a version. Hidden devices are not forgotten; Clear empties the box and shows them again.
Click a column heading to sort by that column; click it again to reverse the order. Addresses sort by their numbers, so 192.168.0.9 comes before 192.168.0.10.
Click a row to select it; hold Ctrl or Shift to select several. Double-click a row to open that device's web page in your browser.
Under the table, on the right, the tool shows how many rows are selected and, when a filter hides rows, how many of all devices are shown. Actions from the right-click menu go to the selected rows, so check this number before you send one.
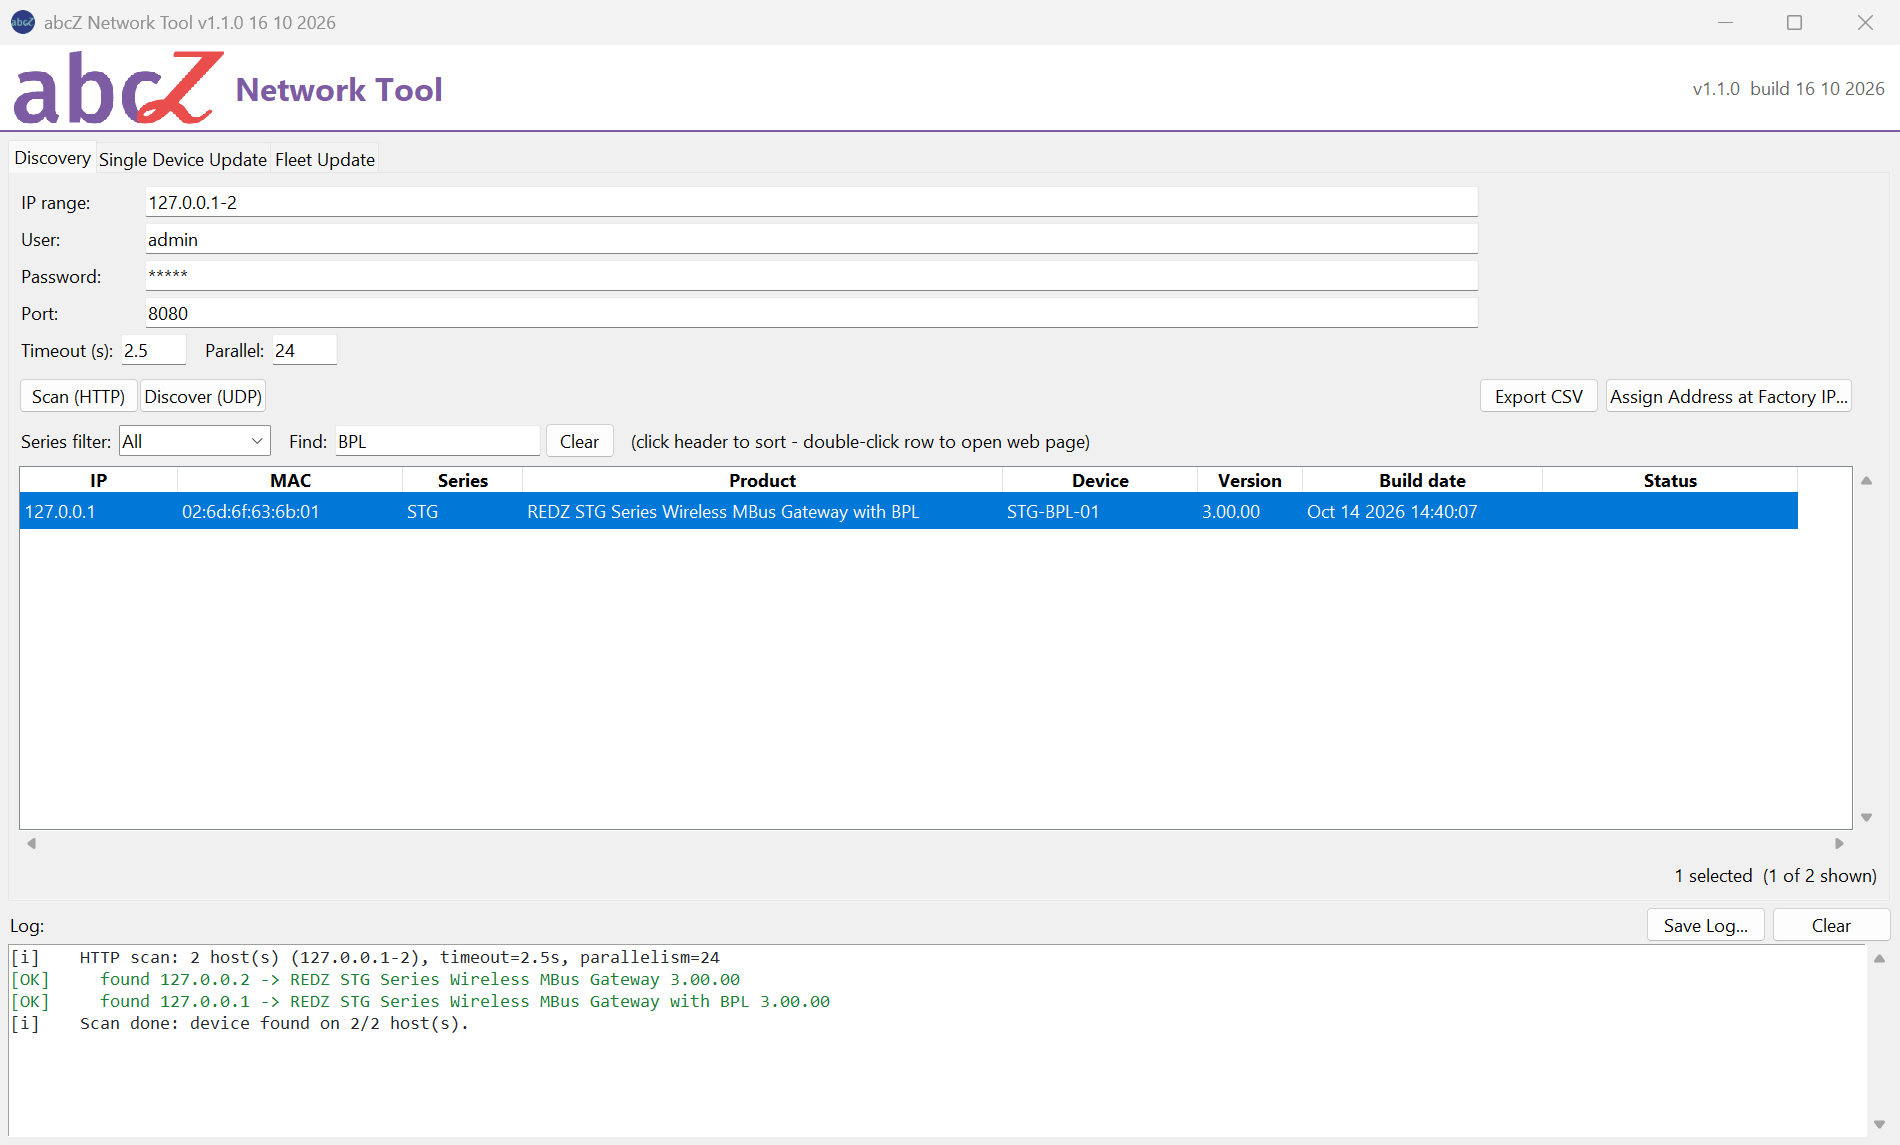
Exporting a device list for a fleet update
Export CSV writes the selected rows to a device list file. If no row is selected, it writes every row that the filters show. Only identified devices are written: rows without a product name, such as "auth required (password?)", are left out. If nothing is left, the log says "No identified devices to export (scan first, or select rows)."
The file has the columns ip, expected_product, image_path and target_version. The tool fills ip and expected_product (the product name read from the device) and leaves image_path and target_version empty, in address order.
After saving, the tool opens the Fleet Update tab with this file in CSV file and checks it. The log reminds you: "CSV loaded into the Fleet tab (fill image_path before running)." Choose the images there, as the chapter Fleet Update describes.
If you saved a file but the log does not show a line that starts with "CSV written:" and the tool stays on the Discovery tab, the file was not written. Choose another folder or file name and export again.
Keyboard shortcuts
| Key | On the Discovery tab |
|---|---|
| F5 | Starts Scan (HTTP) (not while another operation runs). |
| Ctrl+F | Moves the cursor into Find. |
| Ctrl+A | Selects all rows shown. Rows hidden by a filter are not selected. Inside a text field, Ctrl+A selects the text as usual. |
| Esc | Same as Stop while an operation runs. |
No key sends anything that changes a device. On this tab, restart, factory restore and Set IP are only in the right-click menu, and giving an address at the factory IP is only the button Assign Address at Factory IP...; each asks for confirmation.
When you close the tool, it remembers IP range, User, Port, Timeout (s) and Parallel for the next start. It does not save the password.
The same searches are available from the command line with --scan and --discover; see the chapter Command line reference.
Device actions
Right-click a row in the Discovery table to open the device menu. It has two items that change nothing, and three that change the device.
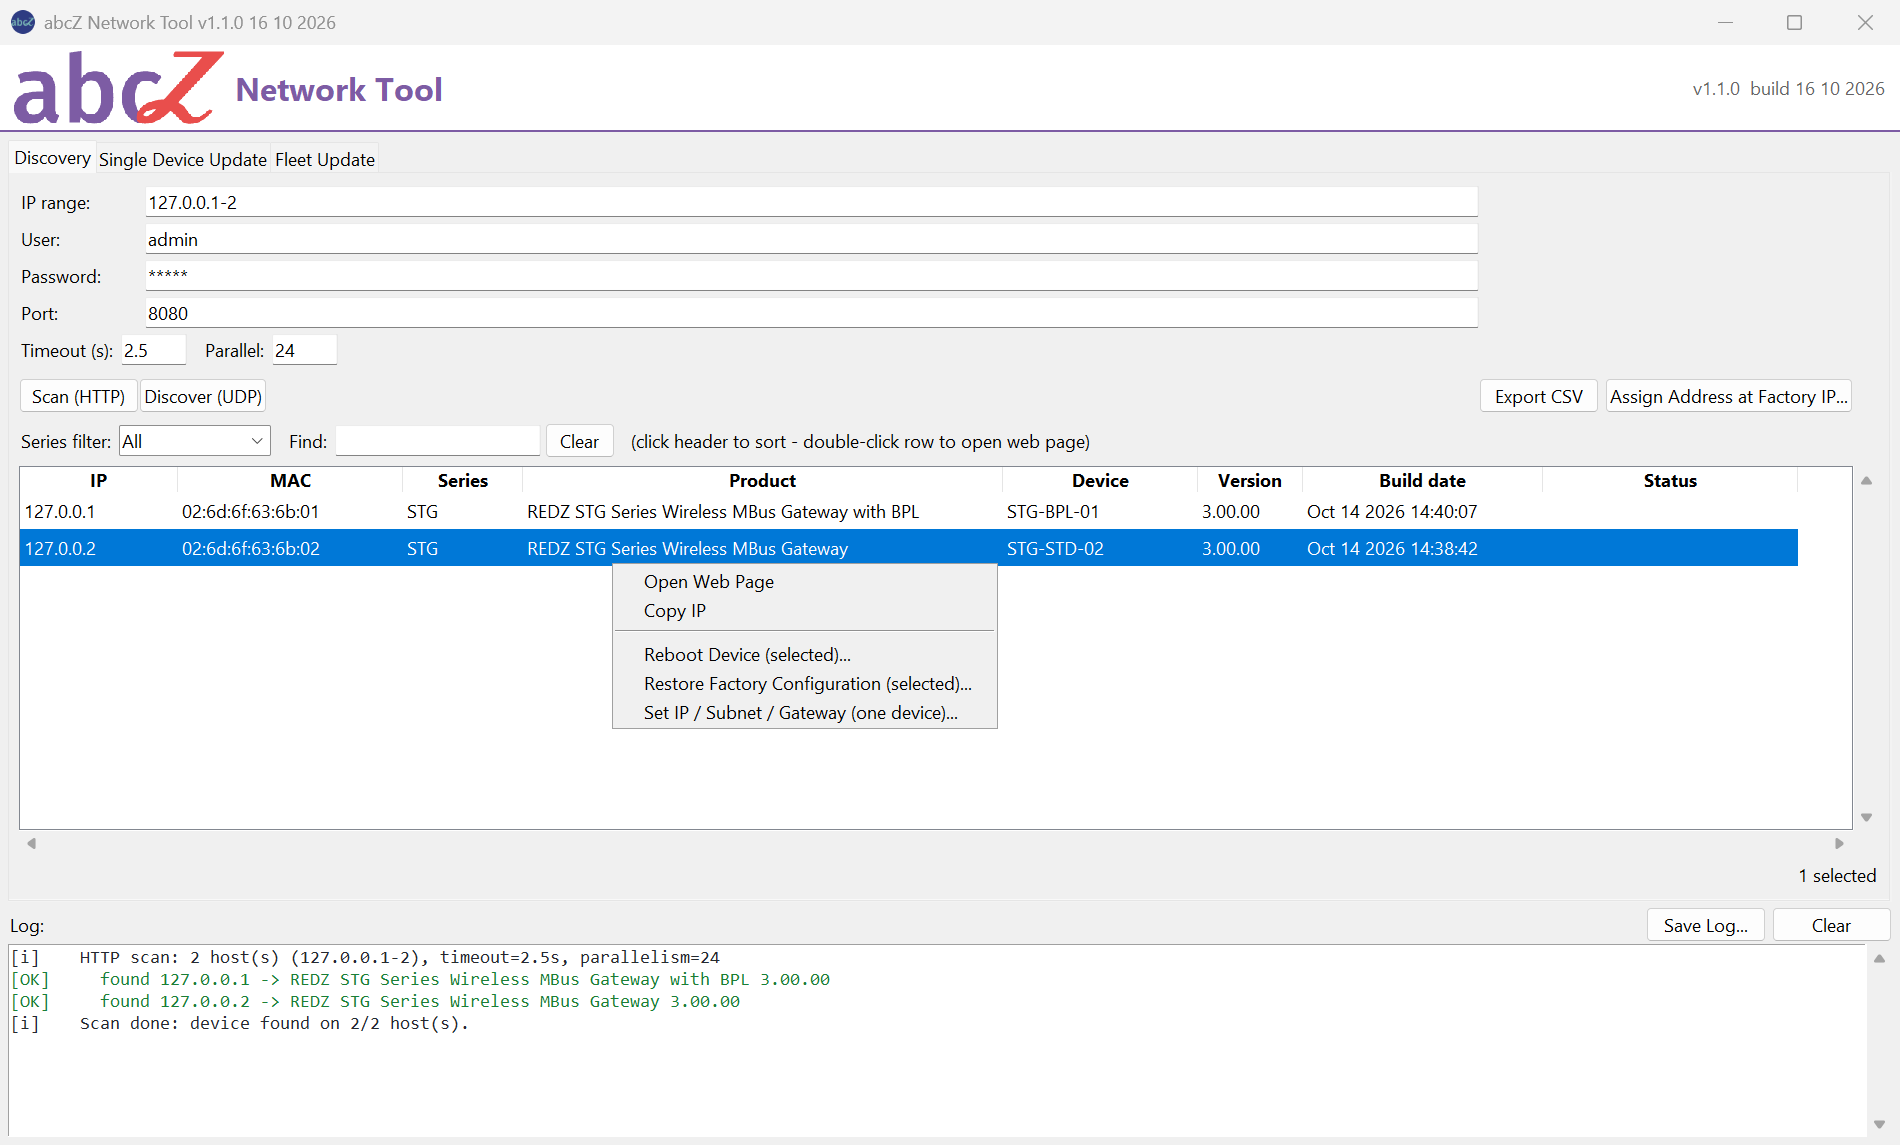
The menu and the selection
If you right-click a row that is not selected, the tool selects only that row. If you right-click a row inside a selection, the selection stays as it is. Items that do not fit the number of selected rows are grey and cannot be clicked.
| Item | Rows | Changes the device |
|---|---|---|
| Open Web Page | exactly one | no |
| Copy IP | exactly one | no |
| Reboot Device (selected)... | one or more | restarts it |
| Restore Factory Configuration (selected)... | one or more | deletes all its settings |
| Set IP / Subnet / Gateway (one device)... | exactly one | gives it a fixed address |
The actions use User, Password and Port of the Discovery tab.
While another operation of the tool runs, on any tab (a scan, an update, a fleet run or another device action), Reboot, Restore and Set IP send nothing. The menu items can still be clicked, but the log only says "A task is running - wait until it ends (or use Stop) before sending device commands." Wait until the operation ends, or stop it with Stop, then choose the item again. Open Web Page and Copy IP work at any time.
The window of Set IP does not block the rest of the tool while it is open. If an operation is running when you confirm the change in that window, the tool writes nothing either: the log adds "Nothing was written." to the same message, and the window stays open. Click Apply again when the operation has ended.
Reboot, and Set IP for a device at its own address, exist only in the window. On the command line, --assign-factory-address gives a new address only to a device at the factory address 192.168.1.1 (see the chapter Assigning an address at the factory IP), and a factory restore is available only after a confirmed update, with --factory-reset; see the chapter Command line reference.
Opening the web page, copying the address
Open Web Page opens the device's web interface in your default browser, at the address of the row and the port in Port. Double-clicking the row does the same. Your browser may ask for the user name and password of the device's web interface; the tool does not pass them on.
Copy IP copies the device address to the clipboard.
Restarting a device
Reboot Device (selected)... asks you to confirm and lists the addresses of the selected devices (the first eight, if there are more). After you click Yes, the tool sends the restart command to each selected device, one after the other.
A restart keeps the device's settings. The device cannot be reached while it starts again; the confirmation window says about 10 to 30 seconds.
Stop (or Esc) skips the devices that have not been sent the command yet; a command already sent is not taken back.
Restoring the factory configuration
Restore Factory Configuration (selected)... deletes every setting of the selected devices and restarts them with the factory settings. It asks twice: first Yes or No with the list of addresses, then a second window where you must type RESTORE. Anything else stops it, and the log says "Factory restore aborted (confirmation text mismatch)."
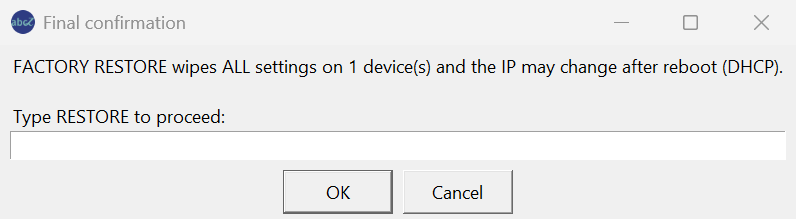
Warning
A factory restore cannot be undone. The tool does not keep a copy of the settings: write down what you need from the device's web page before you restore it, and enter it again afterwards.
After a restore, the device may take a new address from a DHCP server: scan again to find it. Without a DHCP server it is expected at its factory address 192.168.1.1 (see When a device cannot be reached, below).
Setting a fixed IP address, subnet mask and gateway
Set IP / Subnet / Gateway (one device)... works on one device at a time, because each device needs its own address.
First the tool reads the device's network settings from its web page: the fixed address, subnet mask and gateway, the DHCP start address and the two DNS servers. If it cannot read all six, it shows an error and stops without writing anything, because a partial write could break the device's network settings.
The window "Set network" with the device address then shows IP address, Subnet mask and Gateway, filled with the values read, and a warning that the device restarts and that a wrong subnet mask or gateway can make it unreachable. The window says that the tool re-finds the device by its MAC address; it does so only when the row has a MAC address (see below).
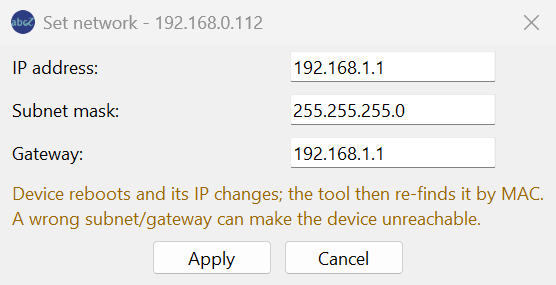
Note
The three fields show the fixed address stored in the device, not necessarily the address it uses now. A device that has its address from a DHCP server can show 192.168.1.1 here although it answers at another address. Type the values you want; do not take the fields for the current address.
Type the new values and click Apply. The tool checks that all three are valid IPv4 addresses, then shows the old address and the new values and asks you to type SET. Anything else stops it, and the log says "Network change aborted (confirmation text mismatch)." Cancel or Esc closes the window without a change.
The tool does not check that the subnet mask is a real mask or that the gateway is in the same network; check these values yourself.
Do not start a new search while the window is open. When you apply, the tool takes the device's product, version and MAC address from the table as it is then; if a new search has removed the device from the table, the tool sends the change the older way and does not look for the device afterwards.
The tool then sends one save request. It turns on the device's fixed address, sends the new address, subnet mask and gateway, and sends the DHCP start address and both DNS servers back exactly as it read them, so that they are not lost.
If the device refuses the request, the request is not sent, or the device answers with an error, the tool stops there and does not restart the device. The Status column and the log show the reason.
Otherwise, also when the device did not confirm the save (older firmware, or the answer was lost), the tool sends the restart command so that the new settings take effect. It does not check the answer to that command; if the device is not found afterwards, it may not have restarted. If the row has a MAC address, the tool waits 12 seconds and then looks for the device by its MAC address. It searches the 254 addresses that share the first three numbers of the new address (for example 192.168.5.1 to 192.168.5.254 for 192.168.5.20), whatever subnet mask you typed. If the row has no MAC address, it does not search.
If the tool finds the device by its MAC address, the log says that the device is now reachable at the address where it was found, the Status column shows IP set with that address and a tick, and the row takes that address. If that address is not the one you typed, check the device's network settings on its web page.
If the tool does not find the device by its MAC address, or the row has no MAC address so that it does not search, the log warns that the device was not found after the change and asks you to check it at the address you typed. The Status column then shows a warning sign with IP set? and not found at the address you typed, and the row takes that address. Check the device yourself, with Scan (HTTP) over that network or in your browser, before you rely on the new address.
To change the address again, run this action on the device at its new address, or use the network settings on the device's web page. The tool always sets a fixed address; to let the device take its address from a DHCP server again, use the web page.
What the device answers
How much the tool can tell you depends on the device's firmware. Devices with firmware 3 of the families STG, LKM and TLM-LW, and TLM-LM from version 3.00.01, can confirm each command: they answer which request they carried out, and whether it needs a restart, or they refuse it with a reason. Older firmware (version 2, HUR and CKL devices) only receives the command and does not say whether it carried it out. TLM-LM 3.00.00 is treated the same way: the tool does not ask it for an answer.
The tool decides from the product and version shown in the table; if the version could not be read, it uses the older way. If a device does not know the confirmation page, the tool sends the command the older way, and you get the older kind of result.
For Reboot and Restore, the Status column shows the action and its result with a symbol: a tick when the device confirmed it, a cross when it failed or was refused, and a warning sign when the result is not known. The log shows the same line. For Set IP, see Setting a fixed IP address, above: there the tick means that the tool found the device again by its MAC address after the restart, not that the device confirmed the change.
| Result text begins with | Meaning |
|---|---|
| confirmed by device | The device confirmed it carried out the command. REQ= names the request, and reboot required means it applies after a restart. |
| REFUSED by device | The device refused the command and gives the reason. This also appears when the device confirmed a different request than the one sent; then check the device, because it may have carried out that other request. |
| accepted (HTTP 200; device gives no acknowledgement on this firmware) | The command arrived. The firmware does not say whether it carried it out. |
| FAILED (HTTP | The device answered with an error. With HTTP 401 the user name or password is wrong. |
| NOT SENT | The tool could not connect to the device. The command did not reach it. |
| sent, response lost | The command was sent, but the connection dropped or no answer came. The device may have carried it out. |
NOT SENT and sent, response lost are different. NOT SENT means nothing reached the device: fix the connection and try again. Response lost means the device may already have acted; a device that restarts often drops the connection before it answers. Scan again or open its web page to see what happened before you send the same command again.
When a device cannot be reached
When a command could not be sent, or a network save failed, the log may add hints below the result line:
- If the device address is not in the same network as one of the PC's own addresses (the tool compares the first three numbers), the log says so and lists the PC's addresses. Unless a router connects the two networks, nothing reaches the device.
- If the device is at the factory address 192.168.1.1 and runs firmware 3: when the network cable was plugged in after the device started, the device restarts once by itself and takes an address from the DHCP server, in about a minute. Wait, then scan your own range again; the device appears there. This needs a DHCP server on the network.
- If the device is at 192.168.1.1 and runs firmware 2, it does not take a new address when the cable is plugged in later. It stays at 192.168.1.1 until it is restarted with the cable already connected.
- If the device is at 192.168.1.1 and the PC is in another network, the log also suggests giving the PC a second, temporary address in 192.168.1.x (for example 192.168.1.50 with subnet mask 255.255.255.0) or connecting the device directly to the PC. Do not add that address by hand if your PC takes its address from a DHCP server; use Assign Address at Factory IP... instead, as described below.
On Windows, use Assign Address at Factory IP... on the Discovery tab instead of changing the PC's network settings yourself. Windows asks for administrator permission. The tool adds the temporary address, gives the device its new address, and removes the temporary address again; if that clean-up cannot be confirmed, the log says so and the tool offers the clean-up again at the next start. On a PC that takes its own address from a DHCP server, adding a second address can make Windows switch DHCP off and drop that address; the tool first switches on the Windows setting that lets DHCP and fixed addresses work together, to avoid this. The chapter Assigning an address at the factory IP describes it.
The same hints also appear in the log of an update that ends as NOT CONFIRMED; see the chapter Single Device Update.
The chapter Firmware generations (v2 / v3) describes the differences between the generations in more detail.
Assigning an address at the factory IP
A REDZ device that finds no DHCP server on its network uses its factory address 192.168.1.1. If your PC is in another network, neither a scan nor a discovery reaches it. Assign Address at Factory IP... on the Discovery tab, or --assign-factory-address on the command line, gives such a device a new address. It changes your PC's network settings only for the operation and undoes the changes afterwards; the section A clean-up that did not finish describes what happens if that undo does not complete.

When you need it
Use it when a device is at 192.168.1.1, for example after a factory restore or on a network without a DHCP server, and the network adapter of your PC that the device is connected to has no address in 192.168.1.x.
If that adapter already has an address in 192.168.1.x, the device is reachable directly through it, and the tool refuses to use that adapter: scan 192.168.1.1 and use Set IP / Subnet / Gateway (one device)... as described in the chapter Device actions. The tool checks only the adapter you choose. Another adapter of your PC in 192.168.1.x, for example Wi-Fi to a router at 192.168.1.1, does not stop the function: choose the adapter the device is on.
A device with firmware version 3 whose network cable was plugged in after it started restarts once by itself and takes an address from a DHCP server, if there is one. In that case, wait about a minute and scan your own range before you use this function.
The function is available on Windows only. On an adapter that gets its address from DHCP, it needs Windows 10 version 2004 or later. The tool reads the needed setting from the English output of the Windows command netsh, so on a Windows whose display language is not English it may refuse such an adapter, with a reason that names Windows 10 version 2004.
What the tool changes on your PC
Changing a network adapter needs administrator rights. The window itself runs without them: when you start the operation, Windows asks for administrator permission, and the tool runs the network steps in a separate administrator process. If you decline, nothing changes.
If your Windows account is not an administrator and another account approves the permission, the administrator process cannot read back a password other than the factory one: with a user name and password other than admin / admin, the tool refuses.
Before it changes anything, the tool writes a clean-up record, %LOCALAPPDATA%\abcZ\factory_assign_undo.json, and reads it back. Then it makes these changes on the adapter you chose:
- On an adapter that uses DHCP, it switches on the Windows setting that lets a DHCP address and a fixed address exist together, and reads the setting back. If it does not read back as switched on, the tool adds no address and stops.
- It adds a temporary address, 192.168.1.250, or the next free address down to 192.168.1.240 if that one is in use.
- It adds a route to 192.168.1.1 through that adapter.
Windows does not save the temporary address and the route: they would also disappear when the PC restarts. The DHCP and fixed address setting is changed with netsh, and Windows may keep that change, also after a restart, until the tool sets it back. The setting is there so that the adapter keeps its own addresses; if the tool finds DHCP switched off afterwards, it switches it on again (see How the tool undoes it).
Warning
Do not add a second address by hand to an adapter that gets its address from DHCP: Windows can switch off DHCP on that adapter and remove its DHCP address. This function avoids that with the setting described above.
How the tool undoes it
When the operation ends, whether it succeeded or not, the tool always undoes its changes: it removes the route and the temporary address, sets the DHCP and fixed address setting back to what it was, and, if it finds DHCP switched off on an adapter that used DHCP, switches it on again and renews the address of that adapter only. If the adapter had a DHCP address before, the tool then waits up to 60 seconds for it to come back.
Then it reads the adapter again and checks that the route and the temporary address are gone, that DHCP and the DHCP and fixed address setting are as before, and that a DHCP address is back if there was one. If all checks pass, the log says "RESTORE: complete - temporary address and route removed, adapter as before" and the tool deletes the clean-up record; if it cannot delete it, a line with "RESTORE: clean-up record NOT removed" follows. If a check fails, the log shows a line with "RESTORE: INCOMPLETE" that names the problems, and the record is kept.
Stop does not interrupt the administrator process. The log says "Stop cannot interrupt the administrator step: it always removes the temporary address itself." and the tool waits for it to finish.
Using it in the window
- On the Discovery tab, check User, Password and Port. They start as admin, admin and 80, the factory values; change them if the device uses others. Wait until no other task is running.
- Click Assign Address at Factory IP.... The tool reads your PC's connected network adapters, which can take up to a minute on some PCs, and opens its window.
- In Adapter, choose the adapter of your PC that the device is connected to, directly or through a switch. Each entry shows the adapter name, its description and its addresses. The first adapter without an address in 192.168.1.x is chosen beforehand: check that it is the right one.
- Type the device's New IP, Subnet mask (255.255.255.0 is filled in) and Gateway for the network where it will be used.
- Click Assign.... A second window shows the new address and the adapter; type SET to go on. Anything else stops here, and the log says "Assign at factory IP aborted (confirmation text mismatch)."
- Allow the administrator permission that Windows asks for.
- When the device has been read, the tool asks you to confirm it (see the next section). Click Yes only if it is the device you mean.
The window does not block the rest of the tool. If another task is running when you type SET, the tool starts nothing, the log says "A task is running - wait until it ends (or use Stop) before sending device commands. Nothing was changed." and the window stays open.
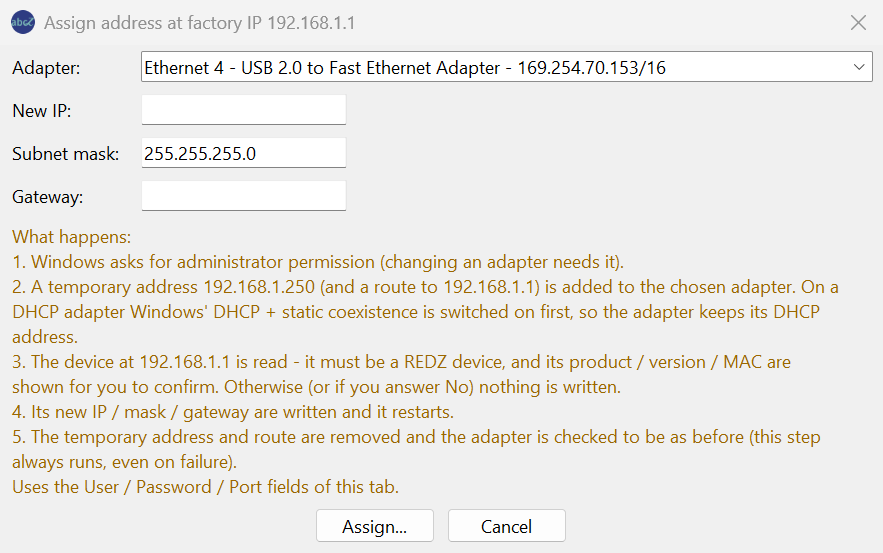
The window also lists, in five steps, what will happen.
Cancel or Esc closes the window without changing anything.
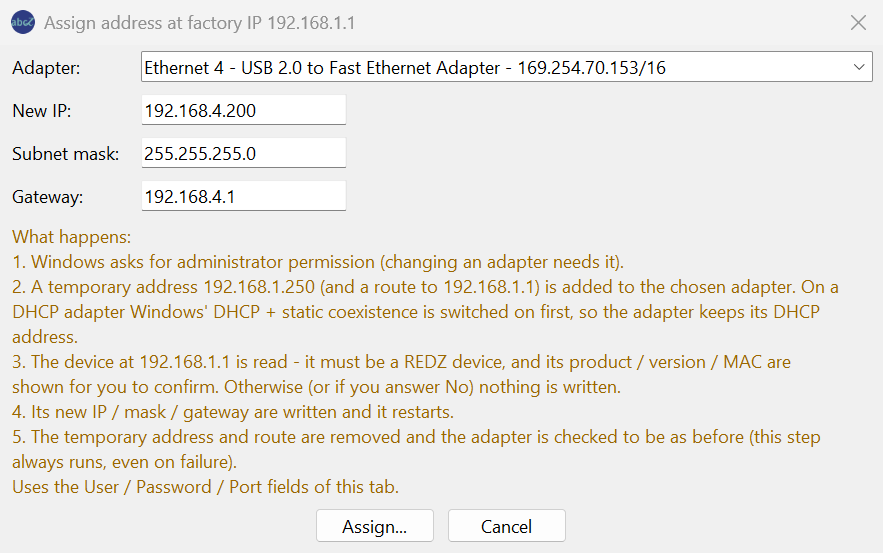
Confirming the device before anything is written
Through the temporary address the tool reads the device's start page. It goes on only if the page is a REDZ device page. If nothing answers within about 20 seconds, if the device answers with an HTTP error (for example because of a wrong password), or if the page is not a REDZ device page, the tool stops before writing anything.
It also reads the device's MAC address: from the page, if needed from a second reading of the page, and otherwise from your PC's table of the hardware addresses it has seen. The log line beginning with "Device at 192.168.1.1:" shows the product, version and MAC, and where the MAC came from.
Several devices at their factory address on the same network all use 192.168.1.1, and the tool cannot know beforehand which one answers. That is why it shows you the product, version and MAC address in the Confirm device question, with the new address, before it writes. The question's default answer is No.
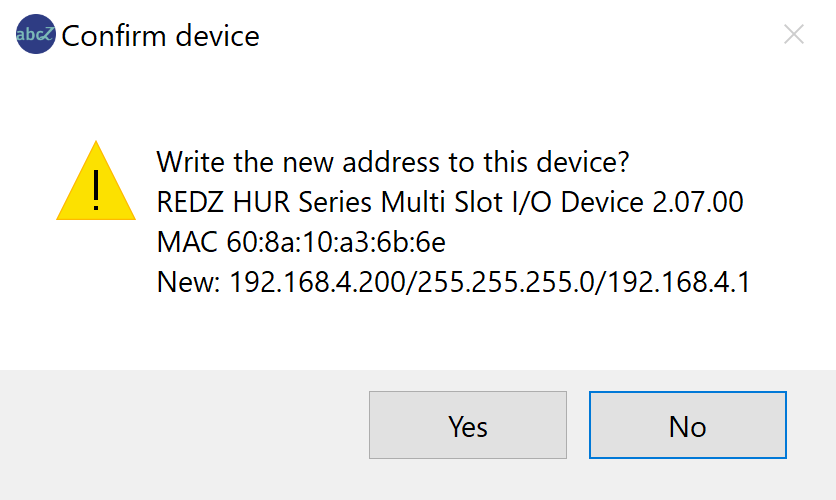
Compare the MAC with the label of the device you mean before you click Yes. If the MAC could not be read, the question shows a question mark in its place, and you cannot tell devices apart: click Yes only if exactly one device at its factory address is connected to that adapter, otherwise click No.
If you click No, or do not answer within 300 seconds, nothing is written. The question can stay open after that time; a Yes after 300 seconds writes nothing either, even if the log then says the device was confirmed, and the result line says FAILED at 'confirm'. In every case the tool still undoes its changes on your PC.
The tool does not check which REDZ product it found: any REDZ device at 192.168.1.1 is accepted. Your answer to the question is the check.
The new address and the restart
The tool reads the device's current network settings, then writes the new IP address, subnet mask and gateway as a fixed address. The other address settings, such as the DNS servers, are sent back as they were read. If the current settings cannot be read completely, nothing is written.
Then it sends the restart command. The tool does not check that the device starts with its new address. If the restart command fails, the save has already been sent: switch the device off and on to apply it, then scan the new address.
Firmware that confirms commands answers the save and the restart with a confirmation. Older firmware, including all version 2 firmware, only receives them; the log then says "accepted (HTTP 200; device gives no acknowledgement on this firmware)". The chapter Device actions explains these result texts.
A lost answer to the save, shown as sent, response lost, is treated as saved, and the restart is sent.
The tool does not look for the device at its new address afterwards. Scan the new address from a PC that can reach that network to see it there.
Warning
The new address cannot be undone from here. After the restart the device is reachable only at its new address. To change it again, reach the device there and use Set IP / Subnet / Gateway (one device)..., as described in the chapter Device actions.
The new IP address must be a normal single address and must not be the network or broadcast address of its subnet, 192.168.1.1 itself, or one of the tool's temporary addresses 192.168.1.240 to 192.168.1.250. The subnet mask must leave room for at least two devices.
The tool checks only that the gateway is written as an IPv4 address. It does not check that the gateway is in the device's new subnet, so check it yourself before you type SET.
When the tool refuses
Before it changes anything on your PC, the tool checks the situation. If a check fails, it refuses, and your PC's network settings are not changed. The most common cases are:
- The tool cannot read the chosen adapter at all.
- The chosen adapter is not connected.
- The adapter already has an address in 192.168.1.x.
- The tool cannot read whether the adapter uses DHCP, or, on a DHCP adapter, cannot read the DHCP and fixed address setting.
- On a DHCP adapter, the adapter name contains a double quote.
- A route to 192.168.1.1 already exists on the adapter. The tool does not touch what it did not add.
- All temporary addresses 192.168.1.240 to 192.168.1.250 are already in use on the PC or on the network.
- The new IP address, subnet mask or gateway is not valid.
- On the command line: the
--adapternumber is not valid, or the value of--expect-macis not a MAC address. - In the window: the password cannot be protected for the administrator process or read back by it (see What the tool changes on your PC), or the administrator process does not run with administrator rights.
- A clean-up record from an earlier run still exists.
- The clean-up record cannot be written and read back. If it was written but reads back differently, the file stays, and the next run offers the clean-up first.
Result lines
When the operation ends, the log shows one result line beginning with "Assign at factory IP:". The lines above it, beginning with [factory-ip], show each step.
| Result | Meaning |
|---|---|
| SUCCESS | The device was read and confirmed, and the save of the new address and the restart were sent without a refusal or an HTTP error. Unless the device confirmed them (firmware that confirms commands), this does not prove that it took the new address: scan the new address to check. Your PC's adapter was checked and is back as it was. The line names the product, MAC and new IP. |
| NOT STARTED | The administrator process did not start, for example because you declined the permission. Nothing changed. |
| REFUSED | A check before the start failed; the line gives the reason. Your PC's network settings did not change. |
| NETWORK CLEAN-UP NOT CONFIRMED | The tool could not confirm that your PC's adapter is back as it was, or the administrator process did not finish within 900 seconds, counted from its start and including the time the Confirm device question was open; it may still finish on its own. If a clean-up record is left, the clean-up is offered again at the next start. |
| FAILED at | The operation stopped at the named step; the line gives the reason. Except for FAILED at 'None' (see below), the tool undid its changes on your PC and checked them. |
The steps are, in this order: 'coexistence' (DHCP adapters only), 'add_address', 'add_route', 'identity', 'confirm', 'net_read', 'set_network' and 'reboot'. A FAILED line at a step before 'set_network' means that nothing was written to the device. At 'set_network' the device refused the save, did not receive it or answered with an HTTP error, and the tool sent no restart. At 'reboot' the save was sent, but the restart failed: switch the device off and on, then scan the new address.
If the line says FAILED at 'None', the administrator process ended without a result, and nothing checked your adapter, although the line says it was restored. Click Assign Address at Factory IP... again or start the tool again: if a clean-up record was left, the tool offers the clean-up.

A clean-up that did not finish
If the operation was interrupted, for example because the PC lost power, the clean-up record stays. The next time you start the tool, the log warns that a temporary address or route may still be on a network adapter, and the Pending network clean-up question asks whether to clean up now.
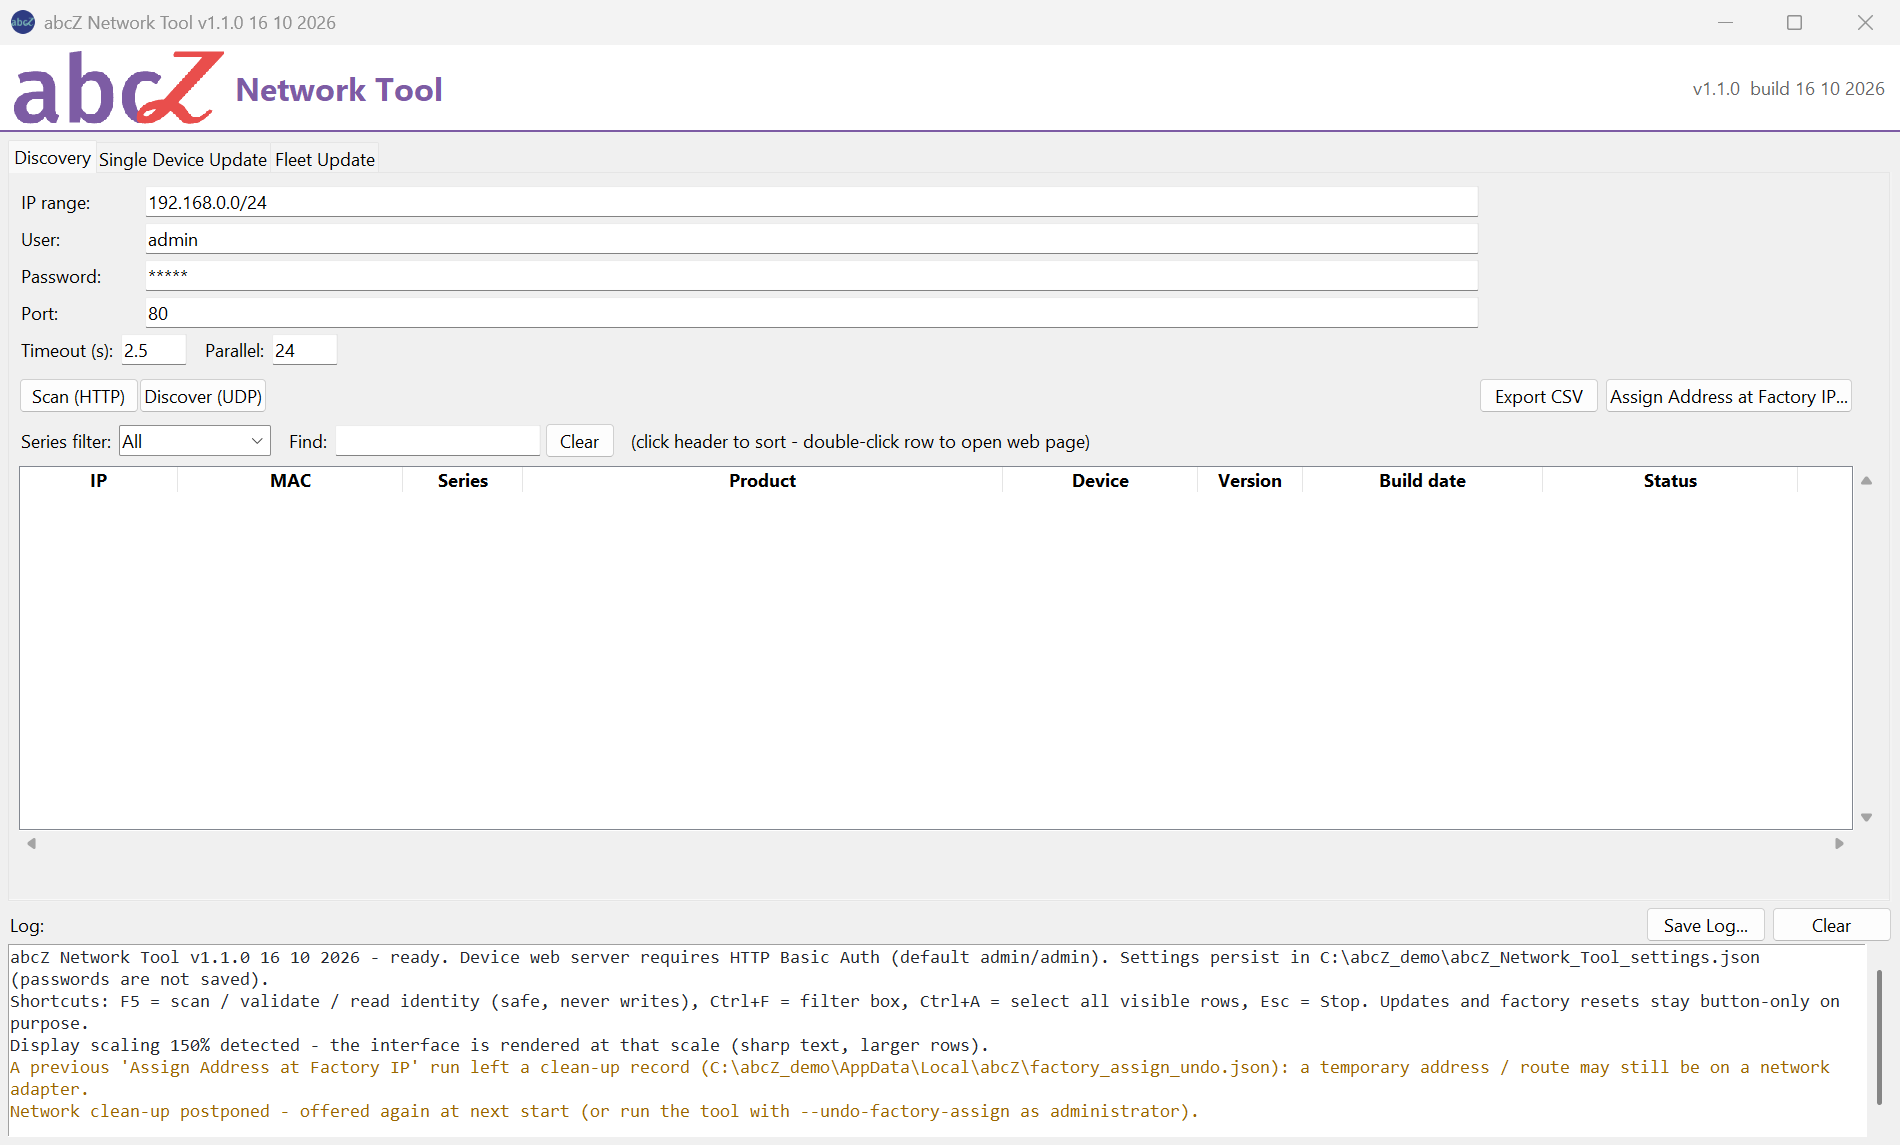
If you click Yes, Windows asks for administrator permission, and the tool runs the same undo and checks as after a normal run. The log ends with "Network clean-up: complete.", with a line beginning with "Network clean-up: NOT STARTED" if the administrator process did not start, for example because you declined the permission, or with a line that says what is not complete.
If you click No, the question comes again at the next start. While the record exists, Assign Address at Factory IP... offers the clean-up instead of a new run.
If the record itself cannot be read, the log asks you to check the adapter by hand for a temporary address between 192.168.1.240 and 192.168.1.250 and a route to 192.168.1.1. The tool keeps the unreadable record, so it asks again at every start and the function stays blocked: after you have checked the adapter, delete %LOCALAPPDATA%\abcZ\factory_assign_undo.json by hand.
From the command line
On the command line, run abcZ_Network_Tool.exe from a command prompt opened as administrator. The command line does not ask for the permission itself; without it the tool refuses. Only the list of adapters, described next, also works without administrator rights.
--assign-factory-address without --adapter lists the connected adapters with their number (ifIndex), name, DHCP state and addresses, and changes nothing. Then give the number of the adapter with --adapter and the new settings with --new-ip, --mask and --gateway, for example:
abcZ_Network_Tool.exe --assign-factory-address --adapter 12 --new-ip 192.168.4.200 --mask 255.255.255.0 --gateway 192.168.4.1
If the device does not use the factory user name and password (admin / admin) or port 80, add --username, --password and --port.
The tool then asks on the console, after it has read the device, "Write new address to this device? [y/N]" and shows the product, version, MAC and new address. Only y or yes writes. The question has no time limit: until you answer, the temporary address and the route stay on the adapter.
With --expect-mac and the MAC address you expect, written as aa:bb:cc:dd:ee:ff, aa-bb-cc-dd-ee-ff or aabbccddeeff, the tool does not ask. It writes only if the device has exactly that MAC address; a device whose MAC cannot be read is not written either. Use this in scripts. A value that is not a MAC address is refused before anything changes.
Without --expect-mac and without a console to answer on, the tool refuses.
--undo-factory-assign runs the clean-up of an interrupted run from its record, also as administrator. Without a record it says there is nothing to do.
The clean-up record belongs to the Windows user who started the run. Run --undo-factory-assign in a command prompt of that same user, opened with Run as administrator; a prompt of another Windows account does not see the record and reports that there is nothing to do. The clean-up question of the window always uses the right record.
Both options end with their own exit codes, listed in the chapter Command line reference: 0 done, 1 failed but the adapter was restored, 2 refused with nothing changed, 3 network clean-up not complete.
Single Device Update
The Single Device Update tab updates the firmware of one device. You type its address, choose the image file, read the device's identity and start the update. The log below the tabs shows every step.
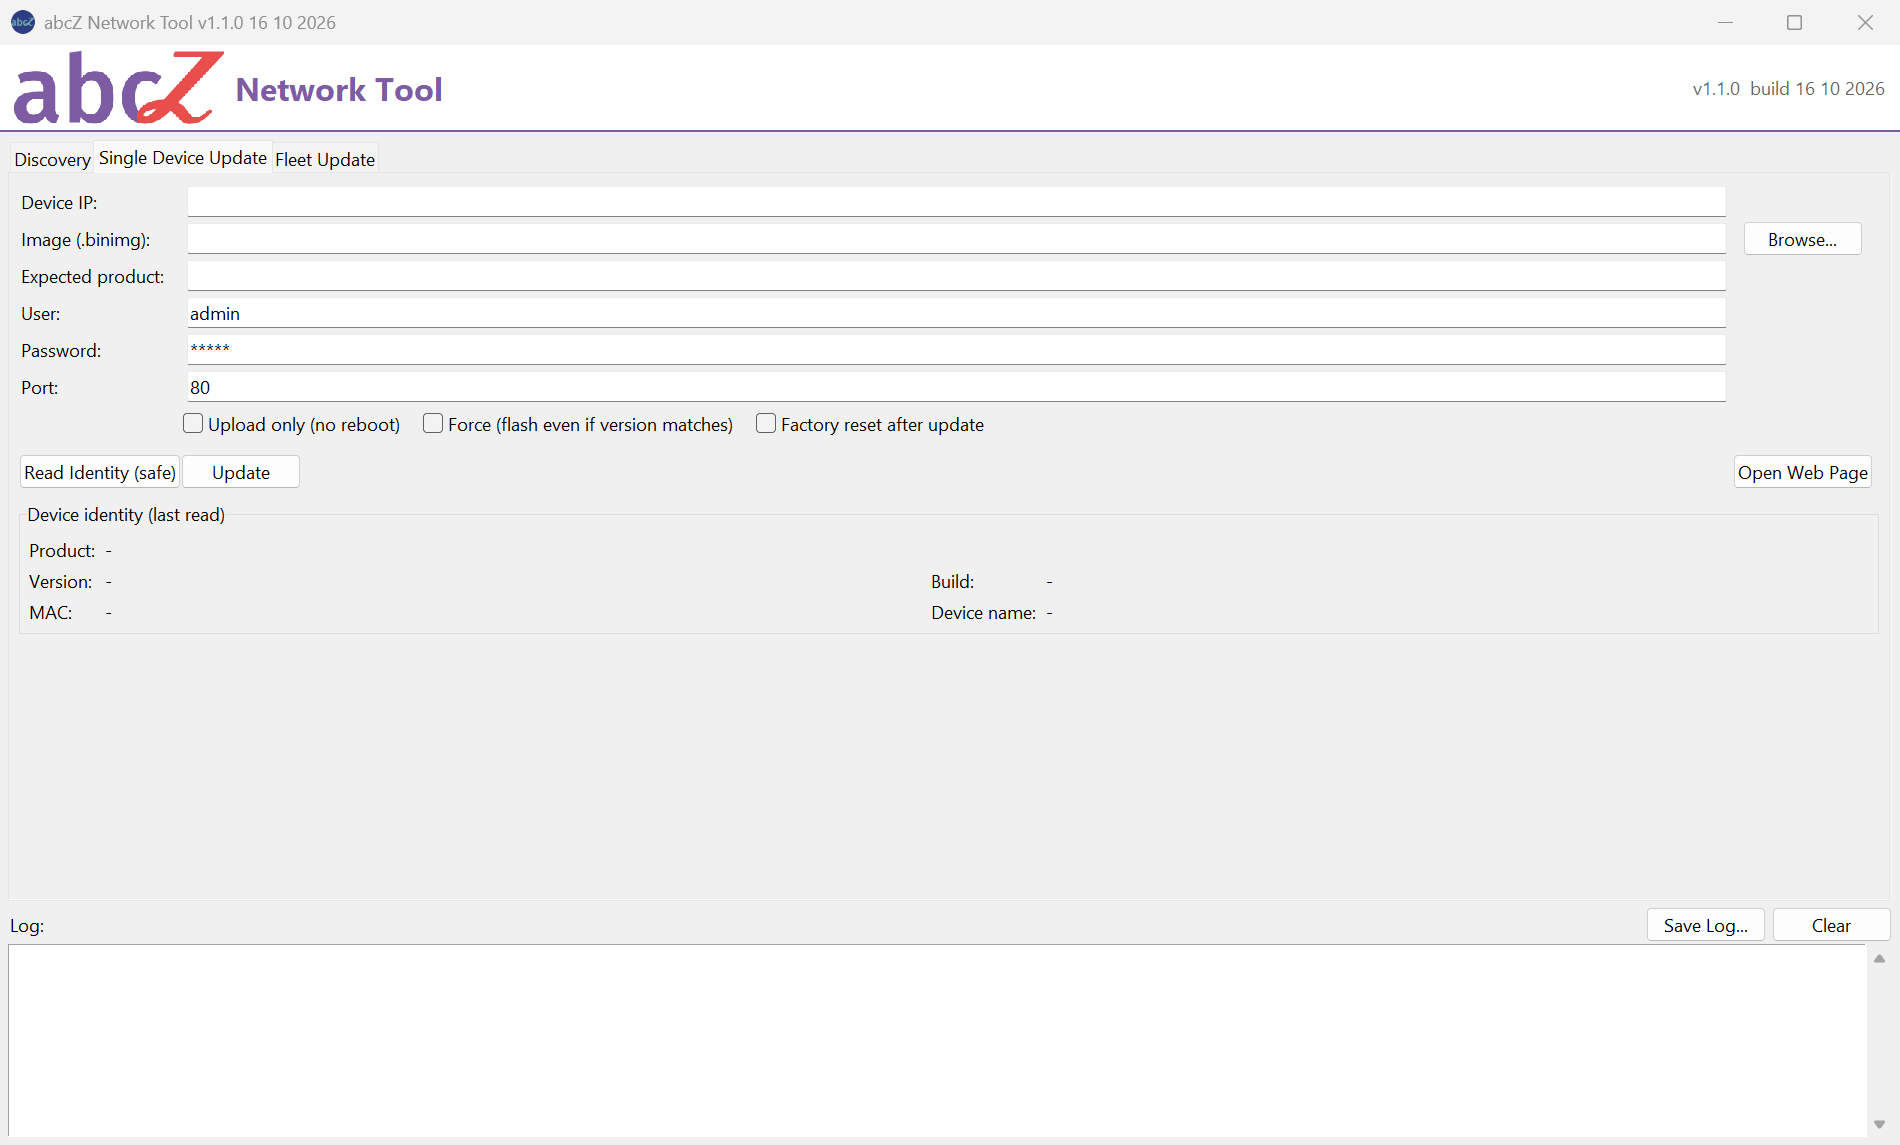
The fields
| Field | What you enter |
|---|---|
| Device IP | The address of the device, for example 192.168.0.137. |
| Image (.binimg) | The firmware image file. The Browse... button next to this field opens a file dialog that lists .binimg files. |
| Expected product | The product name you expect the device to report. The update stops if the device reports another name. Left empty, this check is skipped. |
| User | The user name of the device's web interface: admin. |
| Password | The password of the device's web interface (factory setting admin). It is shown as stars. |
| Port | The port of the device's web server, normally 80. |
The tool remembers Device IP, Image (.binimg), Expected product, User and Port when you close it and fills them in again at the next start. The password is not saved: it is admin again at every start.
The three check boxes are off at every start:
- Upload only (no reboot) writes the image into the device's alternative firmware bank and stops there. The device keeps running its present firmware.
- Force (flash even if version matches) writes the image also when the device already runs the version in the image file name.
- Factory reset after update sends the command that restores the device's factory configuration, after a confirmed update.
The sections below describe each of them.
Reading the identity
Click Read Identity (safe) to read what the device reports about itself. The tool reads the device's start page, as a browser does, and changes nothing on the device. Use it first, to check the address and the password.
The log shows the product name, the firmware version and the build date. The panel Device identity (last read) below the buttons shows them too, together with the MAC address and the device name you gave the device in its web interface:
| Line | Meaning |
|---|---|
| Product | The product name the device reports. Expected product is compared with this name. |
| Version | The firmware version that runs on the device. |
| Build | The build date of that firmware. |
| MAC | The MAC address of the device. |
| Device name | The device name set in the device's web interface. |
A value the device does not report is shown as a dash.
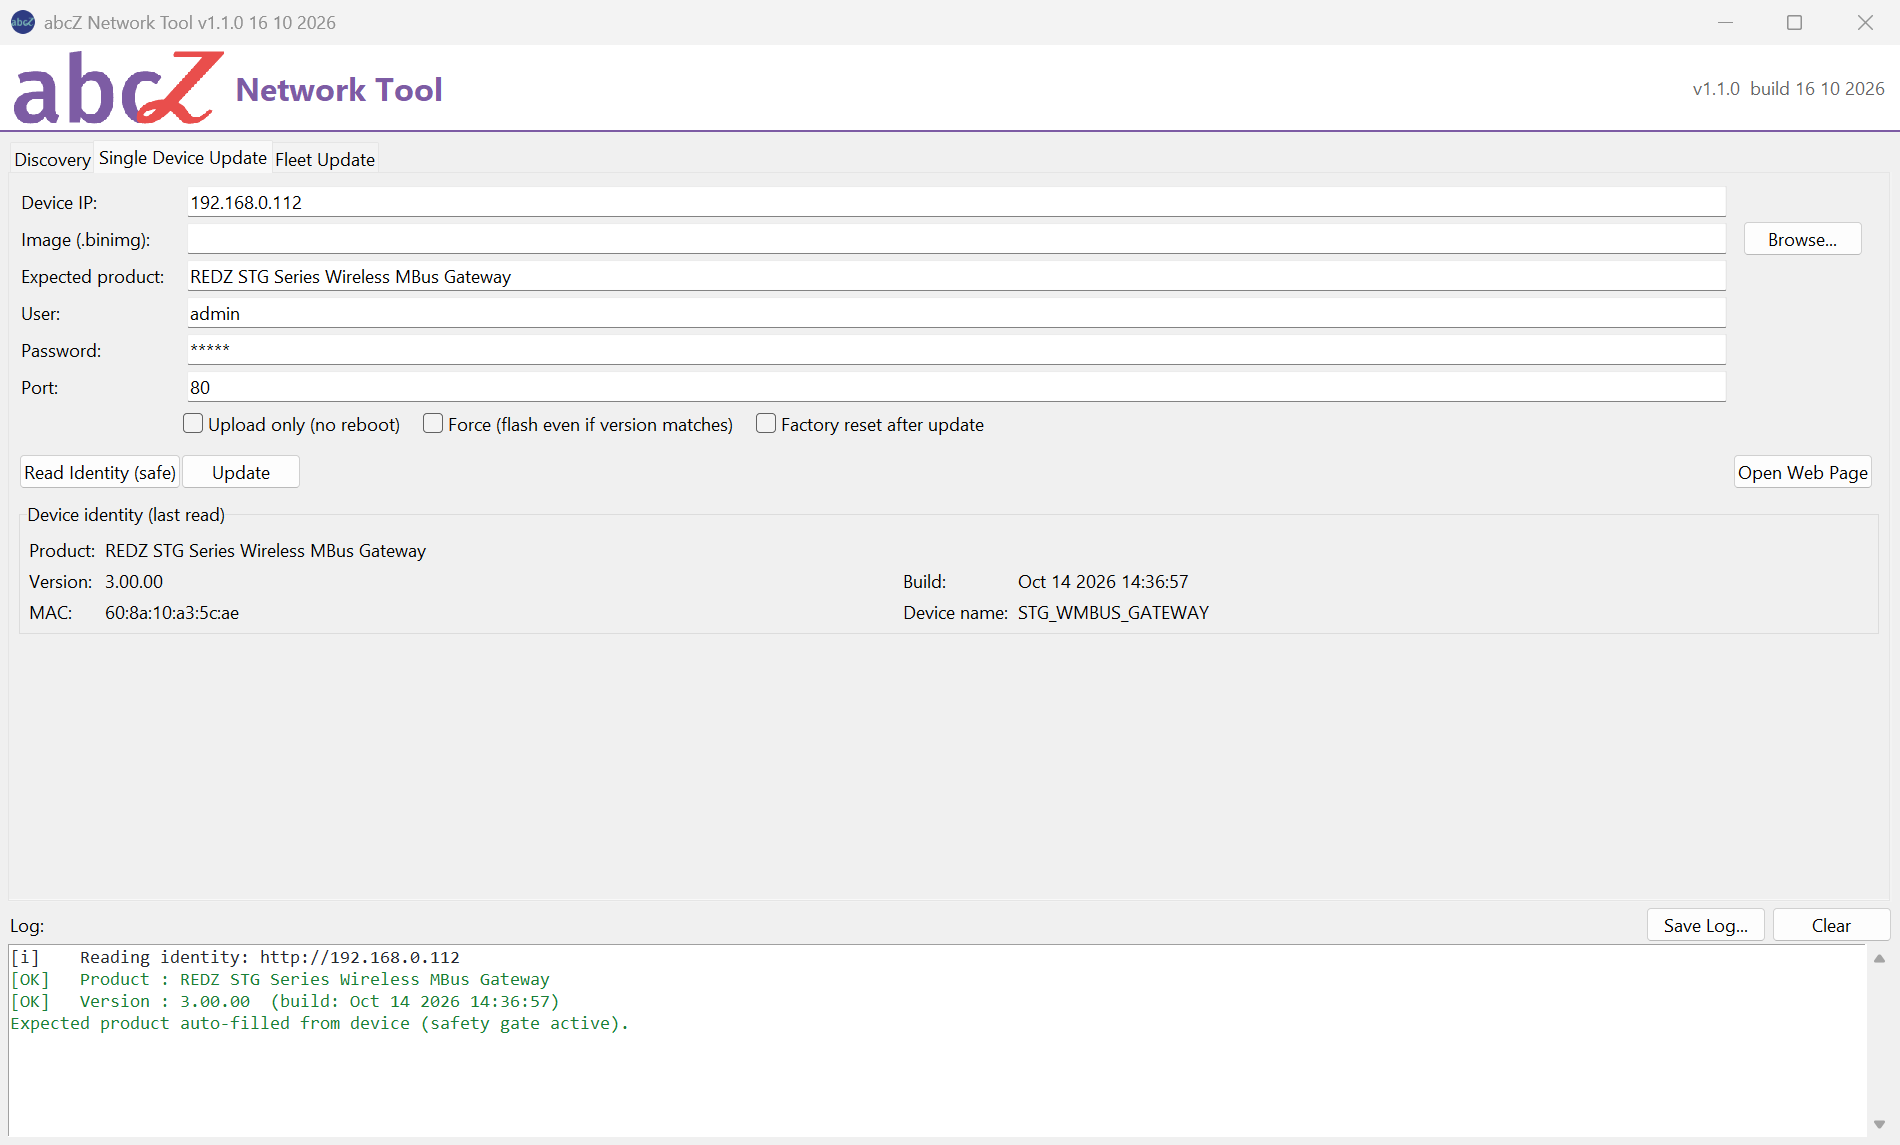
If Expected product is empty, the tool fills it with the product name it has just read and writes "Expected product auto-filled from device (safety gate active)." in the log. If the field already holds a name, the tool leaves it as it is.
Note
A product name filled in this way comes from the device itself. The product check of the update then confirms only that the device at this address is still the same product; it does not tell you whether the image is right for it. Check that the image file is the one for this product before you click Update.
Because the tool remembers Expected product, the field may still hold the name of the device you updated last time. Compare it with the Product line of the panel. If you update a device of another product, empty the field and read the identity again.
The panel shows the values of the last Read Identity (safe). An update does not refresh it; click Read Identity (safe) again after an update to see the new version there.
If the device cannot be read, the log shows "Could not read identity:" and the reason. When the device refuses the password, the log adds a line that asks whether the password is correct. If a read fails, the panel keeps the values of the previous read.
F5 does the same as Read Identity (safe) when this tab is open, Device IP is filled and no other task is running.
The Open Web Page button of this tab opens the web interface of the device in Device IP in your default browser. The browser asks for the device's user name and password. The button also works while an update runs.
The update steps
Fill Device IP and Image (.binimg) and click Update. The tool asks for confirmation first (see Confirming the update, below). After you confirm, it runs these steps one after the other and writes each of them in the log:
- Identity. The tool reads the product name, version and build date from the device. If the device does not answer, it tries up to three times. If it still cannot read them, the update ends with IDENTITY READ FAILED and nothing is written.
- Product check. If Expected product is filled, the tool compares it with the product name of the device; capital letters and extra spaces do not count. If they differ, the update ends with PRODUCT MISMATCH and nothing is written. Nothing overrides this check. If the field is empty, the log says "
--expected-productnot given: PRODUCT SAFETY CHECK SKIPPED." and the update goes on. - Version check. If the image file name contains a version and the device already runs it, the update ends with SKIPPED (version) and nothing is written, unless Force (flash even if version matches) is ticked.
- Image and device check. If a release file next to the image gives a checksum and the file does not match it, the update ends with IMAGE INVALID and nothing is written. The tool then compares what the image is for with the product name and variant the device reports. If they do not match, it asks you whether to go on (see below). If the device name cannot tell an EMH meter from a Lite one and the device does not declare its variant, the log warns that this field was not checked. Other fields that the device does not report are skipped without a warning.
- Image file. If the image file does not exist, the update ends here with IMAGE FILE MISSING and nothing is written. The tool checks the file only at this point, after the identity, product and version checks.
- Upload. The tool sends the image to the device, which writes it into its alternative firmware bank. The firmware that runs now is not touched. The device answers with the version and build date of the image it has received, and the log shows them after "Upload OK". If the device rejects the image, the update ends with IMAGE INVALID or ALT IMAGE DISABLED; if the upload fails on the network after the retries, it ends with UPLOAD ERROR. In each case the running firmware is unchanged.
- Bank switch. The tool sends the command that makes the device restart into the new image. It sends this command once and never repeats it, because a second switch would turn the device back to the old bank. If the device refuses the command or cannot be reached, the update ends with BANK SWITCH REFUSED; the device keeps running its old firmware.
- Confirmation. The tool waits 12 seconds for the restart, then reads the start page of the device up to five times. The update counts as done only when the device reports the version and the build date that the upload answer gave. The log then shows "CONFIRMED" and the new version.
- Search by MAC address. If the new firmware is not confirmed at the old address and the tool knows the device's MAC address, it looks for that MAC address among the addresses that share the first three numbers of the old address. If it is not found there and the old address is not in 192.168.1.x, the tool also tries the factory address 192.168.1.1; if the device does not answer there either, the log says so, together with hints on how this PC can reach that address. If it finds the device at another address, the log says so and the confirmation is made there. If the tool could not read the MAC address before the update, the log says that it cannot search for the device at another address.
The last log line starts with "RESULT:" and gives the device address and the result in square brackets, for example SUCCESS. It is green for SUCCESS and UPLOADED (no reboot), amber for SKIPPED (version) and red for every other result, also for UPDATED, FACTORY RESET FAILED. The chapter Results and reports lists all results.
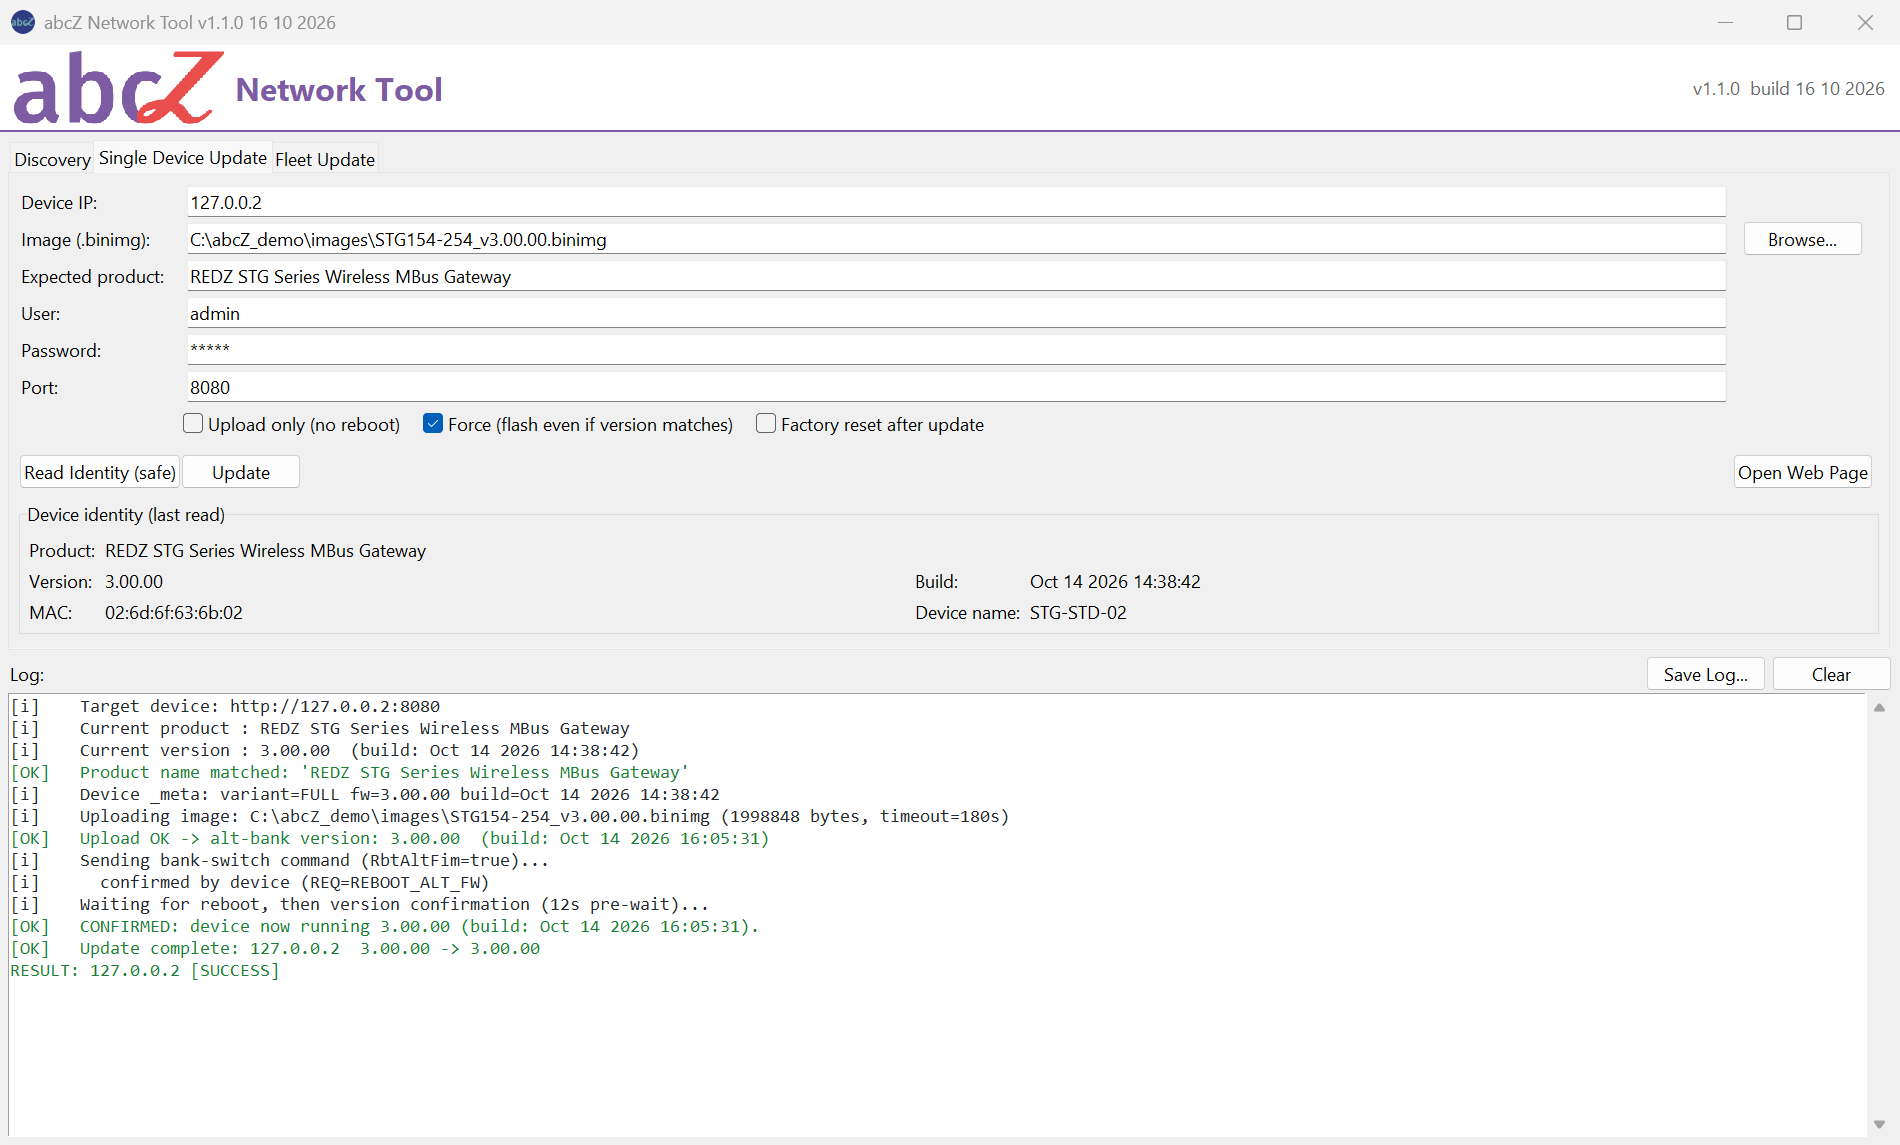
If the tool cannot confirm the new firmware, the result is NOT CONFIRMED. The image was sent and the bank switch was sent; the device may still be restarting or may have another address. The log lists the possible reasons and, when the address is not in a network of this PC or is the factory address, what you can do to reach the device. Wait, then find the device with Scan (HTTP) on the Discovery tab and read its version. If it still runs the old version, you can run the update again: the tool sends the image again before it sends the bank switch.
If the device has fallen back to the factory address 192.168.1.1 and this PC cannot reach that address, the chapter Assigning an address at the factory IP explains how to give it a new address.
If the device came back at another address, the log notes the old and the new address. Use the new address from then on; the tool does not change Device IP for you. The chapter Firmware generations (v2 / v3) explains when this happens.
When the image does not look right for the device
When the image and the device do not match, the window "Image / device mismatch" lists each difference as what the image says and what the device reports, with the image file name and the product name of the device. The window warns that a wrong variant can leave the device inoperable and that the device itself cannot catch this case. No is the preselected answer.
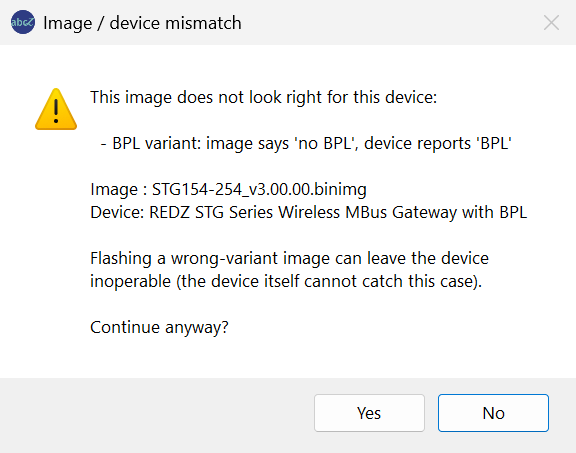
- Answer No, and the update ends with IMAGE/DEVICE MISMATCH. Nothing is written.
- Answer Yes only when you are sure the image is right, and the update goes on. The log notes that you confirmed it.
The chapter Safety checks describes what this check compares and what it cannot see.
Version skip and Force
The tool takes the target version from the image file name: a part such as _v3.00.00, or else a number in the form 3.00.00. If the file name has no version, the version check never skips the device.
If the device already runs that version, the tool stops after the product check, writes nothing and ends with SKIPPED (version). The comparison uses the version only, not the build date.
Tick Force (flash even if version matches) to write the image anyway, for example a newer build with the same version number. Force changes only this version check; the product check and the image and device check still apply.
Upload only
With Upload only (no reboot) ticked, the tool runs the steps up to the upload and stops before the bank switch. The image waits in the alternative bank, the device keeps running its present firmware, and the result is UPLOADED (no reboot).
The tool has no separate command for the bank switch. To start the waiting image later, run the update again without Upload only (no reboot): the tool then writes the image again and sends the bank switch. If the image has the same version number as the running firmware, tick Force (flash even if version matches) for this run.
Factory reset after the update
With Factory reset after update ticked, the tool restores the device's factory configuration, but only after the new firmware is confirmed. It is not sent when the device was skipped, when the update failed or was not confirmed, or when Upload only (no reboot) is ticked.
Warning
A factory reset cannot be undone. Every setting of the device is lost, the device restarts again, and it may get another address from the DHCP server. Note the settings you need before you start.
If the device refused the reset, answered it with an error, or could not be reached, the log shows an error line for it, and the result is UPDATED, FACTORY RESET FAILED, in red: the new firmware runs and is confirmed, but the factory reset you asked for was not done.
Otherwise the result reads SUCCESS (factory reset). This means that the reset command reached the device and was not refused; it does not always prove that the reset was done. Only a device whose firmware acknowledges commands confirms the reset; older firmware gives no confirmation, and the answer can also be lost while the device restarts. The log line about the factory restore says which case it was. If it does not say that the device confirmed the reset, check the device's settings when it is reachable again.
If you still need the reset, use Restore Factory Configuration (selected)... on the Discovery tab: scan for the device there, select its row, and type RESTORE when the tool asks you to confirm. That command uses the User and Password fields of the Discovery tab, not those of this tab.
Confirming the update
Before it starts, the tool shows the Confirm window that opens after Update. It asks one question with Yes and No: "Start FULL update (upload+reboot)?", or "Start upload only?" when Upload only (no reboot) is ticked. It shows the device address and the image file name, and it adds a line when:
- the image file name has a version and Force (flash even if version matches) is off: the device is skipped if it already runs that version;
- Factory reset after update is ticked (and Upload only (no reboot) is not): all settings are lost and the address may change.
Click No to go back without touching the device. Check the address and the file name before you click Yes.
Stopping an update
While the update runs, a Stop button appears next to the log title; Esc does the same. The step that is running finishes or times out first. What the device has then received depends on when you stop:
| Stopped | State of the device |
|---|---|
| Before the upload starts | Not touched. |
| While the image is sent | The upload runs to its end; it can only write the alternative bank. The running firmware is unchanged. |
| After the upload, before the bank switch | The bank switch is not sent. The image waits in the alternative bank; the running firmware is unchanged. |
| During the confirmation | The bank switch was already sent. Read the device's version yourself when it is reachable again. |
A stopped update normally ends with CANCELLED (stopped). If a step had already decided the result before the stop took effect, that result is shown instead.
Fleet Update
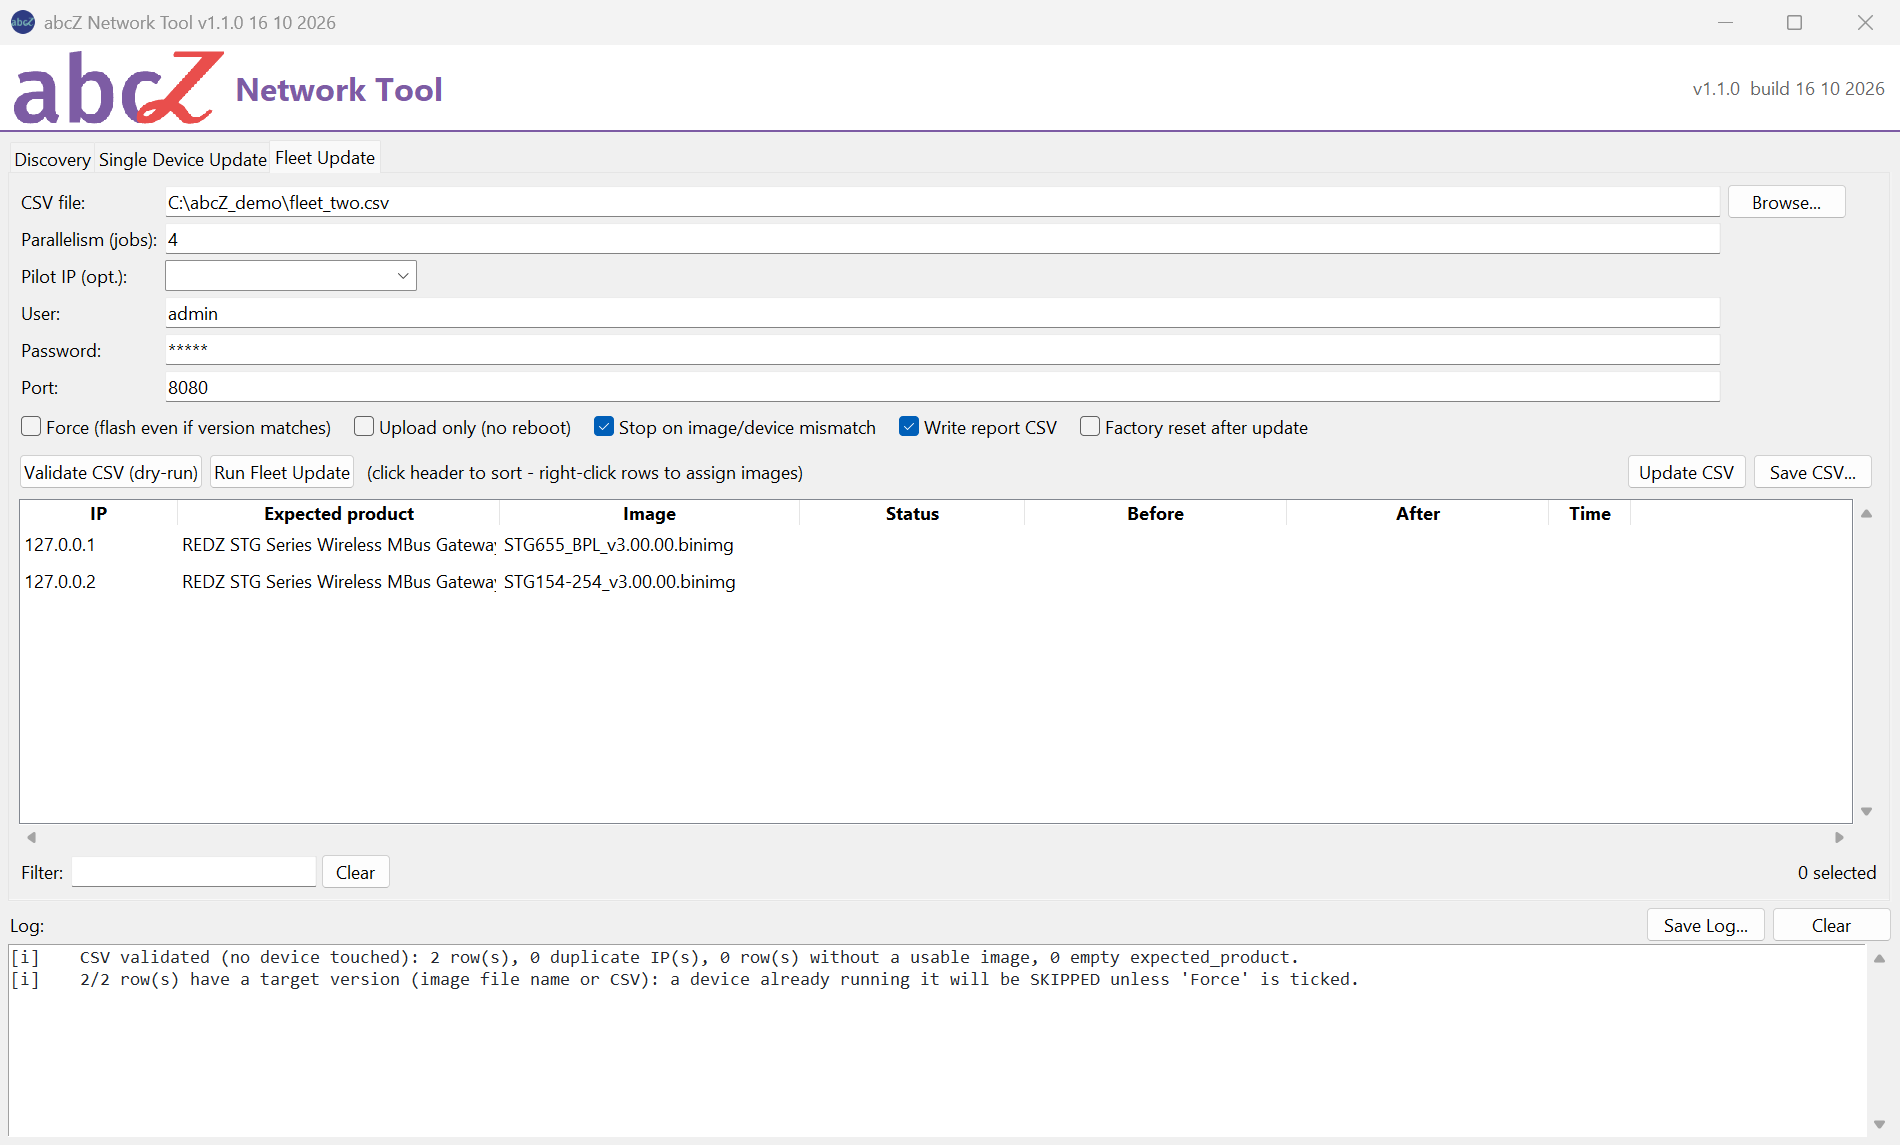
The Fleet Update tab updates a list of devices. The list comes from a CSV file; the tool shows it as a table, lets you check it and assign image files, and then updates every device of the table. Each device goes through the same steps as on the Single Device Update tab, described in the chapter Single Device Update.
The device list file
The device list is a CSV file with a header line. It needs the columns ip, expected_product and image_path; target_version is optional. One line describes one device:
| Column | Content |
|---|---|
| ip | The address of the device. A line with an empty ip, or an ip that starts with #, is skipped. |
| expected_product | The product name the device must report. Left empty, the product check is skipped for this device. |
| image_path | The firmware image file. A full path, such as C:\fw\image.binimg, is used as it is; any other path is taken as relative to the folder of the CSV file. It may be empty; you can assign images in the table. |
| target_version | Optional. A version to compare with the running version for the version check, instead of the version in the image file name. The tool does not check that the image contains this version. |
Write the column names in lower case, exactly as above, with no spaces before or after them. A header in capitals (for example IP) is not read: the tool then finds no devices in the file.
Save the file as UTF-8 with commas between the columns. Excel's "CSV UTF-8" format is accepted only if Excel writes commas; with a language setting that uses semicolons the tool reports "CSV columns missing". A file in another encoding that contains non-English letters, for example in a folder name, ends with "Could not read CSV".
An example with the images in a folder fw next to the CSV file:
ip,expected_product,image_path,target_version
192.168.0.135,<product name>,fw/<image file>.binimg,
Export CSV on the Discovery tab writes such a file and opens it on this tab. It takes the selected rows of the Discovery table or, when no row is selected, the rows its filter shows, and of these only the devices whose product name was read. In the file, ip and expected_product are filled and image_path is empty.
The fields
| Field | What you enter |
|---|---|
| CSV file | The device list. The Browse... button next to this field opens a file dialog; after you choose a file, the tool checks it at once and shows it in the table. |
| Parallelism (jobs) | How many devices are updated at the same time; 4 unless you change it. |
| Pilot IP (opt.) | Optional. One address from the list that is updated first, alone. See Pilot device, below. |
| User, Password, Port | As on the Single Device Update tab; they apply to every device of the list. |
The tool remembers CSV file, Parallelism (jobs), Pilot IP (opt.), User, Port and the check boxes Stop on image/device mismatch and Write report CSV between sessions. The password is not saved, and the other three check boxes are off at every start.
The check boxes
| Check box | Effect |
|---|---|
| Force (flash even if version matches) | Writes the image also to a device that already runs the target version (target_version, or the version in the image file name). The product check still applies. |
| Upload only (no reboot) | Writes each image into the alternative bank and stops before the bank switch. The devices keep running their present firmware. |
| Stop on image/device mismatch | On by default. A device whose image does not look right for it is not written and ends with IMAGE/DEVICE MISMATCH; the other devices go on. Off, the tool writes the image anyway and says in the log that nobody was asked. The fleet never asks you per device, as the single update does; the Confirm window before the run warns you when this box is off. |
| Write report CSV | On by default. Writes a report file at the end of the run (see The report file, below). |
| Factory reset after update | After a confirmed update, sends the command that restores the factory configuration of that device. Not sent to devices that were skipped or failed, and not at all with Upload only (no reboot). A device that refuses the reset, answers it with an error or cannot be reached for it ends with UPDATED, FACTORY RESET FAILED. |
Warning
Factory reset after update cannot be undone. Every setting of each updated device is lost, and each device may get another address from the DHCP server.
Checking the list before a run
Validate CSV (dry-run) reads the CSV file again and fills the table, without sending anything to a device. F5 does the same on this tab. The log then shows a line "CSV validated (no device touched):" with the number of lines, of duplicate addresses, of lines without a usable image file and of lines with an empty expected_product.
If images are missing, the log tells you to assign them in the table or in the CSV file. If an expected_product is empty, it warns that those devices skip the product check. It also counts the lines that have a target version: those devices are skipped if they already run it, unless Force (flash even if version matches) is ticked.
Warning
Validate CSV (dry-run) replaces the table with the content of the file. Images you assigned in the table and not saved to the file are lost. Use Update CSV first if you want to keep them.
If an address appears twice, only its first line is used. The second line shows "duplicate (skipped)" in the table, and the device is updated once.
The table
| Column | Content |
|---|---|
| IP | The address of the device. |
| Expected product | The expected_product of the line, or (EMPTY!) when it is empty. |
| Image | The file name of the image: (none) when no image is set, MISSING: and the name when the file is not found. The version in this name is the target version, unless the CSV line gives a target_version. |
| Status | During the run, the step the device is in; at the end, the result. |
| Before | The version and build date the device ran before, filled as soon as its identity is read. |
| After | For a confirmed update, the version and build date now running. For SKIPPED (version), the version the device runs. For the other results after a successful upload, the version in the alternative bank, which is not running. Every other device with a result shows a dash; rows that were not run stay empty. Read it together with Status. |
| Time | How many seconds the device took. |
Click a column title to sort the table by it; click it again to reverse the order.
When a run starts, every row shows a dash and "queued..." without a colour; a duplicate line keeps "duplicate (skipped)". While a device is updated, its status shows the step: "reading identity (1/4)", "uploading (2/4)", "bank switch (3/4)", "confirming (4/4)" or "searching by MAC (4/4)". At the end it shows the result, for example SUCCESS; the chapter Results and reports lists them all.
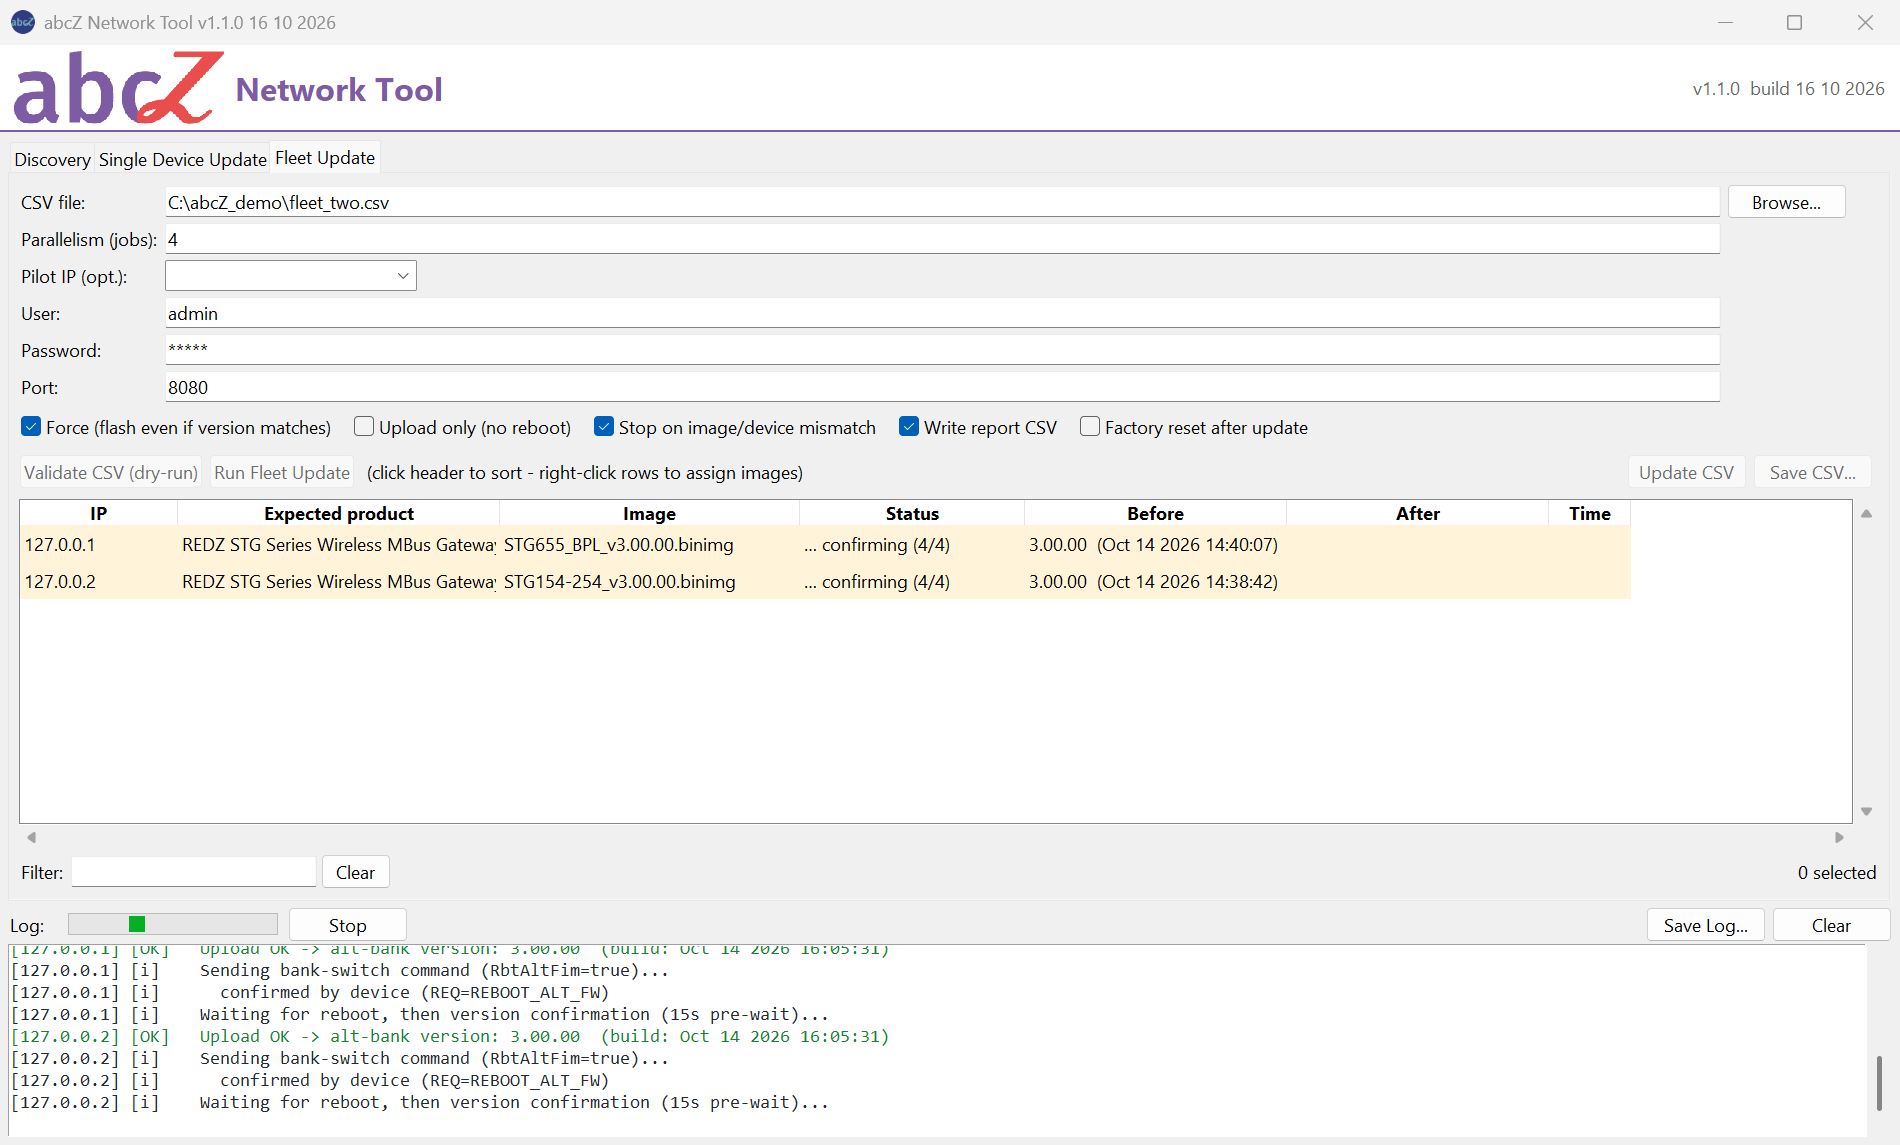
Each status starts with a symbol, and the row has a colour. The symbol remains when you copy or print the table, the colour does not:
| Symbol | Colour | Meaning |
|---|---|---|
| Three dots | Amber | The device is being worked on. |
| Tick | Green | SUCCESS or UPLOADED (no reboot). |
| Warning sign | Yellow | SKIPPED (version): the device already ran the target version. |
| Dash | Grey | Not run: CANCELLED (stopped), a duplicate line, or "not run (halted)" after a failed pilot. |
| Cross | Red | Any other result: the device was not updated, the update was not confirmed, or, for UPDATED, FACTORY RESET FAILED, the update was confirmed but the factory reset failed. |
If the device came back at another address, the status adds "(IP -> " and the new address. If a factory reset was sent to the device and the device neither refused it nor answered it with an error, the status adds "(factory reset)". This does not always prove that the reset was done: devices whose firmware gives no confirmation, or whose answer was lost, also get it. The log line of that device about the factory restore tells which case it was.
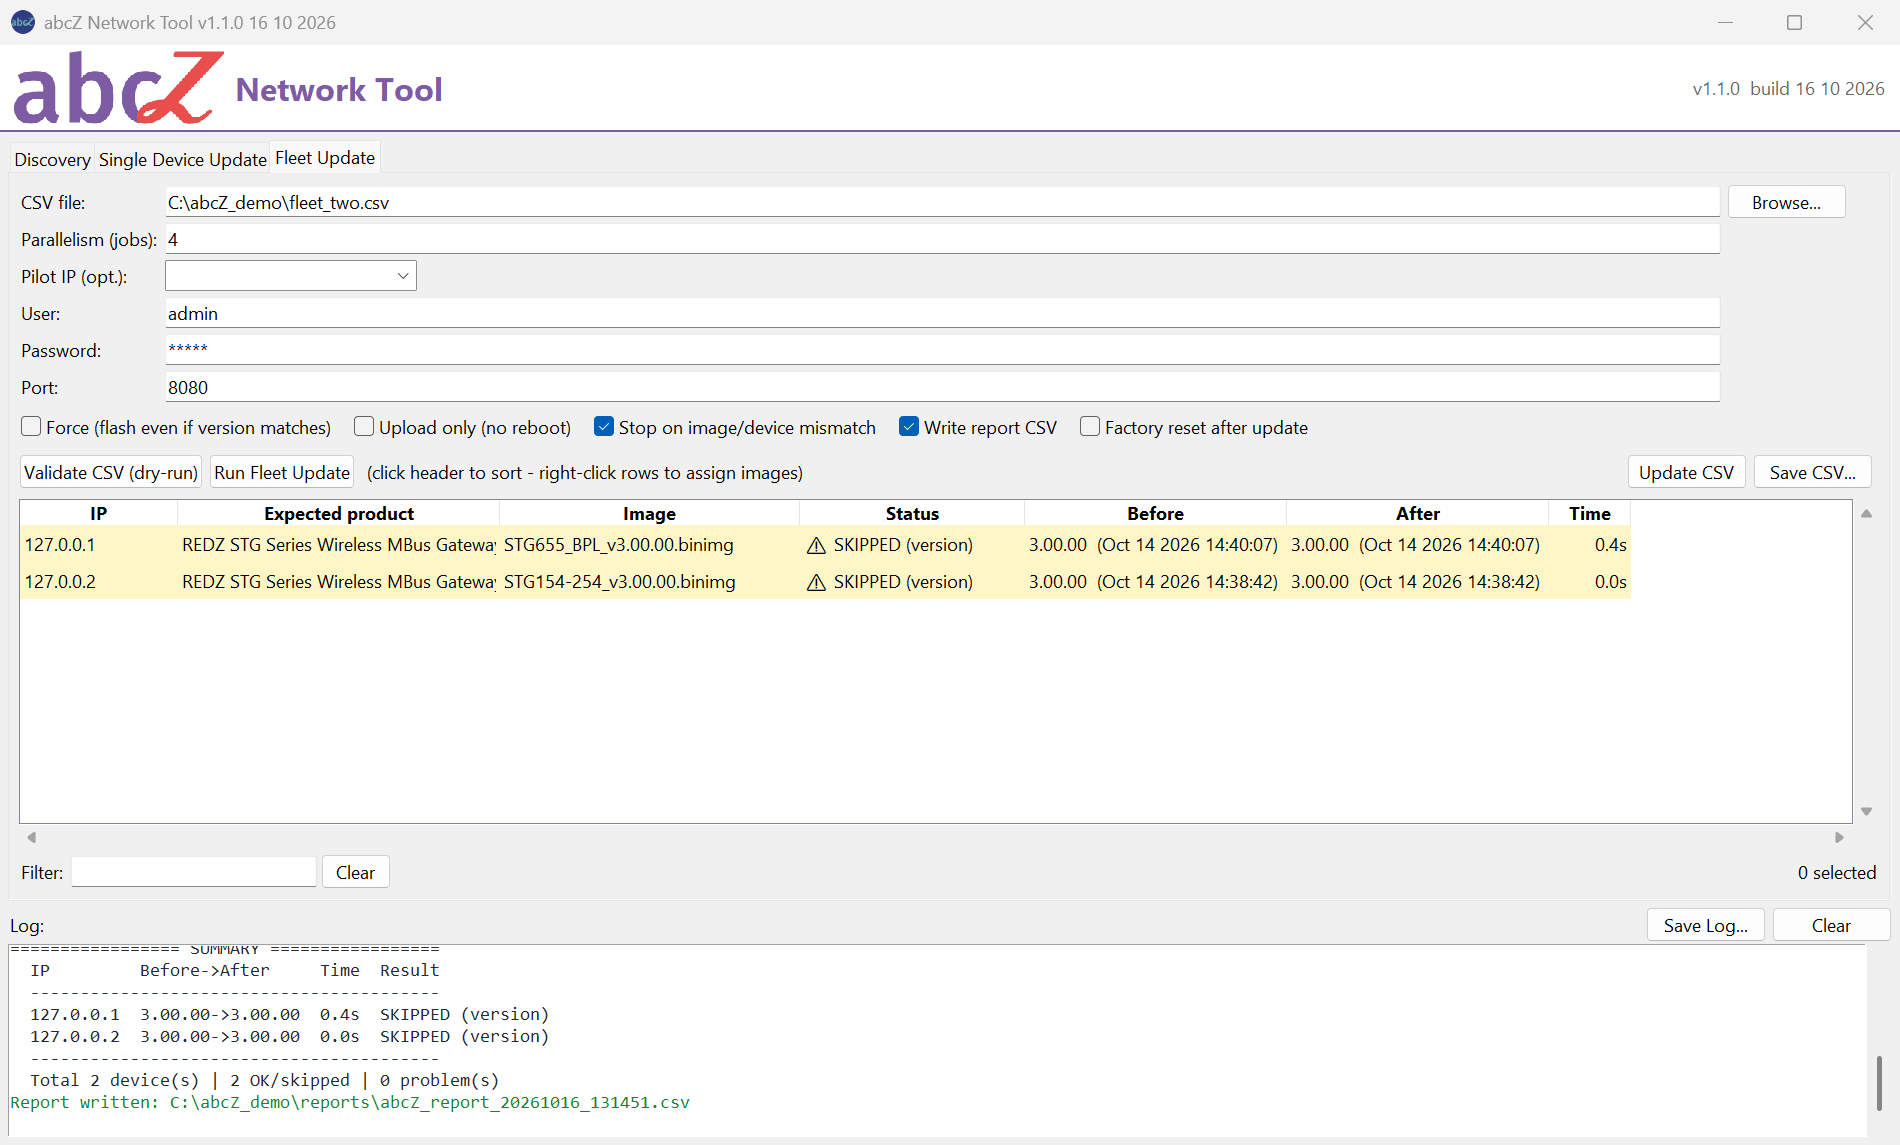
Type in Filter below the table to show only the rows that contain the text, in any column; Ctrl+F puts the cursor there and the Clear button next to the filter box shows all rows again. On the right, the tool shows how many rows are selected and, while the filter hides rows, how many of all rows are shown. Ctrl+A selects all rows that are shown, when the cursor is not in a text field.
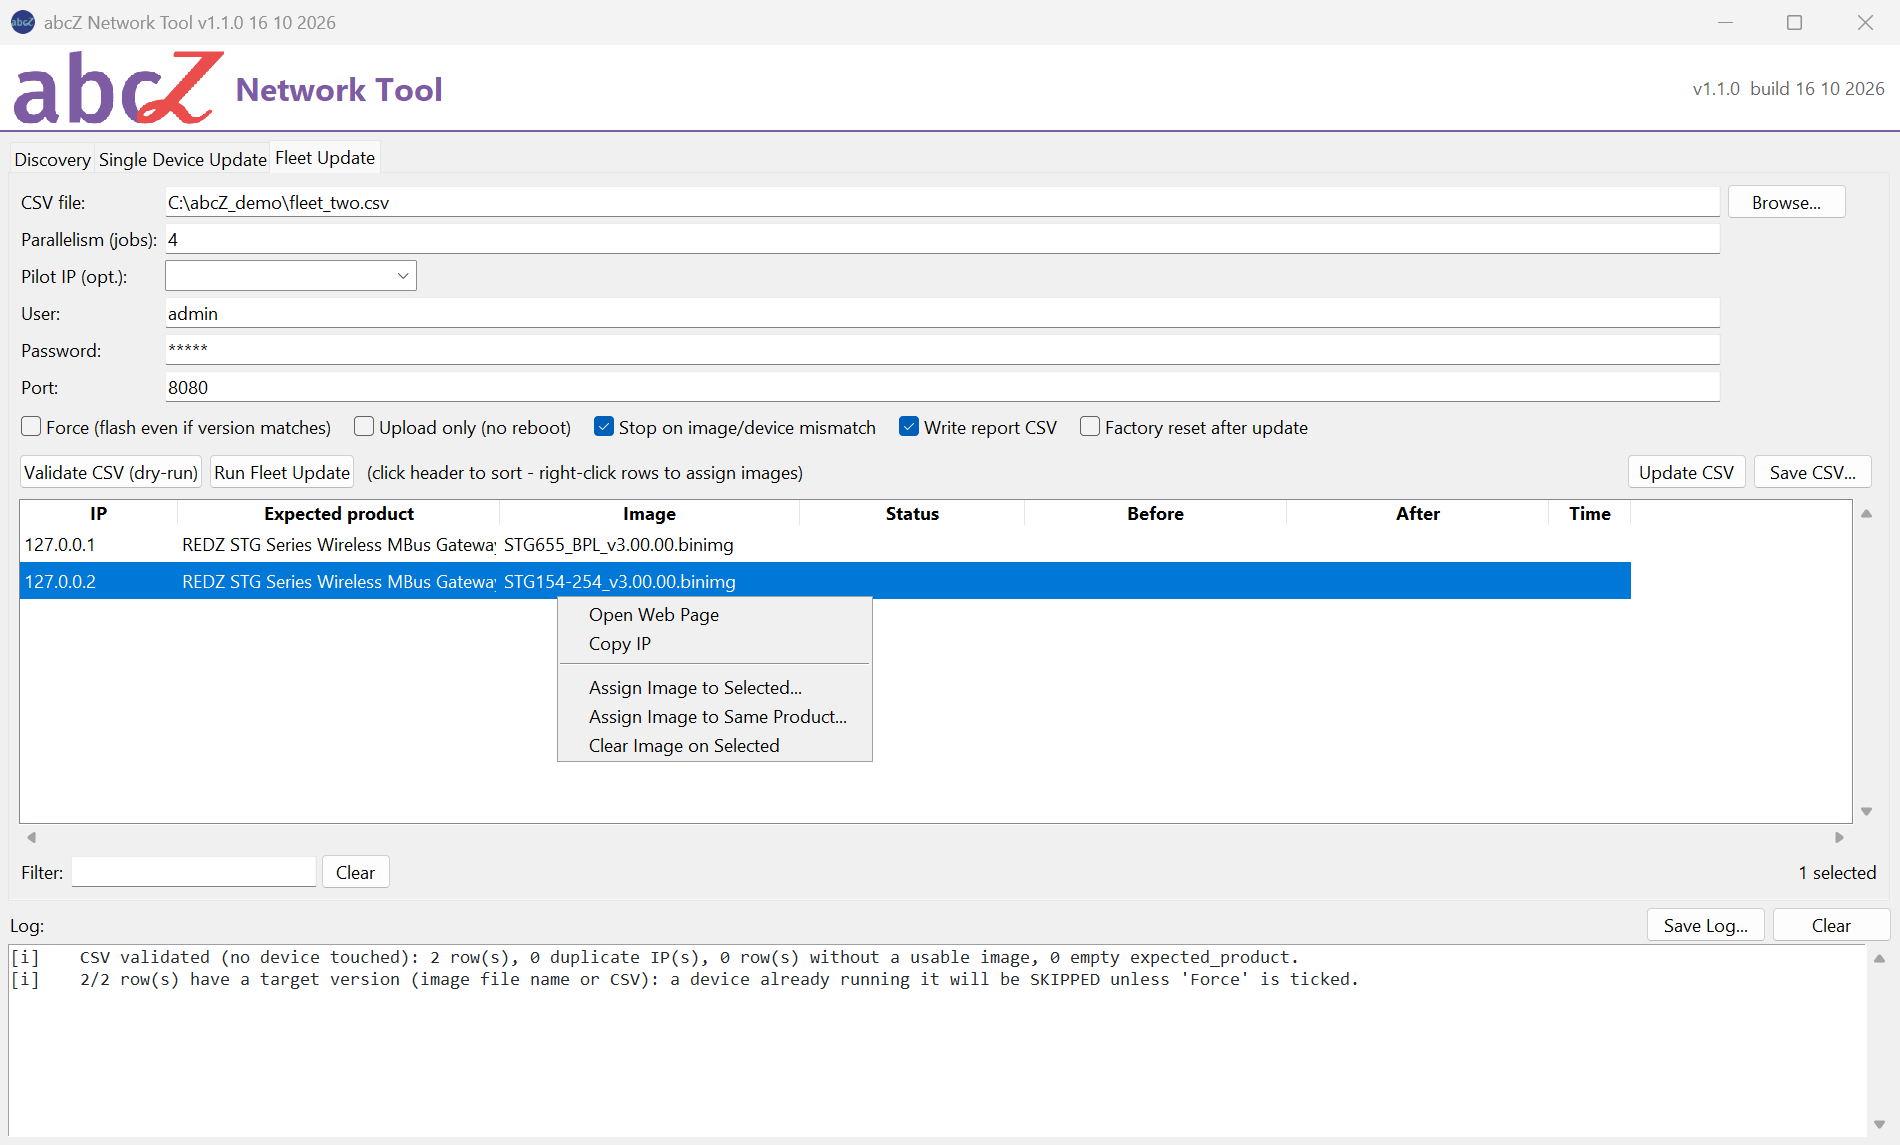
Assigning images
Right-click a row to open its menu. If the row is not part of the selection, the tool selects it alone first. Entries that do not fit the number of selected rows are grey.
| Menu entry | What it does | Rows selected |
|---|---|---|
| Open Web Page | Opens the device's web interface in your browser. | One |
| Copy IP | Copies the address to the clipboard. | One |
| Assign Image to Selected... | Asks for an image file and sets it for every selected row. | One or more |
| Assign Image to Same Product... | Asks for an image file and sets it for every row with the same expected product as the selected row. | One |
| Clear Image on Selected | Removes the image from the selected rows. | One or more |
Assign Image to Same Product... groups the rows by the full product name, not by family. Devices of one family can need different images, for example the 868 MHz and 2.4 GHz models of TLM-LM, and the device itself does not always reject the image of the other model. Only rows with exactly the same name get the image.
A row with an empty expected product cannot be used for this; assign its image with Assign Image to Selected... instead.
Assigned images are kept in the table, not in the file. Run Fleet Update uses the table as it is. To keep the assignments for later, save the table (see Saving the table, below).
Pilot device
Pilot IP (opt.) is a drop-down list of the addresses in the table; you can also type an address. Leave it empty to update all devices without a pilot.
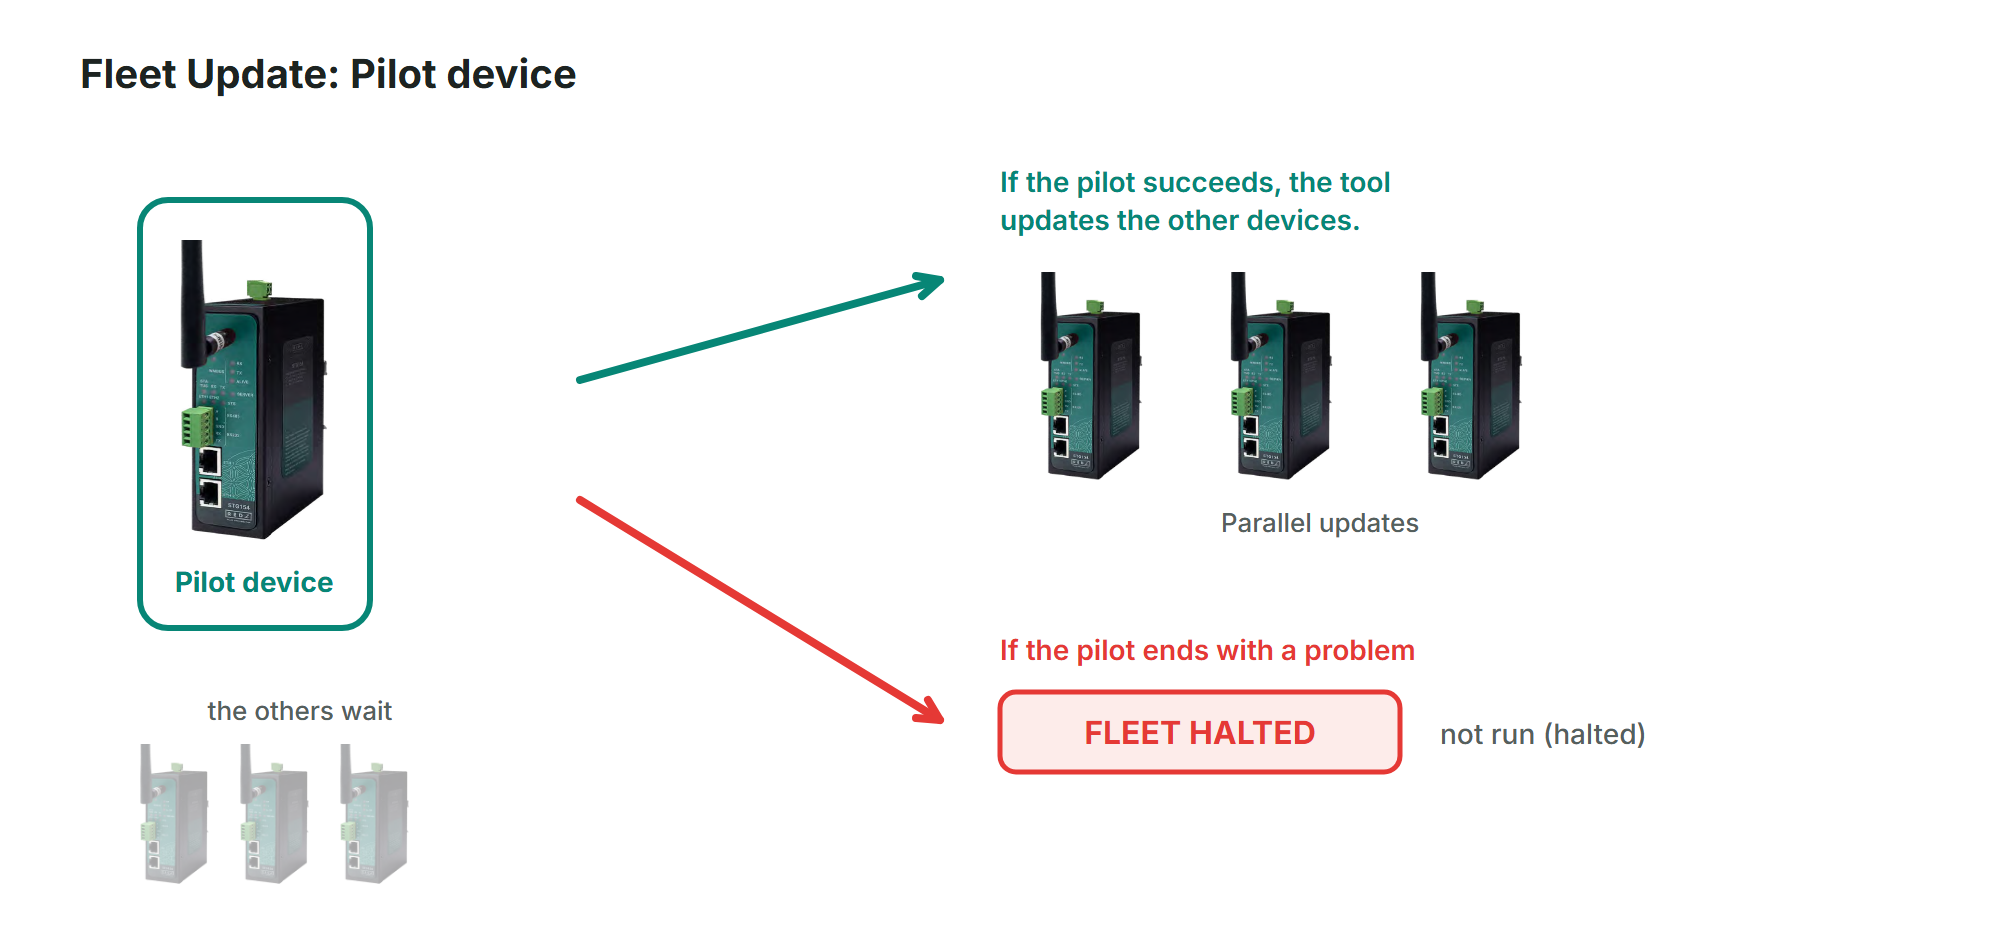
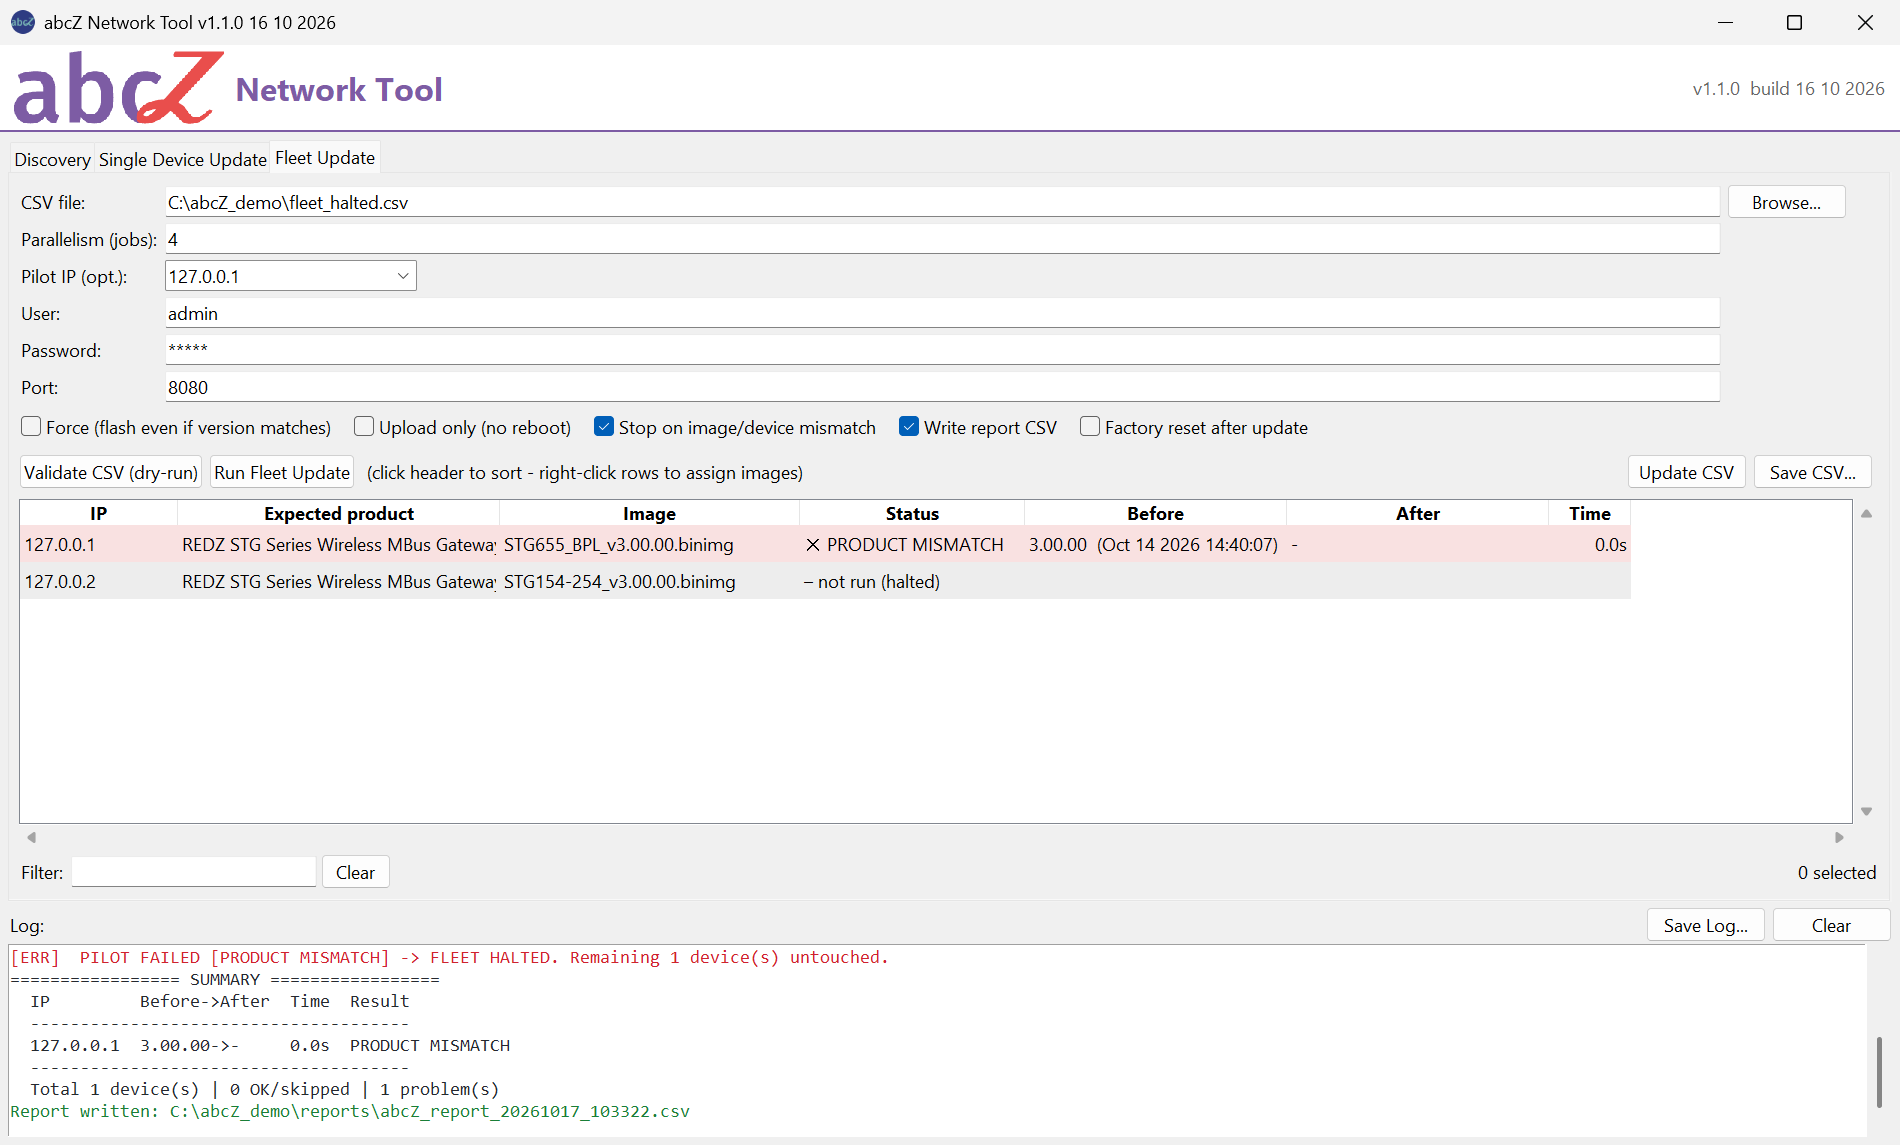
With a pilot, the tool first updates that device alone while the others wait. If the pilot ends with a problem, the log shows "FLEET HALTED", no other device is touched, and their rows show "not run (halted)". This also happens when the pilot ends with UPDATED, FACTORY RESET FAILED. If the pilot succeeds, the tool updates the other devices.
With Factory reset after update ticked, a pilot whose reset was sent but not confirmed by the device, because its firmware gives no confirmation or the answer was lost, also ends with SUCCESS (factory reset) and does not halt the fleet. Every other device then gets the reset too, right after the pilot. If the reset must be proven before the other devices get it, update and reset one device alone first, check its settings, and then run the fleet.
If you click Stop while the pilot is updated, the pilot normally ends with CANCELLED (stopped), which also halts the fleet: the other rows show "not run (halted)". If the pilot had already succeeded, the other devices end with CANCELLED (stopped) without being touched.
Note
A pilot that ends with SKIPPED (version) or UPLOADED (no reboot) also counts as passed, although its new firmware has not run. Choose as pilot a device that does not run the target version yet, and leave Upload only (no reboot) off, if the pilot is to prove the image.
When you load a list that does not contain the pilot, the tool empties Pilot IP (opt.) and says so in the log. If you type a pilot that is not in the table and click Run Fleet Update, an error window titled Pilot IP tells you so, and nothing is started.
Parallel updates
The devices without a pilot, or after a successful pilot, are updated Parallelism (jobs) at a time; as one finishes, the next starts. Each device is still updated by itself, through every step, and a device that fails does not stop the others.
In a fleet run the tool waits 15 seconds for each device's restart before it reads the new version.
Running the update
Click Run Fleet Update. The tool uses the rows of the table, with the images shown in the Image column. If the table is empty, it reads the CSV file first.
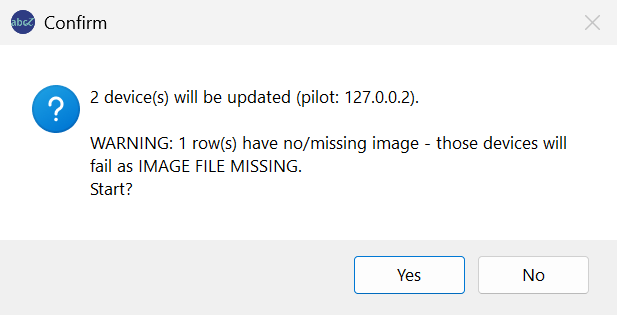
The Confirm window that opens after Run Fleet Update shows the number of lines in the table, duplicate lines included, and the pilot, if any. It adds a warning when rows have no image or a missing one (those devices normally end with IMAGE FILE MISSING), a warning when Stop on image/device mismatch is off (an image that does not match its device is then written without asking), and a line about Factory reset after update when it is ticked: either that all settings will be lost, or that it is ignored together with Upload only (no reboot). Answer No to go back without touching any device.
While the run lasts, the action buttons of all tabs are disabled: Read Identity (safe), Update, Validate CSV (dry-run), Run Fleet Update, Save CSV..., Update CSV, Scan (HTTP), Discover (UDP), Export CSV and Assign Address at Factory IP.... Other controls, such as the filter and the row menus, still work. Images you assign during a run are used from the next run on. Do not load another CSV file during a run.
The device commands of the Discovery row menu, Reboot Device (selected)..., Restore Factory Configuration (selected)... and Set IP / Subnet / Gateway (one device)..., are refused while an update runs: the log says "A task is running - wait until it ends (or use Stop) before sending device commands." and nothing is sent.
A window of Set IP / Subnet / Gateway (one device)... or Assign Address at Factory IP... that was already open when the update started stays open, but it does not write while the update runs: after you type SET, the log shows the same line, followed by "Nothing was written." or "Nothing was changed.", and the window stays open. Click Apply or Assign... in it again when the update has ended.
At the end the log shows a summary: one line per device with its address, its versions before and after (the after version as in the After column), its time and its result, and a total of the devices that are done or skipped and of those with a problem.
Filter while running
You can use the filter during a run, for example type MISMATCH to show only the devices with a mismatch result. The filter only hides rows: hidden devices are updated all the same. A row appears as soon as its result matches the filter, and all rows appear when you clear it. The filter does not choose which devices are updated; every row of the table is.
Stopping a fleet update
Stop next to the log title, or Esc, stops the run (with a pilot, see Pilot device, above). Devices that have not started end with CANCELLED (stopped) and are not touched. A device that is being updated stops at the next safe point, as described in the chapter Single Device Update: an upload that is under way runs to its end, and a device whose bank switch was already sent must be checked by you later.
Finding a device again when its address changes
If a device does not come back at its old address, the tool searches for its MAC address, as in a single update. When it finds the device at a new address, it changes the address in the row and in the table's list, and the log asks you to update your CSV file. Save the table to keep the new address.
Saving the table
Two buttons write the table to a CSV file with the columns ip, expected_product, image_path and target_version, including the images you assigned and any new addresses. The image paths are written in full. Afterwards CSV file names the file that was written.
- Save CSV... asks for a file name, proposing the current one, and writes a new file.
- Update CSV overwrites the current CSV file, after you confirm it in the window Update CSV. If no CSV file is set, it works like Save CSV....
The report file
With Write report CSV ticked, the tool writes a report file when the run ends, if at least one device has a result. The file is named abcZ_report_ with the date and time, for example abcZ_report_20261014_153000.csv, and is placed in the folder reports next to abcZ_Network_Tool.exe; the tool creates the folder when needed. The log ends with "Report written:" and the full path.
If the folder cannot be created there, the file is written to the folder the program was started from.
The chapter Results and reports describes the columns of the report.
Safety checks
Before abcZ Network Tool writes anything to a device, it runs several checks. Some are the tool's own, one is the device's own. Every update goes through them in this order:
- The tool reads the product name, firmware version and build date from the device.
- Product name check: the product name read from the device must be the product you expect.
- Version skip: if the device already runs the version in the image file name (or the target version you gave: the target_version column on the Fleet Update tab,
--target-versionon the command line), the device is skipped (unless Force (flash even if version matches) is ticked). - If the image maker's release file lies next to the image, the tool checks the image file against it.
- Image and device check: the tool compares what it knows about the image with what the device reports.
- The tool sends the image. The device checks it and stores it in its alternative firmware bank.
- The tool sends the command to start the new firmware once and reads the version back.
A stop at any of the first five steps leaves the device untouched. A stop at the device's own check leaves the running firmware unchanged.
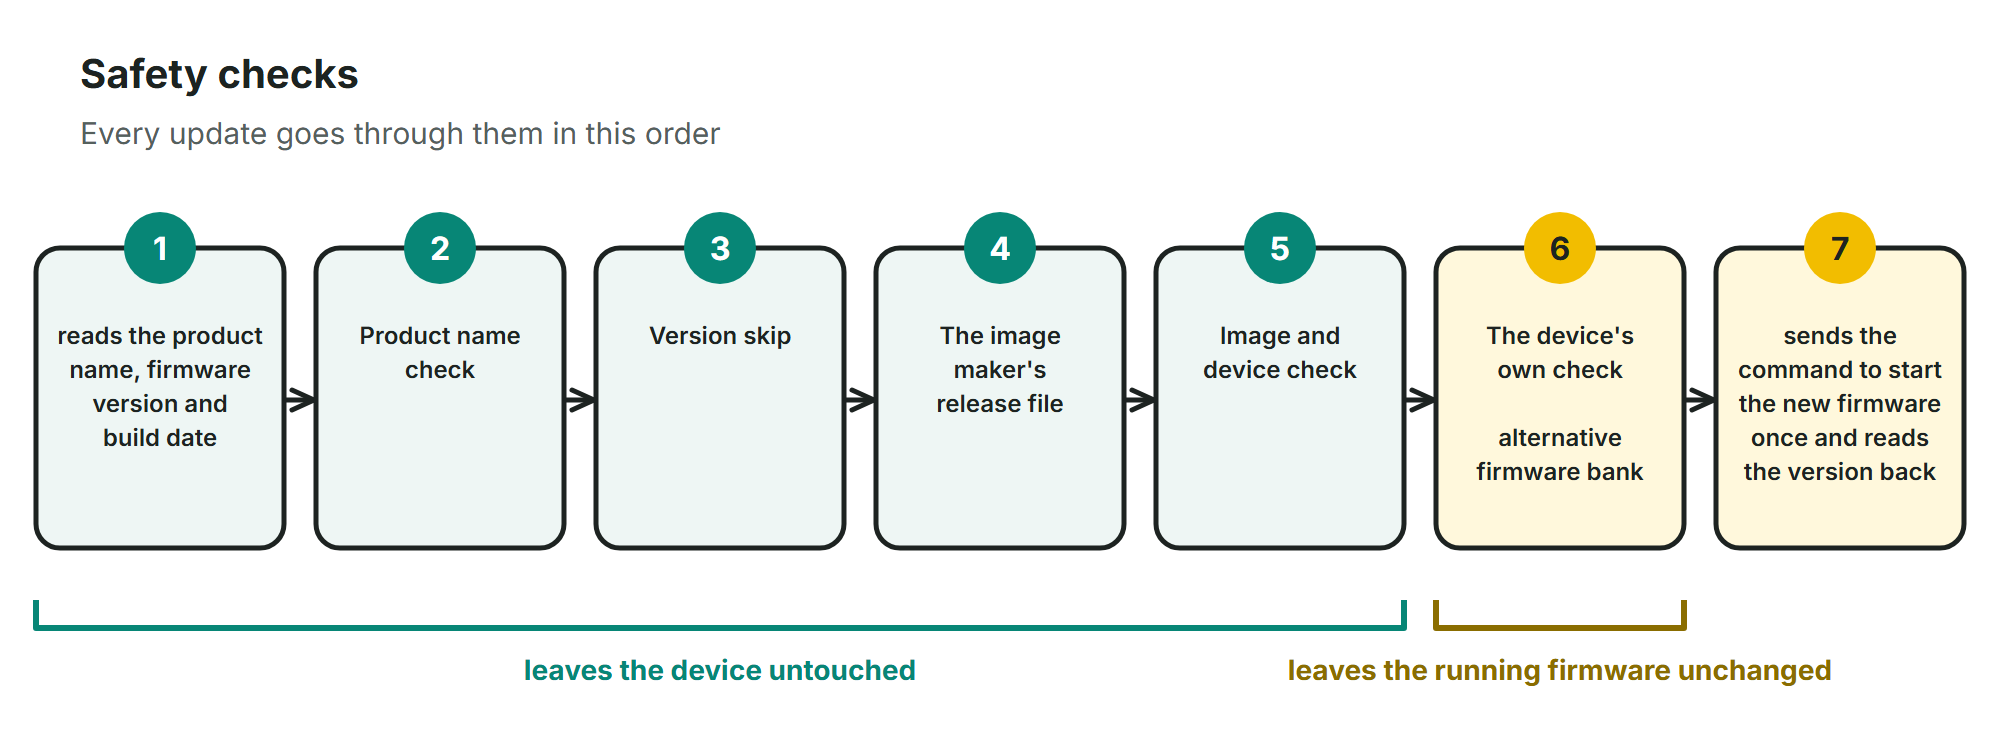
The product name check
The check runs when you give the product you expect: Expected product on the Single Device Update tab, the expected_product column of the device list on the Fleet Update tab, or --expected-product on the command line. The tool compares it with the product name read from the device; upper and lower case and extra spaces do not count.
If the names differ, the update stops with PRODUCT MISMATCH (exit code 3 on the command line) before anything is sent, and the log shows both names. Nothing overrides this check: Force (flash even if version matches) and --force only override the version skip.
Note
The exit codes in this chapter are those of a single-device update on the command line. A fleet update from the command line (--csv) returns 0 when every device ended with SUCCESS, SKIPPED (version) or UPLOADED (no reboot), and 1 otherwise; the result of each device is in the report (see the chapter Results and reports).
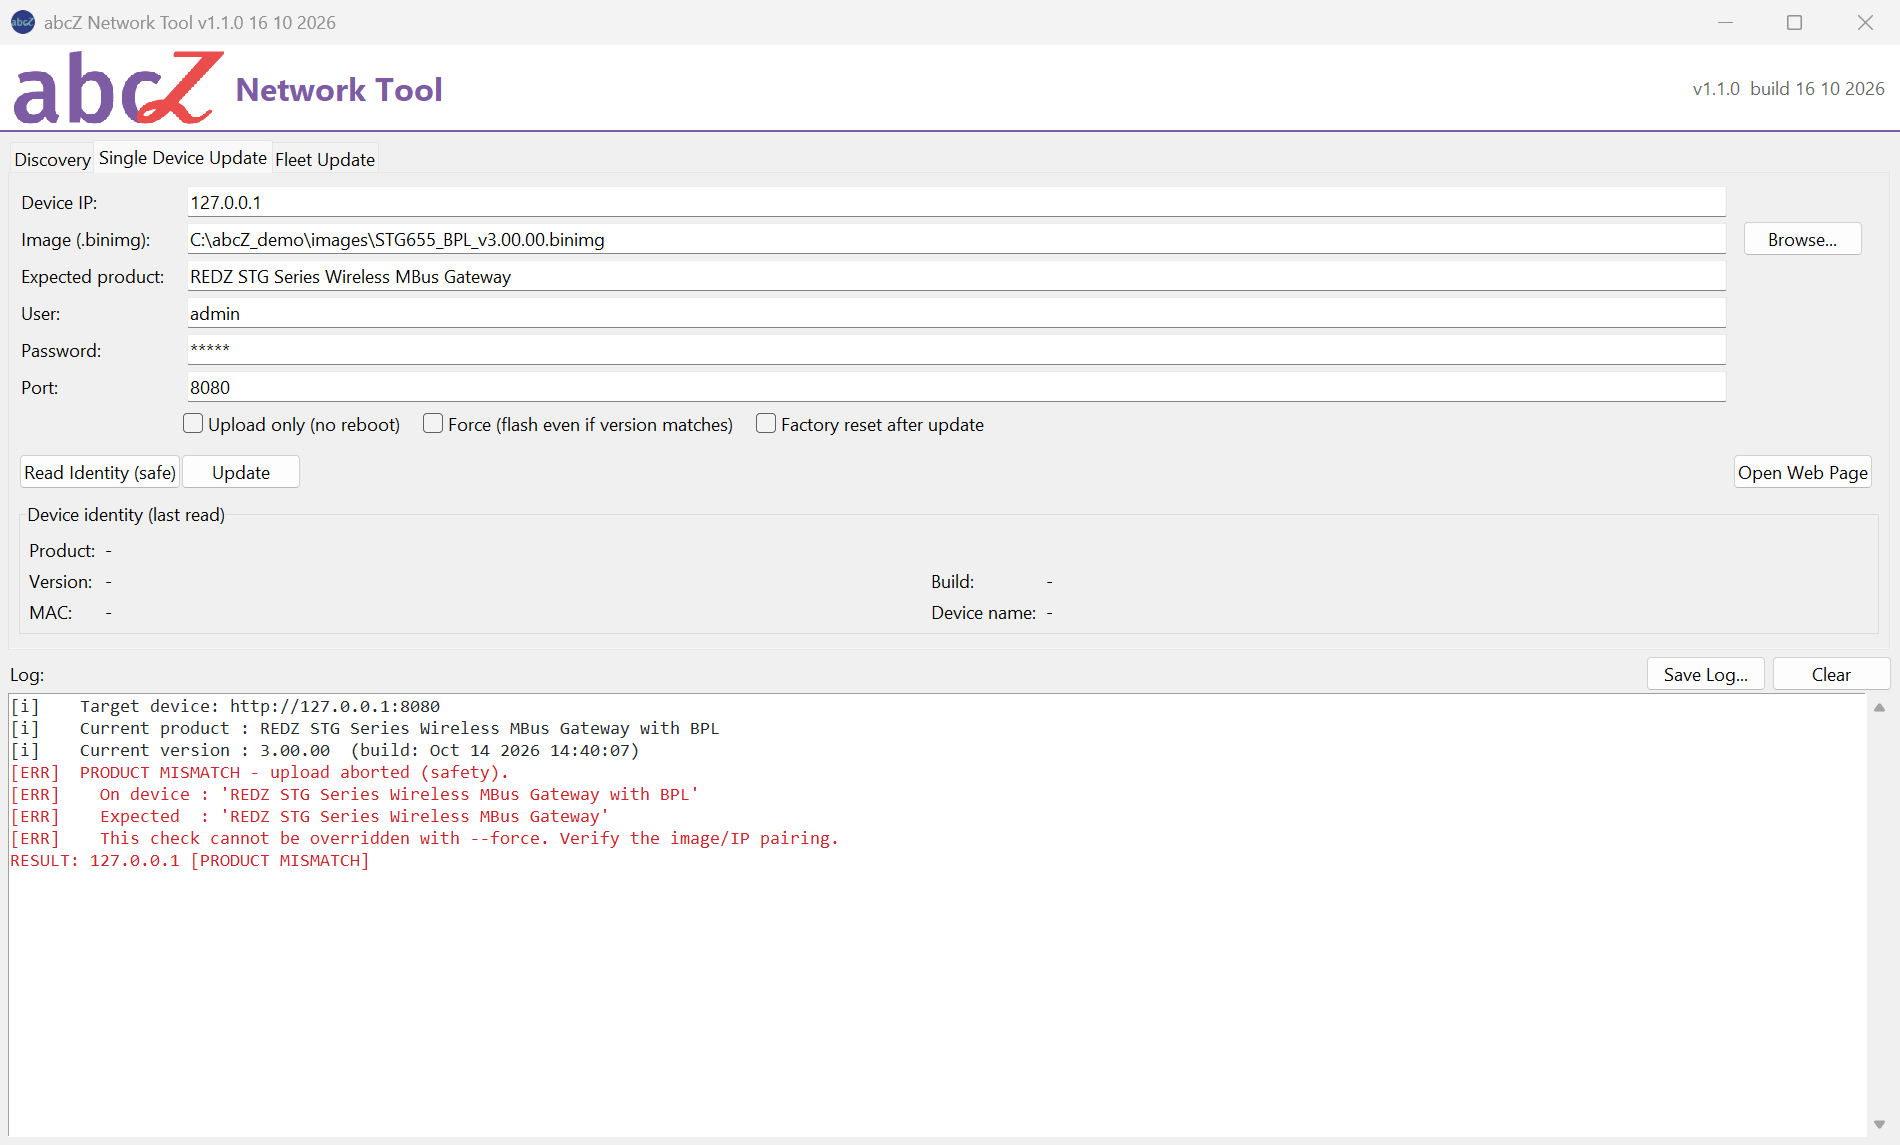
If you leave the expected product empty, the check is skipped and the log says "PRODUCT SAFETY CHECK SKIPPED". On the Fleet Update tab, Validate CSV (dry-run) counts the rows without an expected product and shows them as "(EMPTY!)".
Note
Read Identity (safe) fills an empty Expected product with the name read from the device, and Export CSV writes each device's own name into the list. That protects you from a device that changed at the same address, but it does not check the image: the product name check never looks at the image file. Choosing the right image is what the next checks are for.
Image and device checks
The image and device check compares what the image is built for with what the device reports. These fields are compared:
| Field | What the device reports | Example of a mismatch |
|---|---|---|
| Product family | Its product name | An LKM image for a HUR device |
| Frequency (TLM-LM only) | 868 MHz or 2.4 GHz in its product name | A 2.4 GHz image for an 868 MHz modem |
| BPL | "with BPL" in its product name | A standard image for a device with BPL*, or the reverse |
| Lite | "Lite Model" in its product name; from firmware 3 also the variant it declares | A full image for a Lite device* |
| EMH | "EMH Model" in its product name; from firmware 3 also the variant it declares | A Lite image for an EMH device* |
| LoRaWAN build | "LoRaWAN" in its product name; from firmware 3 also the variant it declares | A LoRaWAN image for a device without LoRaWAN |
| LoRaWAN region | The region in its product name (EU868, IN865, AS923, US915) | A US915 image for an EU868 device |
| I/O modules (HUR) | The I/O modules fitted, read from the device | An image for AO5+DO8+AI8+DI8 on a device fitted with 2xDO8+2xDI8 |
Examples marked * are caught only for images named from version 3 on or described by a release file.
What the image is built for comes from the image maker's release file next to the image (see below) or, without it, from the image file name. When a release file is used, the log says "Image identity from release manifest"; on a mismatch the log also names the source.
A field is compared only when both sides know it. If the file name does not mention a frequency, for example, the frequency is not compared.
On LKM meters with LoRaWAN, the Lite and the EMH builds have the same product name ("Lite Model"). If such a meter does not declare its variant itself (firmware 3), the tool cannot tell from the device whether it is an EMH meter, and the EMH field is not compared. When the image is a Lite or EMH image, the log then warns that this field was not checked: make sure yourself that the image is the right one for the meter.
Image names from firmware 3 on, and every image described by a release file, name every variant the image has. For these images a variant that is not named counts as "not that variant": an image named without BPL is a standard image, and a device with BPL is reported as a mismatch. The rule follows the version number in the file name: a renamed image without a version of 3 or higher in its name is treated like a firmware 2 name. In firmware 2 image names a missing word tells nothing, so it is never counted against the device.
If the file name carries none of these hints and no version number of 3 or higher, and there is no release file, the check has nothing to compare and finds no problem. A file name with a version of 3 or higher still counts every variant it does not name as "not that variant". The I/O modules are compared only when the image name lists modules and the device reports its modules; their order does not matter.
For example, on STG gateways the check tells the standard, BPL and Lite images apart, with and without the release file.
What happens on a mismatch
The log shows "IMAGE/DEVICE MISMATCH" and one line for each field that differs, with the value of the image and the value of the device. What follows depends on where you started the update:
- Single Device Update: the window Image / device mismatch asks whether to continue. No is the default answer. No stops the update with IMAGE/DEVICE MISMATCH; Yes writes the image anyway.
- Fleet Update: with Stop on image/device mismatch ticked (the default), that device stops with IMAGE/DEVICE MISMATCH and the others go on; if it was the pilot device, the fleet stops. Untick the box to only warn and write the image anyway. With the box unticked, the confirmation before the run warns that a mismatching image will be written without asking, and on a mismatch the log line "Proceeding anyway" says that the check is off and "nobody was asked".
- Command line: the update stops with exit code 9.
--allow-image-mismatchwrites the image anyway; the log then says "nobody was asked".
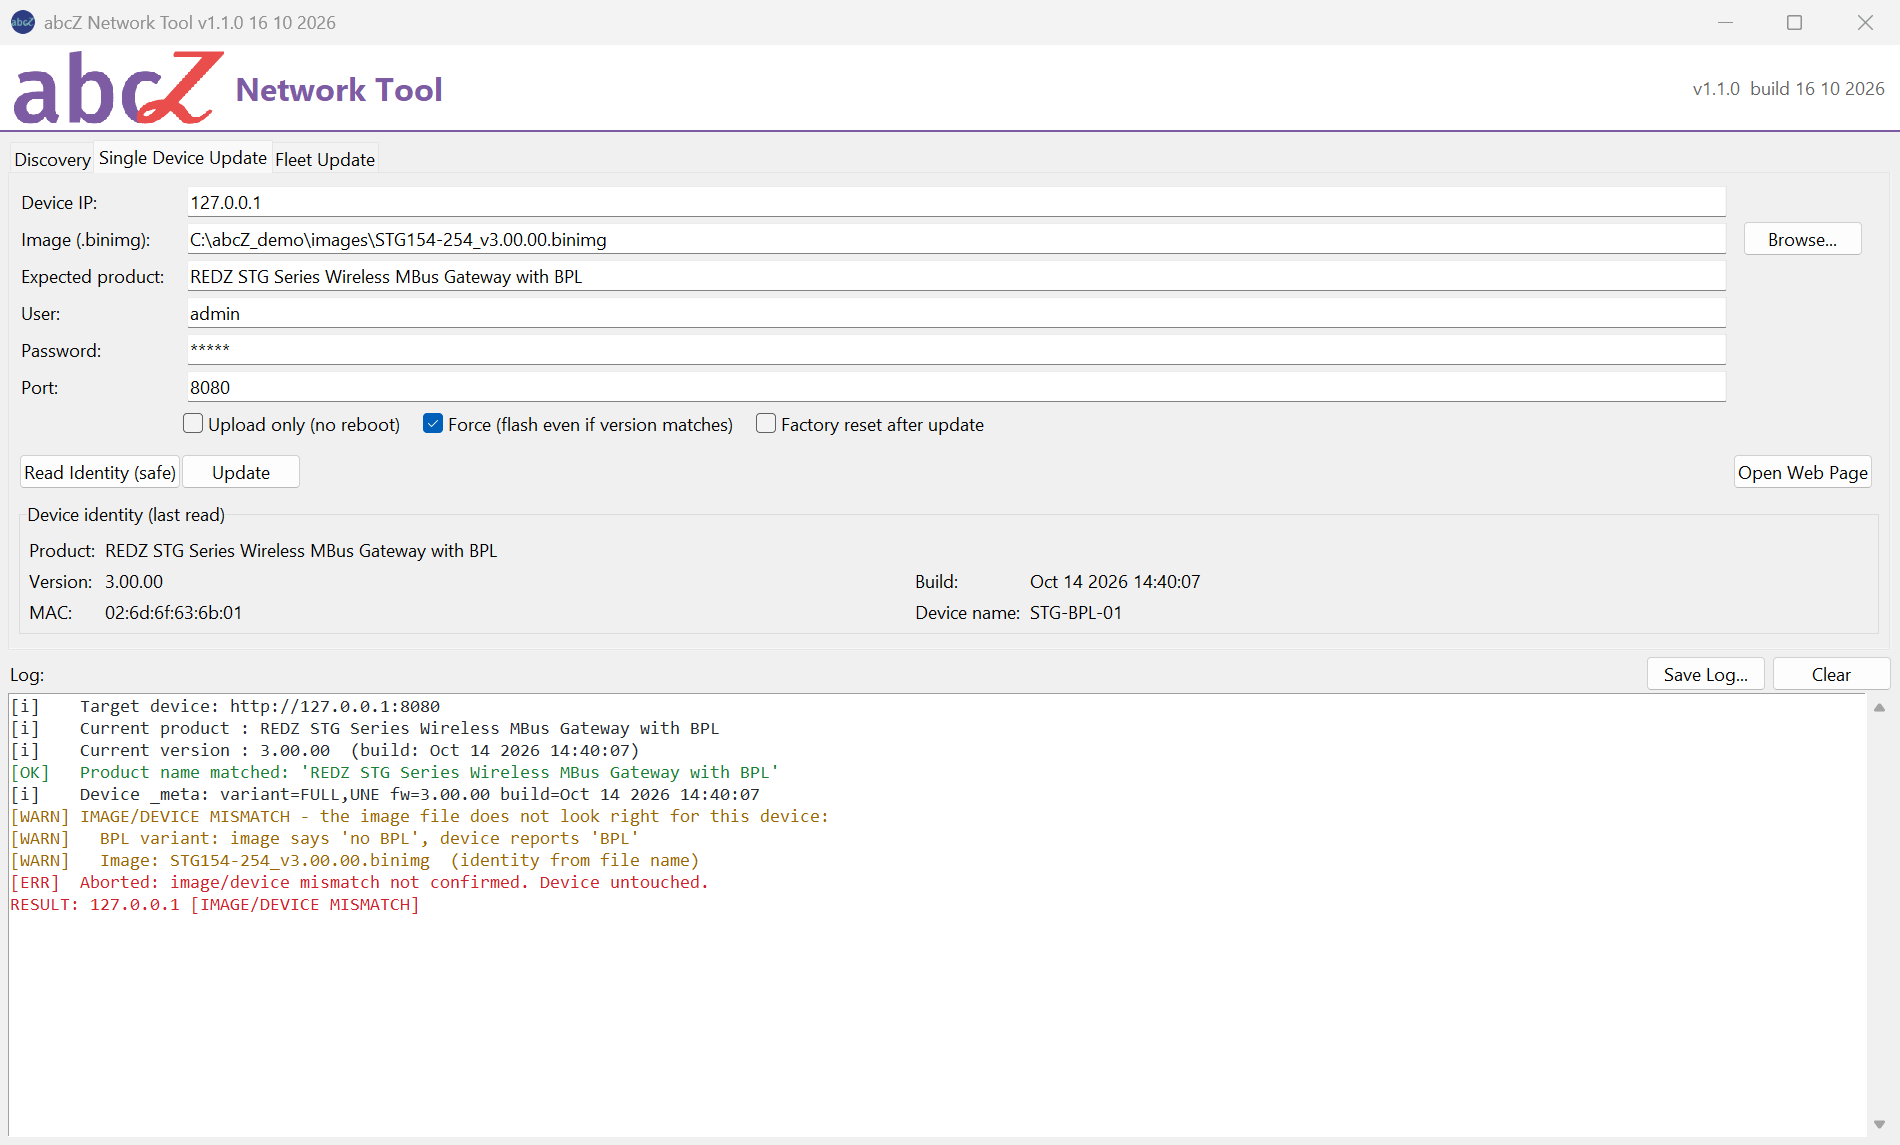
Warning
Answer Yes only when you know the image is right for the device. Apart from the CKL Lite and standard images, the device itself does not stop an image of the wrong variant of its own family, and such an image can leave it inoperable.
The version skip comes before this check. If the device already runs the version in the file name (or the target version you gave), it is skipped without a check of the image; nothing is written.
The image maker's release file
Firmware packages from version 3 on contain a release file, for example RELEASE_v3.00.00.json, which lists every image of the package with its variant and its SHA-256 checksum. Keep it in the same folder as the image. The tool then looks up the image by its file name and takes the image's identity from the release file instead of the file name.
Before it sends anything, if the release file lists a checksum for the image, the tool computes the SHA-256 checksum of the image file and compares it with the release file. The log shows "Image checksum verified against the release manifest (SHA256)." when they match.
If they differ, the image file is damaged or is not the image the release file describes. The update stops with "IMAGE CHECKSUM MISMATCH - upload aborted (device untouched)." in the log and the result IMAGE INVALID (exit code 6). This stop cannot be overridden; the device is not touched. Copy the firmware package again.
If the image was renamed, or the release file is missing, cannot be read or does not list the image, the tool falls back to the file name without a message, and no checksum is compared. If the release file lists the image without a checksum, the identity comes from the release file but no checksum is compared, also without a message.
The device's own check
Each device checks whether an image was built for its own product family. An image of another family is refused (usually HTTP 400). The tool reports every refusal of the upload (any HTTP 4xx answer) as IMAGE INVALID (exit code 6) and does not send the image again; the log shows the HTTP code.
Only the alternative firmware bank was written, and the tool sends no command to start it, so the device keeps running its current firmware. (Measured: a HUR image sent to an STG gateway was refused this way and the gateway kept running.)
After an accepted upload, the device reports the version and build date of the stored image. If it marks the stored image as disabled, the result is ALT IMAGE DISABLED (exit code 6). If the version or build date is missing, or the device adds any other mark, the result is IMAGE INVALID (exit code 6). In both cases the tool does not switch banks.
The device's check does not tell apart the 868 MHz and 2.4 GHz images of TLM-LM modems, or HUR and LKM images, and apart from the CKL Lite and standard images it does not check the variant within a family (BPL, Lite, EMH, region, I/O modules). Such an image is accepted. Only the tool's checks can stop it: the image and device check, and the product name check when the expected product you gave is the product the image is meant for.
The command to start the new firmware is sent once
After the upload, the tool sends the command to switch to the new firmware exactly once. It never repeats it, even when no answer comes back: the device may have switched already, and a second command would switch it back to the old firmware. (Only if the device answers HTTP 404 on the answer path, which means it did not take the command, the tool sends it once the old way; see the chapter Firmware generations (v2 / v3).) Upload only (no reboot) leaves the image in the alternative bank and sends no command at all.
The tool decides the result by reading the version and build date back from the device. Only when both are the ones the device reported for the stored image after the upload is the result SUCCESS (or UPDATED, FACTORY RESET FAILED, exit code 11, when you asked for a factory reset after the update and the reset command was refused, could not be sent or was answered with an HTTP error). If the device does not show them in time, the result is NOT CONFIRMED (exit code 7): the command was sent, but the tool could not see the new firmware run. Check the device with Read Identity (safe) before you do anything else.
If the answer to the reset command was lost, or the device's firmware gives no answer to commands, the result is still SUCCESS: the tool knows only that the reset command was sent, not that the reset was done. The log line "Factory restore" shows which case it was (see the chapter Troubleshooting).
A device that gives answers (see the chapter Firmware generations (v2 / v3)) can refuse the command and say why; the result is then BANK SWITCH REFUSED (exit code 10). BANK SWITCH REFUSED is also the result when the command could not be sent at all; in both cases the device keeps running its old firmware. The same result also appears when the device confirms a different request than the switch; then the tool does not know what the device did, so check it with Read Identity (safe).
What each check does not catch
| Check | Stops | Does not stop |
|---|---|---|
| Product name check | A device at the address that is not the product you expected | Anything when the expected product is empty; a wrong image (the check does not look at the image); a wrong expected product that was filled in from the same device |
| Release file | A damaged or changed image file (when the release file lists its checksum) | An image that was renamed, or whose release file is not in the same folder: the tool falls back to the file name and compares no checksum |
| Image and device check | Wrong family, frequency, BPL, Lite, EMH, LoRaWAN build or region, HUR I/O modules | An image without a release file whose file name names neither the product, the variants nor a version of 3 or higher; a variant that a firmware 2 file name does not mention; a field the file name does not mention (family, frequency); I/O modules the device does not report; the difference between the EMH and the Lite build on an LKM LoRaWAN meter that does not declare its variant (the log warns); a mismatch you confirm (Yes, box unticked, --allow-image-mismatch) |
| Device's own check | An image of another product family; an image the device cannot validate | TLM-LM 868 MHz and 2.4 GHz images; HUR and LKM images; variants within a family (except CKL Lite / standard) |
The safest update therefore has all three: the expected product filled in, the image used under its original file name, and the release file next to it.
Firmware generations (v2 / v3)
REDZ devices run firmware of generation 2 (versions 2.xx.xx) or generation 3 (versions 3.xx.xx). abcZ Network Tool updates both, and also moves a device from one generation to the other. This chapter describes what changes for you between the two.
| Generation 2 | Generation 3 | |
|---|---|---|
| Image file names | May leave out variants; a missing word tells nothing | Name every variant; a missing word means "not that variant" |
| Release file next to the image | No | Yes (RELEASE_v*.json, with SHA-256 checksums) |
| What the device declares | Product name only | Product name and its variant |
| Answer to a command | None: the tool knows only that the command arrived | Confirmed or refused, with the reason (from the versions listed below) |
| Cable plugged in after power-up (device in DHCP mode) | Stays at the factory address until restarted with the cable in | Restarts once by itself and takes an address from the DHCP server |
A move from 2.xx.xx to 3.xx.xx, or back, is an ordinary update in the tool: choose the image of the other generation and update. The tool does not ask anything extra.
Settings after a move between generations
When a TLM-LM or TLM-LW modem, an LKM meter or an STG gateway moves from 2.xx.xx to 3.xx.xx, or back, it returns to its factory settings. This happens without Factory reset after update.
Within generation 3 the first two numbers decide: an update that changes only the third number (for example 3.00.00 to 3.00.01) keeps the settings, unless the release notes of the firmware say otherwise; an update to another second number (for example 3.00.x to 3.01.x) also returns the device to its factory settings.
Warning
Write down the settings you need before you update across generations. abcZ Network Tool does not keep a copy of the device settings and cannot put them back.
In its factory settings the device takes its address from a DHCP server. Its address after the update can therefore differ from the address it had before.
Finding the device again after the update
After the command to start the new firmware, the tool waits and reads the device at its old address. If the device does not answer there, the tool looks for it by its MAC address:
- It scans the network of the old address (for example 192.168.0.1 to 192.168.0.254 for 192.168.0.37) for the MAC address it read before the update.
- If the device is not there, it tries the factory address 192.168.1.1 (unless the old address is already in 192.168.1.x) and accepts the device there only if the MAC address is the same.
The search needs the MAC address the tool read before the update. Without it the log says "The MAC address was not read before the update - the tool cannot search for the device at another address.", and the result is NOT CONFIRMED.
When it finds the device at another address, the log shows "Device found at NEW IP" with both addresses and the tool reads the version there; when it is confirmed, the result names the new address. On the Fleet Update tab the device's row takes the new address; click Update CSV or Save CSV... to keep it in your device list.
If the device answers at 192.168.1.1, the log says so: the device was reset to its factory settings and found no DHCP server on your network.
If the device does not answer there, the log says that too and adds the hints described under "The factory address on a network without DHCP" below, for example when your PC is not in 192.168.1.x.
If neither search finds it, the result is NOT CONFIRMED. The update may still have worked: the device may be booting or may have taken an address in another network. The log lists these reasons, and a hint when the old address is outside your PC's network. Search for the device with Scan (HTTP) later.
The factory address on a network without DHCP
A device in its factory settings that finds no DHCP server uses the address 192.168.1.1.
Your PC reaches that address only if it has an address in 192.168.1.x itself, or a router forwards the traffic. Otherwise give the PC a temporary second address in that range, for example 192.168.1.50 with subnet mask 255.255.255.0, or connect the device to the PC directly. Then scan 192.168.1.1 with Scan (HTTP) and give the device the address you want with Set IP / Subnet / Gateway (one device)... (see the chapter Device actions).
The tool can also do this for you: Assign Address at Factory IP... on the Discovery tab adds a temporary address to your PC's network adapter, gives the device its new address and removes the temporary address again (see the chapter Assigning an address at the factory IP). Prefer it when your PC takes its own address from a DHCP server: adding a second address to such an adapter by hand can switch its DHCP off and remove the address it had.
When a command from the Discovery tab cannot reach a device, when the device does not save new network settings, or when an update cannot find the device again, the log adds hints when the address is outside the PC's network or is the factory address. For the factory address 192.168.1.1, when the PC is not in 192.168.1.x, these hints suggest the temporary second address described above.
When the cable is plugged in after power-up
A device that takes its address from a DHCP server and was switched on without its network cable finds no server and sits at the factory address 192.168.1.1.
With generation 3 firmware, the device restarts once by itself when you plug the cable in, and takes its address from the DHCP server. This takes a short while. Wait, then scan your own address range again; the device appears there. This needs a DHCP server on the network.
With generation 2 firmware, the device stays at the factory address until it is restarted with the cable connected.
Device answers in v3
With generation 2 firmware a device does not answer a command: the tool learns only that the command arrived. With generation 3 firmware, from the versions listed below, the device answers every command - the switch to the new firmware, Reboot, Restore and the network settings - either with "OK REQ=<request> RBT=<0 or 1>" (done; RBT=1 means a restart is needed) or with "Rejected: <reason>".
Whether the tool asks for this answer depends on the family and on the version the device ran at the last scan (Discovery tab) or just before the update (update tabs):
| Family | Device answers from version |
|---|---|
| TLM-LM | 3.00.01 (the tool does not ask 3.00.00 for an answer) |
| TLM-LW | 3.00.00 |
| LKM | 3.00.00 |
| STG | 3.00.00 |
| HUR, CKL | No answer |
If the device answers that it does not know the answer path (HTTP 404), the tool sends the command the old way.
The log and, for Discovery commands, the Status column show what came back:
| Shown | Meaning |
|---|---|
| confirmed by device (REQ=...), with ", reboot required" when the device says RBT=1 | The device confirmed the command (generation 3). |
| REFUSED by device: <reason> | The device refused the command (nothing was done), or confirmed a different request. |
| accepted (HTTP 200; device gives no acknowledgement on this firmware) | The command arrived; the tool has no answer from the device (generation 2, HUR, CKL; TLM-LM 3.00.00, which the tool does not ask; or a device whose version in the table is older than the firmware it runs now - scan again). |
| NOT SENT (...) | The tool could not connect. The command did not reach the device. |
| FAILED (HTTP <code>) | The device answered with an error; with 401 check the password. |
| sent, response lost (...) | The command was sent but the answer was lost. The device may have done it. |
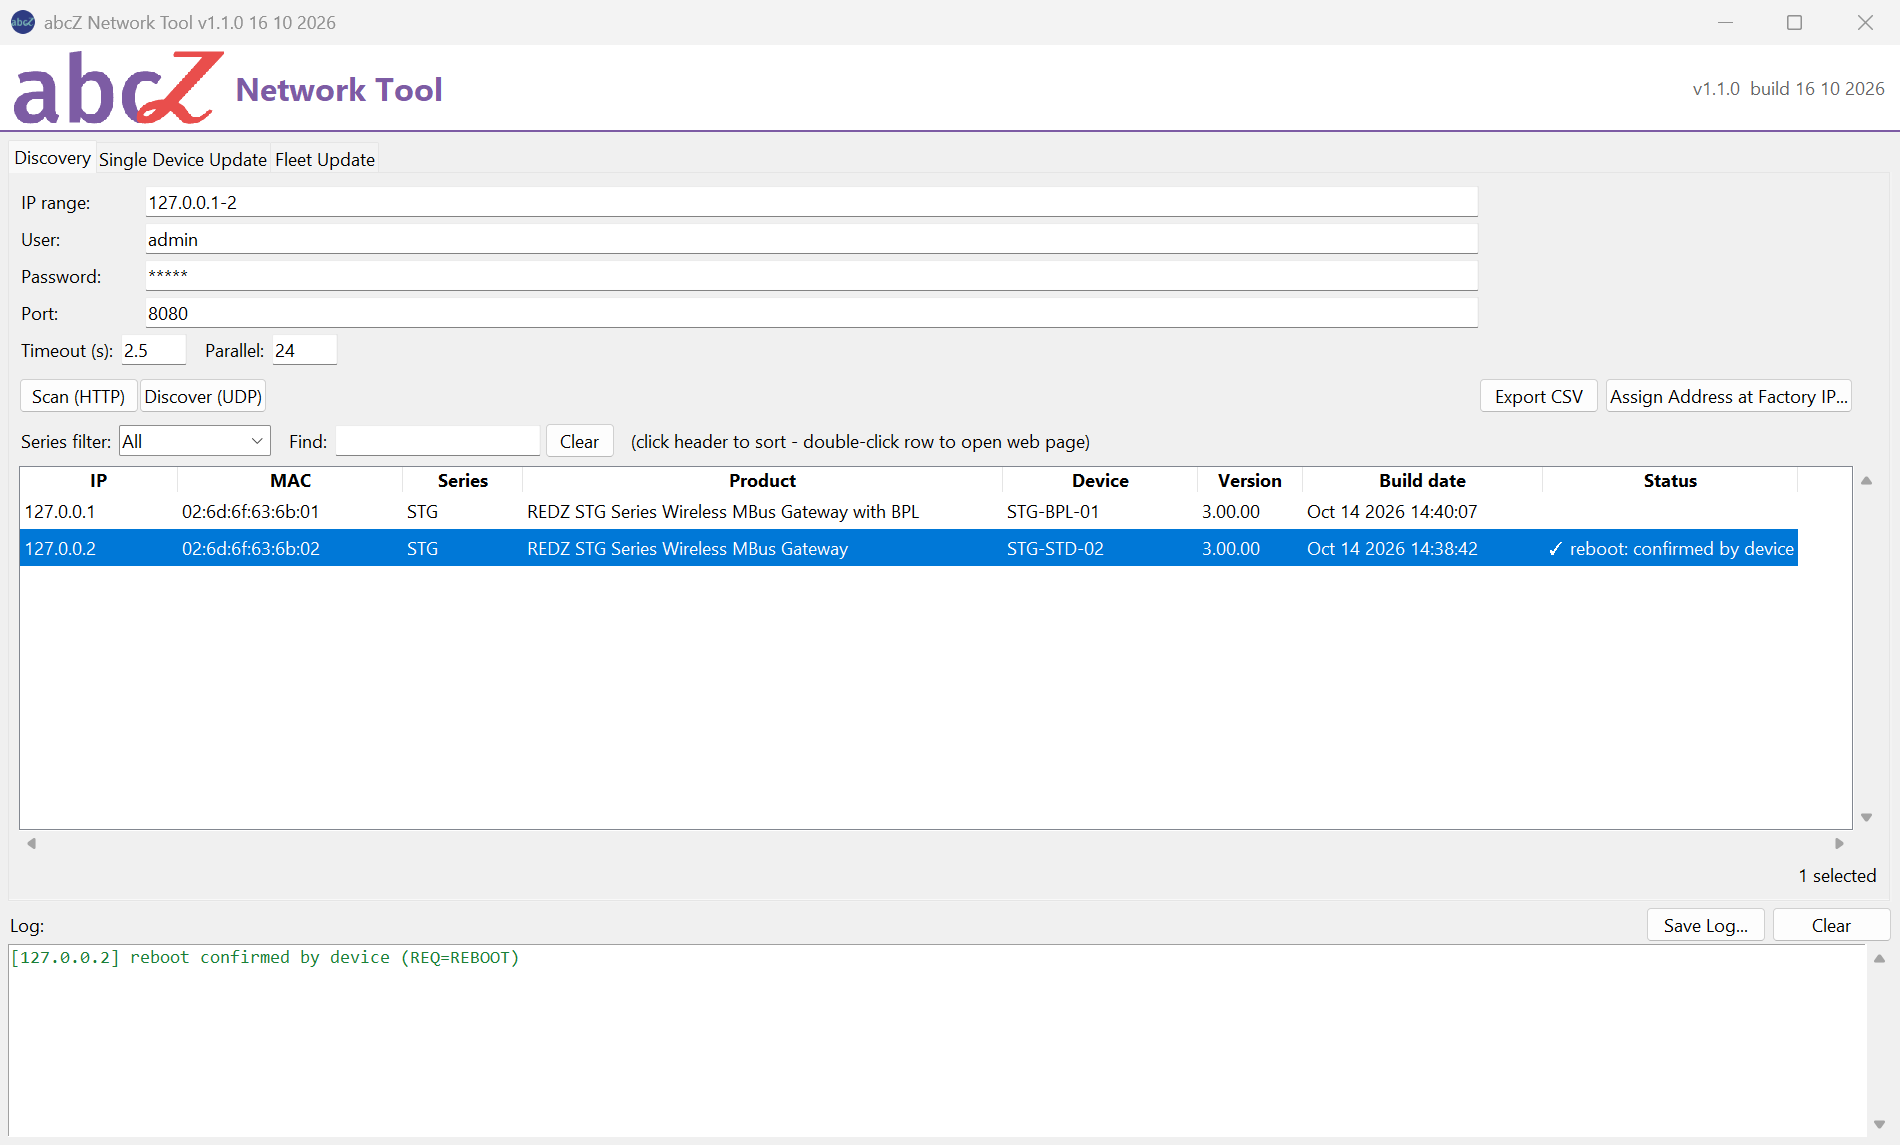
During an update, a refused switch ends at once with BANK SWITCH REFUSED (exit code 10); the device keeps running its old firmware and the new image stays in the alternative bank. Without an answer, the tool decides the result from the version and build date it reads back, as the chapter Safety checks describes. In both cases the command is not repeated.
Results and reports
Result names
Every device of an update ends with one result. In the window, the same name appears in the log, in the Status column of the Fleet Update table and in the report file. From the command line, a single-device update gives it as the exit code (see below) and in the report if you give --report.
| Result | Fleet row | Meaning |
|---|---|---|
| SUCCESS | tick, green | The device runs the new firmware: after the restart the tool read the version and build date of the uploaded image back from the device. "(factory reset)" is added when a factory reset was sent after the update and the device neither refused it nor answered it with an error. A device whose firmware gives no confirmation, or whose answer was lost, also gets it, so the reset is then not proven: read the log line about the factory restore. |
| SKIPPED (version) | warning sign, yellow | The device already runs the version the update aims for (the version in the image file name, or target_version in the device list). Nothing was written. |
| UPLOADED (no reboot) | tick, green | The image was written into the device's alternative firmware bank and the device accepted it. No switch was made: the device still runs its old firmware. |
| IDENTITY READ FAILED | cross, red | The tool could not read the device's start page, also after the retries. Nothing was written. |
| PRODUCT MISMATCH | cross, red | The product name read from the device is not the expected product. Nothing was written. Nothing overrides this check. |
| IMAGE FILE MISSING | cross, red | The image file was not found. Nothing was written. |
| UPLOAD ERROR | cross, red | The upload failed on the network or the device answered it with a server error, also after the retries. No switch was sent: the device runs its old firmware. |
| IMAGE INVALID | cross, red | The image file does not match the checksum in the release file next to it, or the device refused the image, or the device answered the upload without a version. No switch was made. |
| ALT IMAGE DISABLED | cross, red | The device received the image but reported it as not valid. No switch was made. |
| NOT CONFIRMED | cross, red | The image was written and the switch command sent, but the tool did not see the device run the new firmware in time, also not after searching for it by its MAC address where it could. The device may run the old or the new firmware: check it. The log lists possible reasons and, where it can, how this PC can reach the device. |
| CANCELLED (stopped) | dash, grey | You stopped the run. What was done depends on the moment; see below. |
| IMAGE/DEVICE MISMATCH | cross, red | The image does not look right for the device. On Single Device Update you answered No; in a fleet update with Stop on image/device mismatch ticked, or from the command line without --allow-image-mismatch, the tool stopped by itself. Nothing was written. |
| BANK SWITCH REFUSED | cross, red | The device refused the switch to the new image, or the switch command could not be sent at all. The image waits in the alternative bank; the device runs its old firmware. |
| UPDATED, FACTORY RESET FAILED | cross, red | The update is confirmed as for SUCCESS: the device runs the new firmware. You asked for Factory reset after update, but the device refused the reset, answered it with an error or could not be reached for it, so the factory reset was not done. |
If a device answered at another address after the restart, the Fleet Update table adds (IP -> new address) to its result and shows the new address in the IP column. This can also happen with NOT CONFIRMED and with a device cancelled while the tool waited for the restart.
UPDATED, FACTORY RESET FAILED counts as a problem: on a pilot device it halts the fleet like any other problem result.
A CANCELLED (stopped) device that was stopped before or during the upload still runs its old firmware. One stopped after the upload has the new image waiting in its alternative bank, but no switch was sent. One stopped while the tool waited for the restart has had the switch command: the log then says "Stopped by user during confirmation. Upload + bank switch WERE sent; verify the device manually when the network is back."
From the command line, the result of a single-device update is also the exit code of the program:
| Result | Exit code |
|---|---|
| SUCCESS | 0 |
| SKIPPED (version) | 0 |
| UPLOADED (no reboot) | 0 |
| IDENTITY READ FAILED | 2 |
| PRODUCT MISMATCH | 3 |
| IMAGE FILE MISSING | 4 |
| UPLOAD ERROR | 5 |
| IMAGE INVALID | 6 |
| ALT IMAGE DISABLED | 6 |
| NOT CONFIRMED | 7 |
| CANCELLED (stopped) | 8 |
| IMAGE/DEVICE MISMATCH | 9 |
| BANK SWITCH REFUSED | 10 |
| UPDATED, FACTORY RESET FAILED | 11 |
Exit code 2 is also returned when the command line itself is wrong or the device list cannot be read.
Results with exit code 0 count as good: a pilot device with such a result lets the rest of the list continue. A pilot that ends with SKIPPED (version) has not tested the new image: choose a pilot that needs the update. The chapter Command line reference gives the exit code of a fleet update.
Symbols and colours
In the Fleet Update table each row has a symbol and a colour, so the state can be read without colour as well. While a device is being updated, its row is amber, starts with three dots and names the step: "reading identity (1/4)", "uploading (2/4)", "bank switch (3/4)", "confirming (4/4)" or "searching by MAC (4/4)". When it ends, the row shows the symbol and colour of its result from the table above.
A dash marks a device that did not finish: a row waiting in the queue (no colour), a second row with the same address (grey), a device not run because the pilot device failed (grey), or a CANCELLED (stopped) device (grey).
Before and After show the version and, in brackets, the build date. For SUCCESS and UPDATED, FACTORY RESET FAILED, After is the version read back after the restart; for SKIPPED (version) the running version. For UPLOADED (no reboot), NOT CONFIRMED, BANK SWITCH REFUSED and a device cancelled after the upload, After is the version of the image waiting in the alternative bank, which the device does not necessarily run. For every other result the table shows a dash, and the report leaves after_version empty.
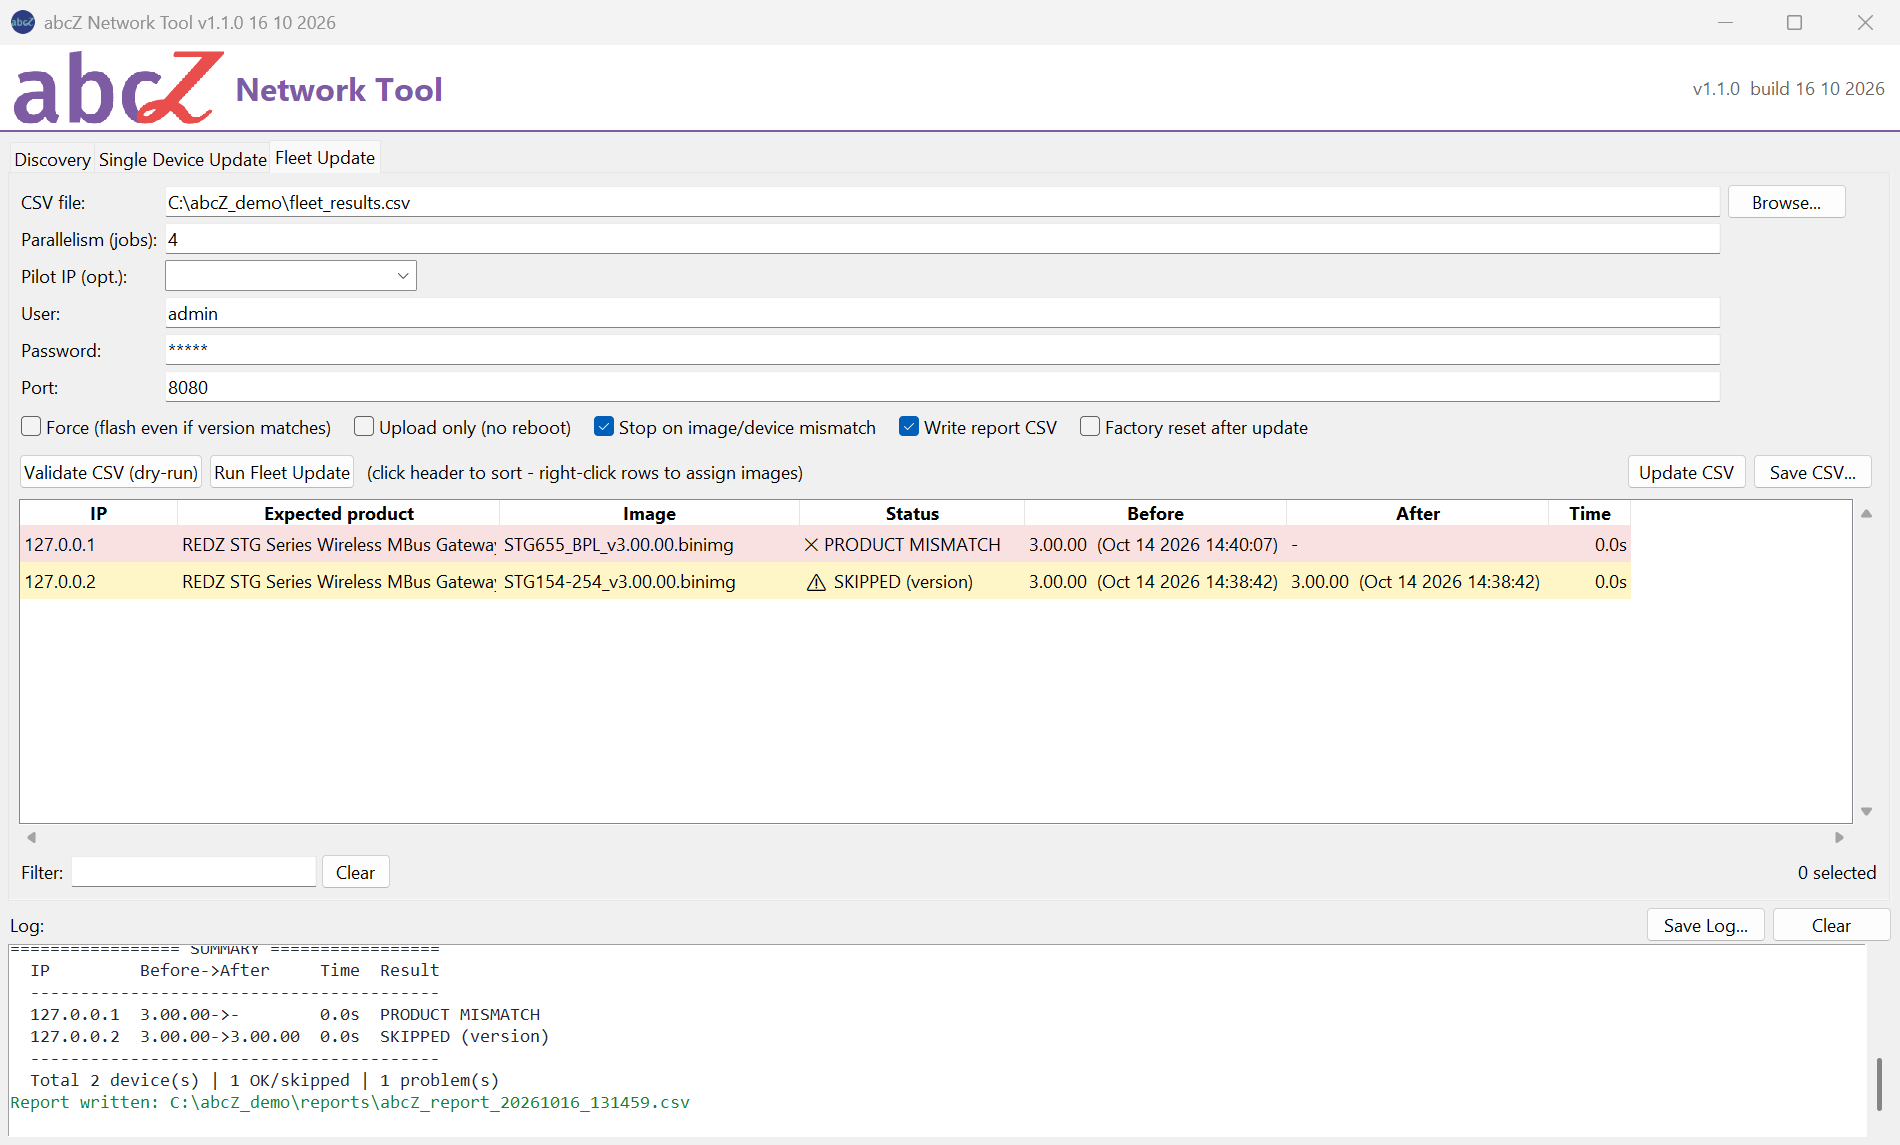
On the Discovery tab, the Status column of the device table shows only the result of the last right-click action on that device: three dots while it runs, a tick when the device confirmed the command, a warning sign when the command was sent but the device gave no confirmation (its firmware does not give one, or the answer was lost), and a cross when it failed. A new scan clears it. The chapter Device actions explains these messages.
On Single Device Update the update ends with a log line that starts with "RESULT:" and gives the address and the result name in square brackets. It is green for a good result, amber for SKIPPED (version) and red for every other result.
The summary after a fleet update
After Run Fleet Update the log shows a summary block headed SUMMARY: one line per device with the address, the version before and after, the time it took and the result, then a line with the number of devices, how many ended with a good result and how many had a problem. The command line prints the same block.
The report file
When Write report CSV is ticked, the tool writes a report file after the run and names it in the log. The chapter Requirements and installation tells where the file is saved.
The report is a comma-separated text file in UTF-8 with one header row and one row per device, sorted by the address as text (so 192.168.0.10 comes before 192.168.0.9). The columns, in this order:
| Column | Content |
|---|---|
| timestamp | Date and time the update of this device started (YYYY-MM-DD HH:MM:SS); empty for a device that ended with an unexpected error. |
| ip | The address from the device list. |
| product | Product name read from the device; empty if it could not be read. |
| before_version | Firmware version before the update. |
| after_version | For SUCCESS and UPDATED, FACTORY RESET FAILED the version read back after the restart; for SKIPPED (version) the running version; for UPLOADED, NOT CONFIRMED, BANK SWITCH REFUSED and a device cancelled after the upload, the version of the image waiting in the alternative bank; otherwise empty. |
| status | Short code of the result, for example success, skipped or mismatch. |
| status_label | Result name as in the table above. |
| duration_s | Time the device took, in seconds; empty for a device that ended with an unexpected error. |
| message | Short text with the reason or detail, for example complete, or the two product names of a product mismatch. |
| tool_version | Version of abcZ Network Tool that wrote the report. |
| before_build | Build date of the firmware before the update. |
| after_build | Build date after the update, in the same sense as after_version. |
| new_ip | The new address, if the device answered at another address after the restart; otherwise empty. |
| factory_reset | yes if a factory reset was sent to the device after the update and the device neither refused it nor answered it with an error; this does not prove that the reset was done when the device gave no confirmation. Otherwise empty, also for UPDATED, FACTORY RESET FAILED. |
The log
The Log at the bottom of the window shows every step of every tab. Drag the divider above it to make it larger or smaller.
Most lines start with [i] for information, [OK] for a step that worked (green), [WARN] for a warning (amber) and [ERR] for an error (red). Lines without such a mark take the colour of their kind, for example the "RESULT:" line and the summary. In a fleet update, each device's lines have its address in square brackets in front, so you can follow one device among several running at the same time.
While the tool works, a moving bar and the Stop button appear above the log. During a scan, the count of addresses already tried is shown next to them.
Save Log... asks for a file name and saves the whole log as a text file. The Clear button of the log empties the log window; reports that were already written are not affected.
Note
The log is not saved by itself and is lost when you close the tool. After an update on Single Device Update, which writes no report, use Save Log... if you need a record.

From the command line the same lines are printed in the console; [ERR] lines go to the error output.
Command line reference
Run abcZ_Network_Tool.exe with arguments to use it without its window, for example from a script. The table lists every option the tool accepts.
--help (or -h) prints the list of options and exits.
Options
| Option | Default | Description |
|---|---|---|
--version | - | Print the program name, version and build date, then exit. |
--ip IP | - | Single-device mode: target IP address |
--image IMAGE | - | Single-device mode: firmware image file (.binimg) |
--expected-product EXPECTED_PRODUCT | - | Single device: expected product name (mismatch is a HARD abort) |
--csv CSV | - | Fleet mode: device CSV (ip,expected_product,image_path[,target_version]) |
--jobs JOBS | 4 | Fleet parallelism (default 4) |
--pilot PILOT | - | Fleet mode: validate this IP first; halt the fleet if it fails |
--report REPORT | - | Report CSV path (fleet mode default: auto timestamped file in the 'reports' folder next to the program) |
--no-report | off | Fleet mode: do not write the automatic report CSV |
--port PORT | 80 | Device web server port (default 80) |
--username USERNAME | admin | HTTP Basic Auth user (device fixed: admin) |
--password PASSWORD | admin | HTTP Basic Auth password (factory default: admin) |
--target-version TARGET_VERSION | - | Single device: skip if already at this version. When omitted, the version is taken from the image FILE NAME (e.g. ..._v3.00.00.binimg) |
--force | off | Override version skip (does NOT override product mismatch) |
--no-reboot | off | Upload only; do not bank-switch |
--factory-reset | off | After a CONFIRMED update, restore factory configuration (ALL SETTINGS LOST; IP may change via DHCP) |
--allow-image-mismatch | off | Continue even when the image does not match the device (frequency, I/O modules, BPL/Lite, LoRaWAN region). Default: abort |
--upload-timeout UPLOAD_TIMEOUT | 180 | Upload response timeout in s (default 180) |
--confirm-wait CONFIRM_WAIT | 12 | Pre-wait before confirmation in s (default 12) |
--retries RETRIES | 2 | Retries for identity-read/upload (default 2; NO reboot retry) |
--retry-delay RETRY_DELAY | 3 | Delay between attempts in s (default 3) |
--gui | off | Open the graphical interface (running with no arguments also opens the GUI) |
--scan SCAN | - | Discovery: HTTP IP-range scan (CIDR/range/single IP; e.g. 192.168.0.0/24) |
--discover | off | Discovery: UDP broadcast (30303) - ONLY same subnet as the PC |
--save-csv SAVE_CSV | - | Write discovery results to a fleet CSV |
--scan-timeout SCAN_TIMEOUT | 2.5 | Scan per-host timeout in s (default 2.5) |
--scan-jobs SCAN_JOBS | 24 | Scan parallelism (default 24; devices accept ~7 HTTP connections - very high values plus repeated scans can exhaust their sockets) |
--disc-timeout DISC_TIMEOUT | 2.5 | UDP broadcast discovery listen time in s (default 2.5) |
--assign-factory-address | off | Give the device at the FACTORY address 192.168.1.1 a new IP: adds a temporary address 192.168.1.250/32 + route to the chosen adapter, checks the device is REDZ, asks you to confirm its product/MAC (or checks --expect-mac), writes --new-ip/--mask/--gateway, reboots it, then removes the temporary address. Run as ADMINISTRATOR. Without --adapter it lists the adapters. Exit: 0 done, 1 failed (adapter restored), 2 refused (nothing changed), 3 clean-up incomplete |
--adapter ADAPTER | - | --assign-factory-address: network adapter ifIndex (the one the device is connected to) |
--new-ip NEW_IP | - | --assign-factory-address: device's new IP |
--mask MASK | - | --assign-factory-address: new subnet mask |
--gateway GATEWAY | - | --assign-factory-address: new gateway |
--expect-mac EXPECT_MAC | - | --assign-factory-address: MAC the device at the factory address must have (aa:bb:cc:dd:ee:ff or aa-bb-...); if it differs nothing is written. With it there is no prompt; without it the tool asks on the console (and refuses when there is no interactive console) |
--undo-factory-assign | off | Remove a temporary address/route left by an interrupted --assign-factory-address run (from its clean-up record). Run as ADMINISTRATOR |
Exit codes
When you update one device (--ip and --image), the tool ends with the exit code of the result:
| Result | Exit code |
|---|---|
| SUCCESS | 0 |
| SKIPPED (version) | 0 |
| UPLOADED (no reboot) | 0 |
| IDENTITY READ FAILED | 2 |
| PRODUCT MISMATCH | 3 |
| IMAGE FILE MISSING | 4 |
| UPLOAD ERROR | 5 |
| IMAGE INVALID | 6 |
| ALT IMAGE DISABLED | 6 |
| NOT CONFIRMED | 7 |
| CANCELLED (stopped) | 8 |
| IMAGE/DEVICE MISMATCH | 9 |
| BANK SWITCH REFUSED | 10 |
| UPDATED, FACTORY RESET FAILED | 11 |
When you update a list of devices (--csv), the tool ends with 0 if every device ended with exit code 0, and with 1 otherwise. If it cannot read the CSV file, it ends with 2.
A search for devices (--scan or --discover) ends with 0.
Assigning an address at the factory IP (--assign-factory-address) and its clean-up (--undo-factory-assign) end with their own codes: 0 done, 1 failed but this PC's network adapter was restored, 2 refused with nothing changed, 3 the network clean-up is not complete. --assign-factory-address without --adapter lists the network adapters and ends with 2. --undo-factory-assign ends with 0 when the Windows user who runs it has nothing to clean up, with 2 when a clean-up record exists but the command prompt was not opened as administrator, and with 3 when the record cannot be read or the clean-up is not complete. The chapter Assigning an address at the factory IP describes both.
A command line the tool cannot accept, such as --pilot without --csv, prints the reason and ends with 2.
Troubleshooting
This chapter starts from what the tool shows: a message in the log, a word in a table or a result name. The result names are explained in the chapter Results and reports.
A scan finds no devices
The first log line of a scan gives the number of addresses the tool tries, the last line how many of them answered as a REDZ device. If the number of addresses is not what you meant, check IP range: the chapter Discovery lists the forms it accepts. A single address is used as you typed it, so a typing error gives an empty result without an error message. A range the tool cannot read stops the scan with an error line.
If the range is right, check these causes:
- The devices are in another subnet. Discover (UDP) finds only devices in the PC's own subnet. Use Scan (HTTP) with the devices' range; it reaches them only if the PC has a route to them.
- The answers are slow. An address that does not answer within Timeout (s) (2.5 seconds at first) counts as empty. Raise it for devices behind a router.
- The devices use another web port. Type it in Port.
- Only devices that show a REDZ start page are listed with a product name. Another web server that asks for a password, for example a router, can also appear with "auth required (password?)".
- A device with another password is not missing: it is listed with "auth required (password?)" (see below). Such a row can also be another device on the network that asks for a password.
- A device that found no DHCP server may be at 192.168.1.1 (see below).
A row from Discover (UDP) with (UDP) at the end of the Product cell is a device that answered the broadcast but not the web request. Check Port, or open its web page with a double-click.
Devices stop answering after a scan
Each device accepts only about seven web connections at the same time. Scans with a high Parallel value repeated one after the other can use them all up: in a test with 48 parallel requests and repeated scans of 254 addresses, every device stopped answering for about a minute and then came back by itself.
If this happens, wait a minute and scan once more. Leave Parallel at its default of 24 unless you scan a large range, and do not start scans one right after the other.
Note
Do not leave Parallel empty: the tool then tries 64 addresses at once.
A device asks for a password
"auth required (password?)" in the Product column means the device answered but did not accept the user name and password of the Discovery tab. Type the device's password in Password and scan again. The user name is always admin.
On Single Device Update, Read Identity (safe) then logs "-> is the password correct? (factory default admin)", and Update ends with IDENTITY READ FAILED and the hint "Device requires HTTP authentication." Each tab has its own Password field.
A right-click action on a device with another password fails with HTTP 401 and the hint password? in the Status column.
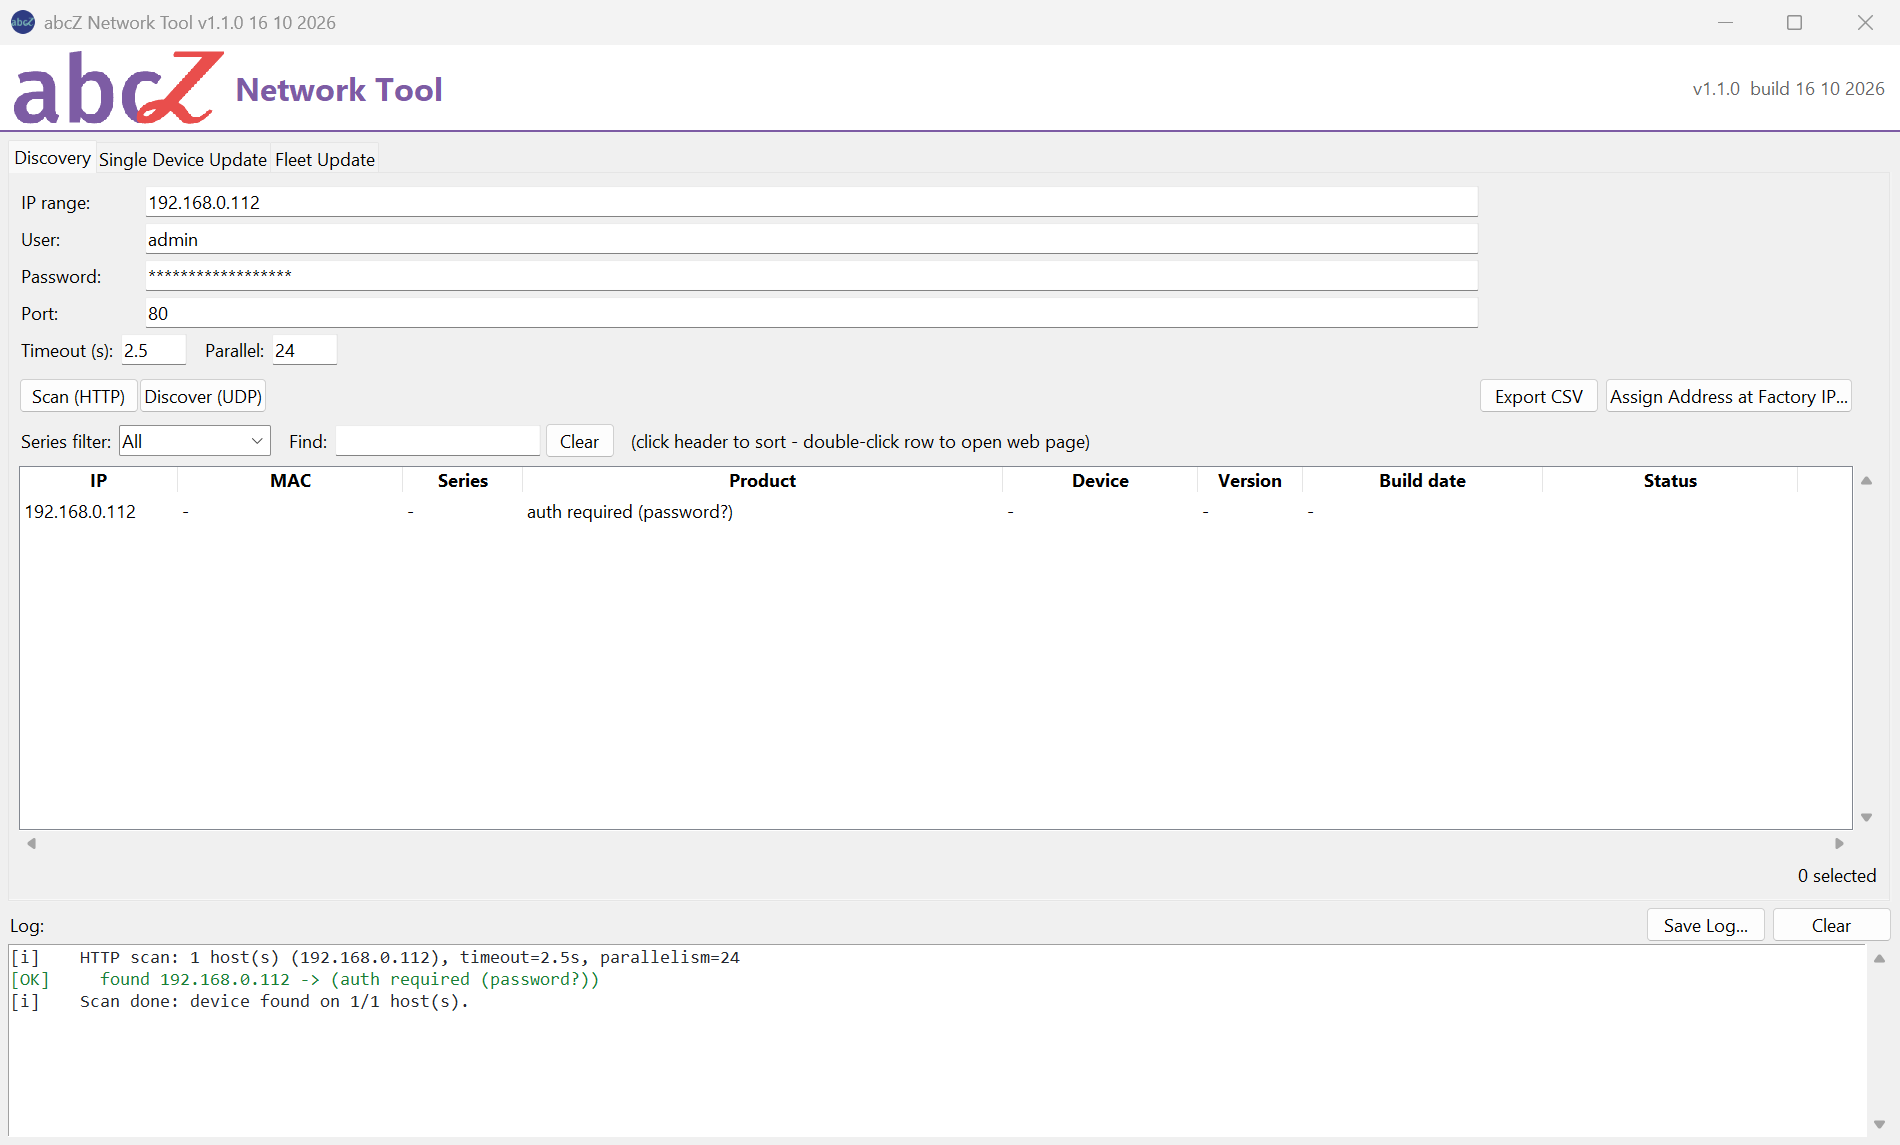
IDENTITY READ FAILED
The tool could not read the device's start page, also after two more tries a few seconds apart. Nothing was written to the device. The log line before the result gives the reason:
- a connection error or a timeout: the device is off, restarting, at another address, or not reachable from this PC;
- an error with 401: the password (see above);
- an HTTP error such as 404, or "index.htm tokens not found (could not read product/version)": something answered at that address, but not with the start page of a REDZ device.
Use Read Identity (safe) to test the address and password before you start an update; it changes nothing on the device.
PRODUCT MISMATCH
The log shows "PRODUCT MISMATCH - upload aborted (safety)." and, below it, the product name read from the device and the expected one. Nothing was written, and no option overrides this check.
The comparison ignores upper and lower case and extra spaces, but nothing else. Check first that the address and the image belong together. If they do, the expected name is wrong: on Single Device Update clear Expected product and click Read Identity (safe), which fills it with the device's own name; for a fleet, create the list with Export CSV on the Discovery tab, which writes the names as the devices report them.
An empty expected product does not cause this result: the check is then skipped, and the log warns "PRODUCT SAFETY CHECK SKIPPED." In the Fleet Update table such a row shows (EMPTY!) in the Expected product column.
IMAGE FILE MISSING
The image file was not found at the path given. Nothing was written. The log names the path the tool looked for.
In the Fleet Update table, Image shows (none) for a row without an image and MISSING: in front of a file name that does not exist, and the confirmation before the run counts these rows. A relative image path in the device list is read from the folder of the list file, not from the folder of the program. Validate CSV (dry-run) counts the rows without a usable image, but it reads the list file again and so removes images you assigned with a right-click.
IMAGE INVALID and ALT IMAGE DISABLED
IMAGE INVALID has three causes; the log tells which one:
- "IMAGE CHECKSUM MISMATCH - upload aborted (device untouched)." The image file does not match the checksum in the release file next to it: "The image file is corrupt or is not the one the manifest describes." Nothing was sent to the device. Copy the image and its release file again from the firmware package.
- The device refused the image: "Likely a wrong-family or corrupt image: the device could not validate it." and "Only the ALTERNATE bank was written; the running firmware is UNCHANGED." The tool does not try again, because the answer would be the same.
- "Upload response invalid (version/date empty). Bank switch NOT done." The device took the file but its answer had no version or build date, or an unknown mark; an image of another device family also gives this answer.
ALT IMAGE DISABLED comes with "Alt image NOT VERIFIED (response line 3: 'disabled'). Bank switch NOT done." The device received the image but did not accept it as valid.
In all these cases no switch was made and the device runs its old firmware. Check that the image is the one for this device's family and model (the chapter Safety checks describes what the tool and the device check).
IMAGE/DEVICE MISMATCH
Before it writes, the tool compares what the image is made for with what the device reports. When they differ, the log shows "IMAGE/DEVICE MISMATCH - the image file does not look right for this device:" and one line for each difference: product family, frequency, LoRaWAN region, BPL variant, LoRaWAN build, Lite model, EMH model or I/O modules, each with what the image says and what the device reports.
On Single Device Update the window Image / device mismatch asks whether to continue; No is the default. No ends with "Aborted: image/device mismatch not confirmed. Device untouched." and the result IMAGE/DEVICE MISMATCH. Yes writes the image anyway, and the log line "Proceeding anyway" gives the reason "confirmed by the user".
In a fleet update with Stop on image/device mismatch ticked (it is ticked at first), the device gets this result and the others continue; if it is the pilot device, the fleet stops. From the command line the update stops unless you give --allow-image-mismatch.
Warning
With Stop on image/device mismatch cleared, a fleet update does not ask: the tool only warns and writes the image to every device that does not match and, unless Upload only (no reboot) is ticked, switches the device to that image. The confirmation before the run warns that "an image that does not match its device will be written WITHOUT asking.", and the log line "Proceeding anyway" then says "nobody was asked". Clear the box only when you are sure that every image in the list is right for its device.
Warning
Continue only when you are sure the image is right. The device itself does not refuse every wrong image: an image of another variant of its own family, and some images of a related product family, are accepted, and such an image can leave it inoperable. Choose the image of this variant instead.
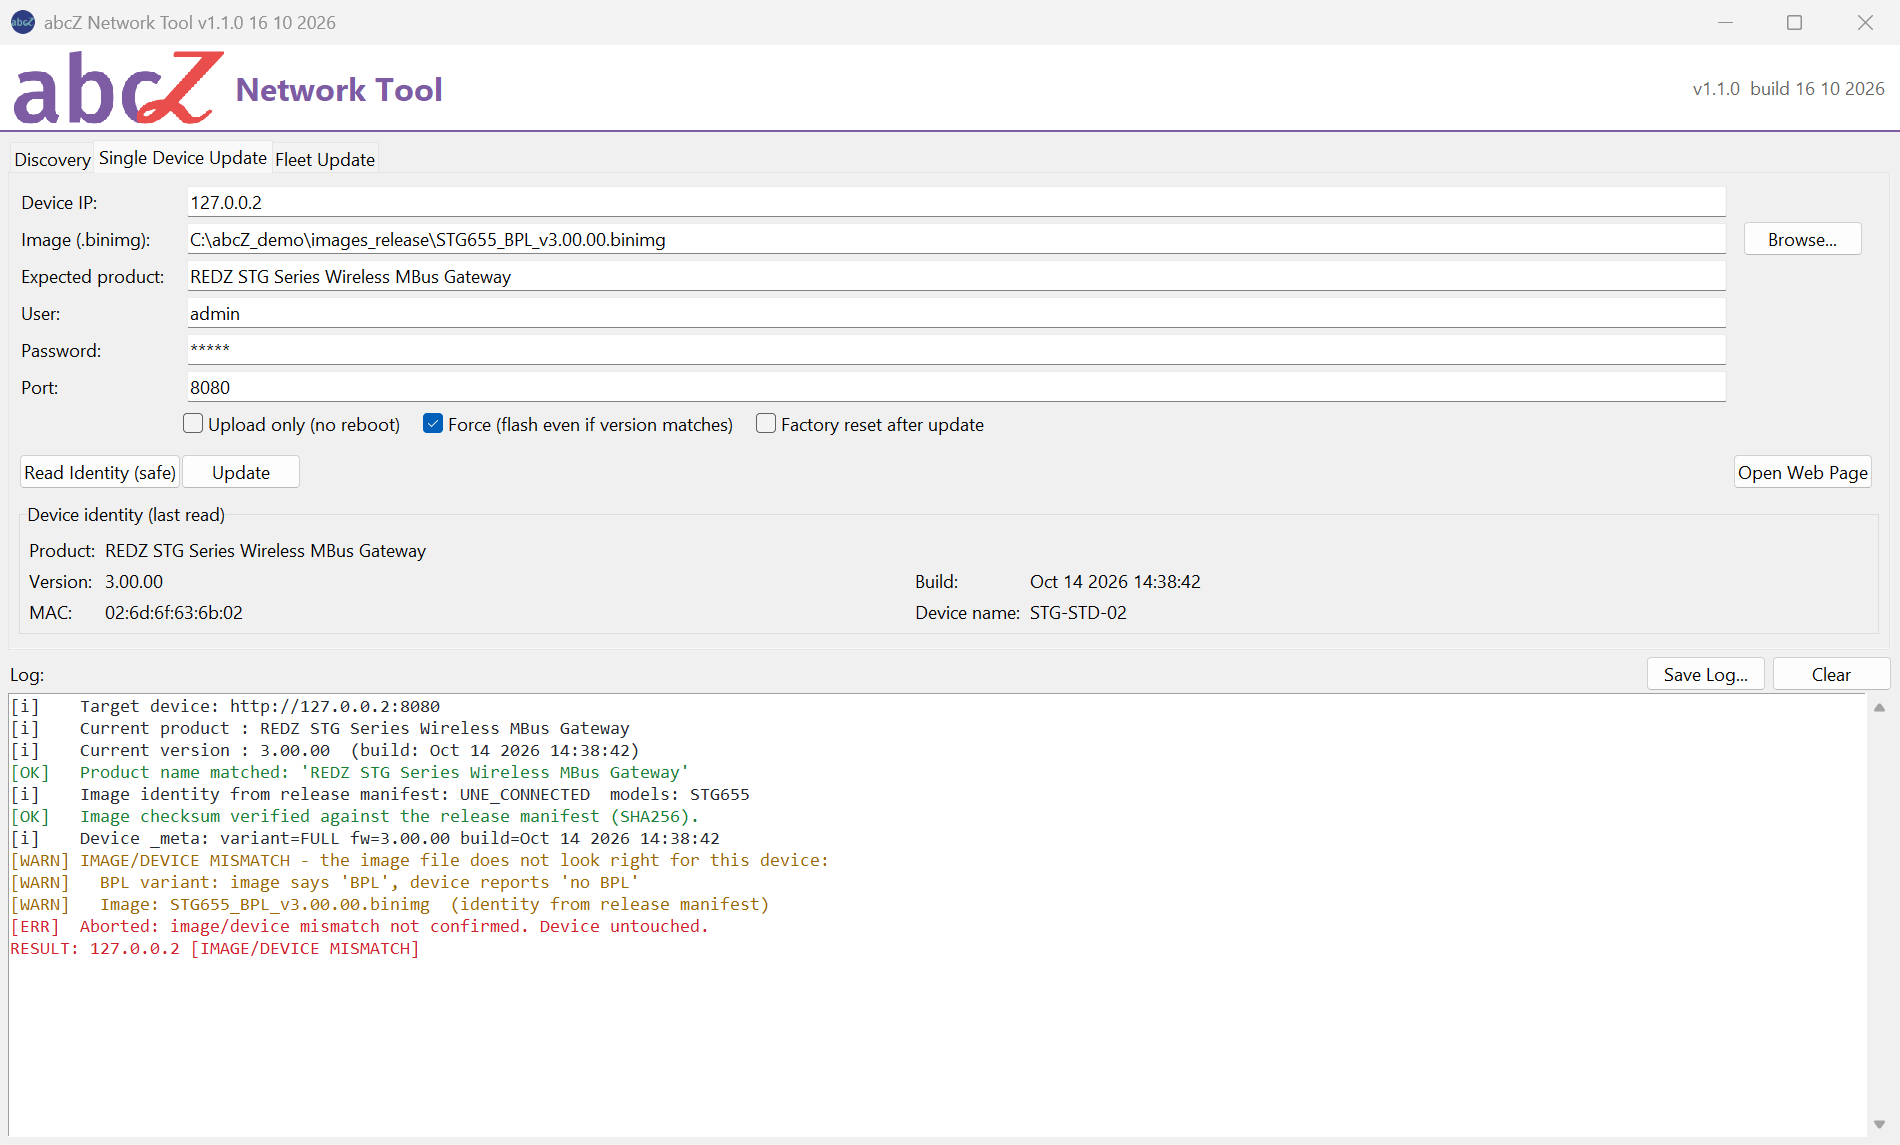
NOT CONFIRMED
The image was written and the switch command sent, but the tool did not see the device run the new version. It waited and asked the device at its address; when it knew the device's MAC address, it also searched the address's subnet for it and, unless the address was already 192.168.1.x, tried the factory address 192.168.1.1. The log then gives the likely reasons:
- "Device still rebooting (wait longer and check GET / manually)."
- "Layout change triggered factory-reset -> IP changed (MAC search found nothing this time; re-run Discovery later)."
Below these lines the log can add advice for the device's address (see "A device at 192.168.1.1" below). If the tool had not read the MAC address before the update, the log says "The MAC address was not read before the update - the tool cannot search for the device at another address." If the device did not answer at the factory address either, the log says so and adds the advice for 192.168.1.1.
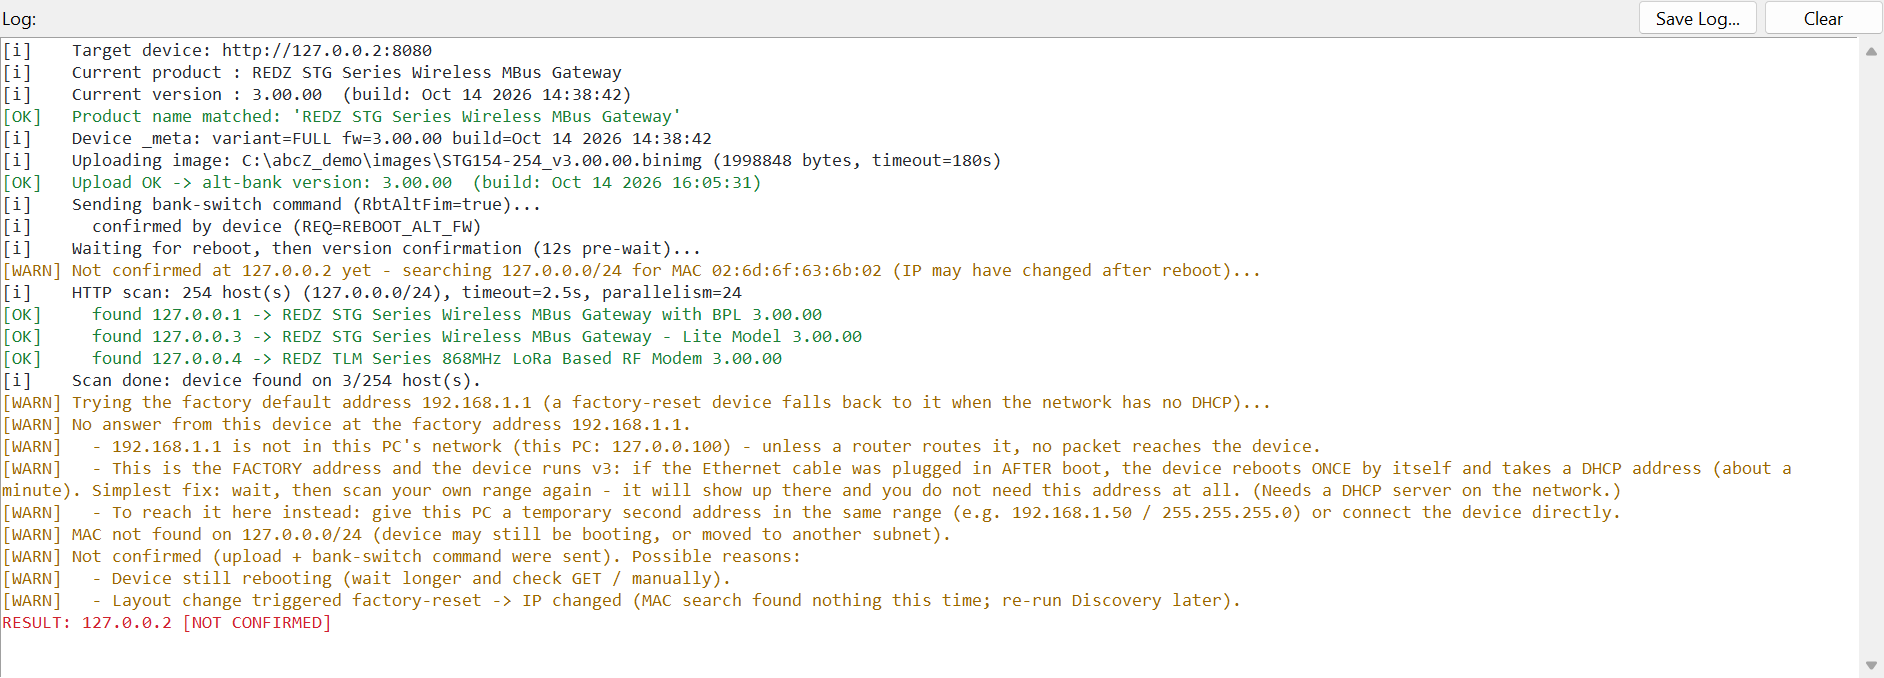
If the line after "Sending bank-switch command (RbtAltFim=true)..." shows FAILED with an HTTP code, the device answered the switch command with an error instead of taking it. Read its version with Read Identity (safe): if it still shows the old version, the new image is waiting in the alternative bank.
Wait a minute, then find the device with Scan (HTTP) and look at its version and build date. The tool sends the switch command only once on purpose, because a second switch would go back to the old firmware. (Only when the device answers HTTP 404 on the answer path, which means it did not take the command, is it sent once more the old way; see the chapter Firmware generations (v2 / v3).) Check the device before you start another update.
UPDATED, FACTORY RESET FAILED
The update itself worked: the tool confirmed the new version and build date. But you had ticked Factory reset after update, and the reset command after the update was refused by the device, could not be sent or was answered with an HTTP error. The device runs the new firmware without the requested factory reset (after a move between firmware generations its settings were already reset by the update itself). The error line "Factory restore" in the log gives the reason. For a single-device update on the command line the exit code is 11; a fleet run returns 1.
The result is SUCCESS, also with (factory reset) after it, when the tool cannot tell whether the reset was done: when the answer to the reset command was lost, or when the firmware gives no answer to commands ("accepted (HTTP 200; device gives no acknowledgement on this firmware)"). In both cases the reset command was sent, but its effect is not confirmed. If the line "Factory restore" says that the response was lost, or shows that the device gave no acknowledgement, check the device's settings before you rely on the reset.
If this happens to the pilot device of a fleet update, the fleet stops before the other devices.
To reset the device now, find it with Scan (HTTP) on the Discovery tab and use Restore Factory Configuration (selected)... (see the chapter Device actions). Running the update again with the same image does not help: the device already runs that version, so it is skipped (unless Force (flash even if version matches) is ticked, or the image file name carries no version and no target version was given; then the image is written again).
BANK SWITCH REFUSED
The device answered the switch command with a refusal. The log shows "BANK SWITCH REFUSED - the device is still running the old firmware." and, on the line before, the reason the device gave. The new image stays in the alternative bank; nothing changed for the running firmware.
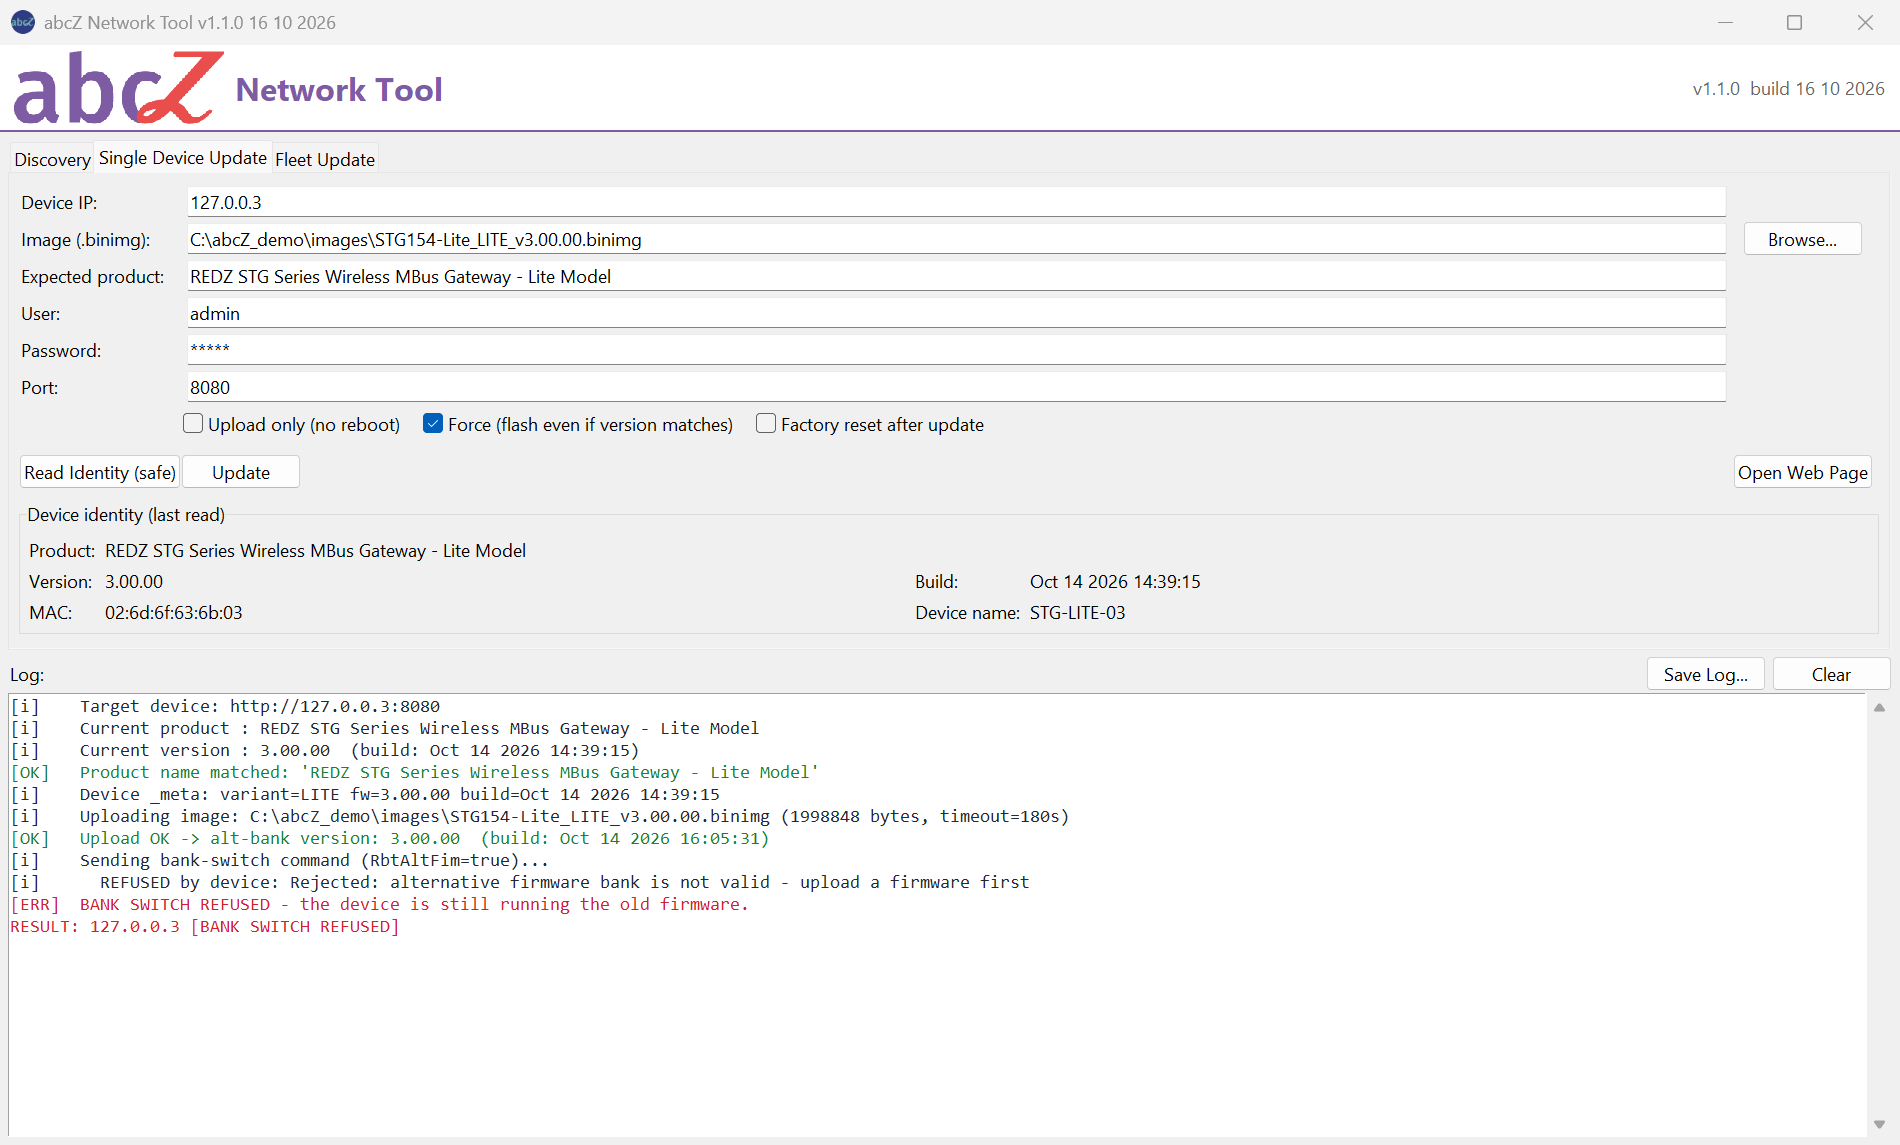
The same result comes when the command could not be sent at all: "Bank-switch command could NOT be sent - the device did not accept a connection. The uploaded image stays in the alternate bank (nothing was activated); re-run when the device is reachable."
Only firmware that answers commands (see the chapter Firmware generations (v2 / v3)) gives a reason; on other firmware this result means the command could not be sent. If the reason says that the device acknowledged a different request, the tool does not know what the device did: check it with Read Identity (safe).
Examples of reasons for a refused switch (the exact words depend on the family and the firmware version):
| The reason says | What to do |
|---|---|
| the alternate firmware bank or image is not accepted / not valid | The image waiting in the alternative bank cannot be used. Run the update again: the tool sends the image again before it asks for the switch. |
| config flash invalid | Restart the device as the reason says, then run the update again. |
| reboot in progress | The device is restarting. Wait until it answers again, then run the update again. |
A device at 192.168.1.1
After a factory reset, and after an update between firmware generations that resets the settings (see the chapter Firmware generations (v2 / v3)), a device asks for an address from a DHCP server. If there is none, it uses its factory address 192.168.1.1, which a scan of your own range does not include unless your range is 192.168.1.x.
After an update the tool tries this address by itself when it knew the device's MAC address and could not find it in the subnet, unless the device's address was already 192.168.1.x. The log says whether the device answered there.
When an action on 192.168.1.1 cannot reach the device, or an update does not find the device there, the log adds advice. For a device whose version the table shows as 3.x (during an update: when the new image is 3.x): "This is the FACTORY address and the device runs v3: if the Ethernet cable was plugged in AFTER boot, the device reboots ONCE by itself and takes a DHCP address (about a minute). Simplest fix: wait, then scan your own range again - it will show up there and you do not need this address at all. (Needs a DHCP server on the network.)" Otherwise, also when the version is unknown: "This is the FACTORY address. On v2 firmware the device does NOT re-acquire an address when the cable is plugged in later - it stays here until it is rebooted with the cable already connected."
If the PC has no address in that range, the advice ends with: "To reach it here instead: give this PC a temporary second address in the same range (e.g. 192.168.1.50 / 255.255.255.0) or connect the device directly." The chapter Firmware generations (v2 / v3) explains the difference between the two generations.
Instead of changing your PC's address by hand, you can let the tool give the device its new address: Assign Address at Factory IP... on the Discovery tab adds a temporary address to your PC's network adapter only for the time it needs and removes it again. See the chapter Assigning an address at the factory IP.
Appendix: device families
This appendix lists what abcZ Network Tool reads from a product name, from the variant a device declares and from an image file name. The chapter Safety checks explains how these values are compared.
Product names
The family code in the Series column is the word after REDZ in the product name, normally in the form "REDZ <code> Series ...". A product name without REDZ gets no family; the column shows -.
| Family | Product name contains | Example |
|---|---|---|
| TLM-LM | REDZ TLM Series, without LoRaWAN | REDZ TLM Series 868MHz LoRa Based RF Modem |
| TLM-LW | REDZ TLM Series and LoRaWAN | REDZ TLM Series EUROPE 868MHz LoRaWAN EndNode Modem |
| STG | REDZ STG Series | REDZ STG Series Wireless MBus Gateway |
| HUR | REDZ HUR Series | REDZ HUR Series Multi Slot I/O Device |
| CKL | REDZ CKL Series | REDZ CKL Series Serial To Ethernet Gateway - Lite Model |
| LKM | REDZ LKM Series | REDZ LKM Series IEC62056-21 Meter to Modbus TCP Gateway |
TLM-LM and TLM-LW share the name "REDZ TLM Series" but are different firmware families. Only the word LoRaWAN in the product name tells them apart. HUR and LKM names can also contain LoRaWAN; there the word marks the LoRaWAN build, not another family.
The tool also reads these variant words from the product name. Capital letters do not count:
| Product name contains | The tool takes it as | Families |
|---|---|---|
| with BPL | BPL build | All |
| Lite Model | Lite build (on an LKM LoRaWAN build: Lite, EMH unknown) | All |
| EMH Model | EMH build (an EMH build is also a Lite build) | LKM (not the LoRaWAN build) |
| LoRaWAN | LoRaWAN build | All |
| EU868 or EUROPE 868, IN865 or INDIA 865, AS923 or ASIA 923, US915 or US 915 | LoRaWAN region EU868, IN865, AS923 or US915 | All |
| 2.4 GHz, or else 868 | Frequency 2.4 GHz or 868 MHz | TLM-LM only |
A variant word (with BPL, Lite Model, EMH Model, LoRaWAN) that is missing from a product name counts as "not that variant": a device whose name has no "with BPL" is taken as a device without BPL. Exception: the LoRaWAN Lite and EMH builds of LKM are both named "... - Lite Model". For these names the tool leaves EMH open; only the firmware 3 declaration (see below) shows whether the meter is an EMH build. A region or frequency missing from the name stays unknown; a missing region counts as "none" only against an image named from firmware 3 on or described by a release file.
Warning
LKM LoRaWAN meter readers with "- Lite Model" in the product name: when the tool cannot read the device's declaration (firmware 2, or the declaration cannot be read), it does not know whether the meter is a Lite or an EMH build and does not compare this field. Neither a Lite nor an EMH image is then stopped by it, and the log warns that the field was not checked. On these devices, check yourself that the image name matches the build of the device (Lite or EMH) before you start the update.
Variants by family
From firmware 3 on, TLM-LM, TLM-LW, STG and LKM devices also declare their build variant. The tool reads it during an update, just before the image check (not when the update stopped before it: product mismatch, version skip or a missing image file), and writes it into the log as "Device _meta: variant=...". A device with firmware 2 declares none. If the declaration cannot be read, the tool uses the product name only.
| Family | Declared variants | What the tool takes from it |
|---|---|---|
| LKM | FULL, LITE or LITE_EMH, followed by ,LORAWAN for the LoRaWAN build | Lite, EMH and LoRaWAN build |
| STG | FULL or LITE, followed by ,UNE for the BPL build | Lite, and "not a LoRaWAN build". BPL is taken from the product name |
| TLM-LM | 868 or 2G4, followed by ,UNE for the BPL build | "Not Lite" and "not a LoRaWAN build". Frequency and BPL are taken from the product name |
| TLM-LW | EU868, US915, AS923 or IN865 (the band), followed by ,UNE for the BPL build | "Not Lite". LoRaWAN is a property of the family; region and BPL are taken from the product name |
When a device declares a variant, Lite and EMH are taken from the declaration; the LoRaWAN build too, except for TLM-LW, where LoRaWAN is always taken as yes.
HUR and CKL devices are compared by their product name. For HUR, the tool also reads the I/O modules fitted in the device when the image file name lists modules.
What an image file name tells the tool
Without a release file next to the image, the tool learns what the image is for from its file name. Capital letters do not count. A "part" below is text between the separators _ - . or at the start or end of the name.
| Hint | Found in the file name | Example part |
|---|---|---|
| Family | TLM (with _LW or LORAWAN: TLM-LW, else TLM-LM), HUR, STG, CKL or LKM anywhere in the name; if a name contains more than one, HUR, STG, CKL and LKM win over TLM, in this order | TLM111_LW, STG111 |
| Frequency (TLM-LM only) | 2.4GHz (also 2_4GHz or 24GHz), or else 868 | 2.4GHz, 868MHz |
| BPL build | The part BPL | _BPL_ |
| Lite build | The part LITE | _LITE_ |
| EMH build | The part EMH (also counts as Lite) | _EMH_ |
| LoRaWAN build | The part LW or LORAWAN; every TLM-LW image | _LW_ |
| LoRaWAN region | EU868, IN865, AS923 or US915 (also EUROPE868, INDIA865, ASIA923) | _EU868MHz |
| I/O modules (HUR) | AO, AI, DO or DI followed by the port count, optionally with a count such as 2x | _AO5_DO8_AI8_DI8, _2xDO8_2xDI8 |
| Version | v followed by the version, or else a number in the form 3.00.00 | _v3.00.00, _2.09.03 |
Image names from firmware 3 on name every variant of the image. When the version in the file name is 3 or higher, a variant that is not named counts as "not that variant" (no BPL, not Lite, no region). With a lower version, or no version, a missing part tells the tool nothing. The family and the frequency are compared only when the name contains them.
| Image file name | What the tool reads |
|---|---|
| TLM695_2.4GHz_BPL_v3.00.01.binimg | TLM-LM, 2.4 GHz, BPL, version 3.00.01; not Lite, not EMH, no LoRaWAN, no region |
| TLM111_LW_H3_US915MHz_v3.00.00.binimg | TLM-LW, LoRaWAN, US915, version 3.00.00; no BPL, not Lite |
| LKM615_LITE_EMH_v3.00.00.binimg | LKM, Lite, EMH, version 3.00.00; no BPL, no LoRaWAN, no region |
| LKM354-454_LW_EU868MHz_v3.00.00.binimg | LKM, LoRaWAN, EU868, version 3.00.00; no BPL, not Lite |
| STG111_H3_v2.09.03_iM881A-XL_LITE.binimg | STG, Lite, version 2.09.03; nothing else is known |
| HUR111_v2.07.00_2xDO8_2xDI8.binimg | HUR, I/O modules DO8 + DO8 + DI8 + DI8, version 2.07.00; nothing else is known |
| LKM111_v2.07.00.binimg | LKM, version 2.07.00; nothing else is known |
When the release file of the firmware package lies next to the image and lists it, the tool takes these values from the release file instead of the file name; only the HUR I/O modules, and the family or version when the release file does not give them, still come from the file name. The version skip never uses the release file: it uses the version in the file name, unless a target version is given for the device in a fleet list or on the command line. See the chapter Safety checks.
From which firmware version each family answers commands is listed in the chapter Firmware generations (v2 / v3).
Appendix: version history
The changes of each published version that you can see in the tool, newest first. This manual describes version 1.1.0.
Version 1.1.0 - 16 October 2026
- First published version.