Introduction
abcZ is a Windows program for REDZ optical probes. It finds your probes, reads what each probe reports about itself, and lets you change the probe's settings, read its Bluetooth or Wi-Fi module, update its firmware and read its diagnostic counters.
The probes abcZ works with
abcZ works with five probe models: KMK118, KMK119, KMK138, KMK139 and KMK179.
- KMK118: a probe without a mode switch. With current firmware its function is a setting of the probe; with older v5.x firmware the function is fixed by the firmware.
- KMK119: a probe with a 4-position switch. The switch position decides what the probe does.
- KMK138: a KMK118 with an ANSI optical head.
- KMK139: a KMK119 with an ANSI optical head.
- KMK179: a KMK119 with a Wi-Fi module instead of Bluetooth. It also has the 4-position switch. abcZ reaches it over the network: choose Connect by IP address (KMK Wi-Fi) in the SOURCE list and type its address. It does not appear when you click Find devices. A KMK179 that is not on a network yet is reached on the Service port page.
You do not choose the model. abcZ reads it from the identity the probe itself reports and shows it in the Model column of the device list. If a probe's identity could not be read, the column shows a dash.
The KMK138 is a KMK118 and the KMK139 is a KMK119, each with an ANSI optical head; they report the model code of a KMK118 and of a KMK119 respectively, so the Model column shows KMK118 for a KMK138 and KMK119 for a KMK139. Where this manual describes a KMK118 or a KMK119, the same applies to a KMK138 or a KMK139, unless the text names them.
How the window is laid out
The bar at the top of the window holds, among other controls, the SOURCE list, the Find devices button and, at the top right, the menu button (Application settings). The left bar lists the pages.
Overview, Settings, Module, Firmware and Diagnostics cannot be selected until you open a probe. To open one, double-click its row in the device list, or click the row once and then click Open device. abcZ then shows the Overview page of that probe. Firmware also opens when you tick several probes in the list and click Update firmware....
| Page | In the left bar | Needs an opened probe |
|---|---|---|
| Devices | Always | No |
| Service port | Always | No |
| Customer test | Only when opened from the menu | No |
| Overview | Always | Yes |
| Settings | Always | Yes |
| Module | Always | Yes |
| Firmware | Always | Yes |
| Diagnostics | Always | Yes |
| Log | Always | No |
The Customer test page is not in the left bar when abcZ starts. To open it, click the menu button at the top right and choose Open the Customer test page. The page then stays in the left bar until you close abcZ. The chapter Customer test describes it.
Requirements and installation
What you need
- A PC with 64-bit (x64) Windows 11 in a version Microsoft still supports, or with a Windows 10 Enterprise LTSC or IoT Enterprise edition that Microsoft still supports. abcZ is built on .NET 10, and these are the Windows versions .NET 10 supports.
- For KMK118, KMK119, KMK138 and KMK139 probes: a Bluetooth adapter that Windows recognises. abcZ uses the Bluetooth of Windows.
- For KMK179 probes: a network connection from the PC to the probe's IP address.
- For the Service port page: a USB optical probe connected to the PC.
- Nothing else: abcZ carries everything it needs inside its program file. You do not install .NET or any other runtime.
One program file, no installation
abcZ is one program file, abcZ.exe. There is no installer: copy the file into a folder and double-click it to start abcZ.
To remove abcZ, close it and delete abcZ.exe, settings.json, abcZ.log and abcZ.previous.log. abcZ also keeps an error report in the folder abcZ in your local application data, and the results of the Customer test page in the folder abcZ in your Documents.
Choose a folder you can write to, for example a folder in your Documents. abcZ keeps its settings and its session logs next to abcZ.exe. In a folder that Windows does not let you write to, abcZ still runs, but it cannot keep your settings or write its log file.
Only one abcZ runs at a time in your Windows session. If you start abcZ again while it is open, the second start closes without changing your settings or log files, and the open abcZ window is brought up with the note "A second abcZ was started and closed - this window is the one in use. The options given to that start were not applied."
The files abcZ keeps next to itself
- settings.json: your settings, for example the theme, the choice in the SOURCE list, the window's place and size, the device list's column widths and the last IP address you typed. abcZ creates it at its first start.
- abcZ.log: the log of the current session.
- abcZ.previous.log: the log of the session before. At each start abcZ renames the last abcZ.log to this name, so only the last two sessions are kept.
The result files of the Customer test page are not kept next to abcZ.exe but in the folder abcZ\customer-test in your Documents. The chapter Customer test describes them.
NOTE:
To move abcZ to another folder or another PC with your settings, close abcZ and copy abcZ.exe together with settings.json.
Quick start
This chapter takes you once through the most common path: find your probes, open one, read what it reports and switch it off again. Each step names the chapter with the details.
Read one probe
- Double-click abcZ.exe. abcZ opens on the Devices page and reads nothing by itself (the chapter Requirements and installation).
- In the SOURCE list at the top right, choose where your probes come from. For KMK118, KMK119, KMK138 and KMK139 probes, Bluetooth BLE + SPP (Serial Ports) is the choice abcZ starts with on its first start. For a KMK179, which abcZ reaches over the network, choose Connect by IP address (KMK Wi-Fi). abcZ remembers your choice.
- Click Find devices. Each probe gets a row as soon as it is found, and the row fills in when the probe has been read. For a KMK179, type its IP address in the box at the top instead (for example 192.168.4.145:2015) and click Connect. The chapter Devices explains the list.
- Look at the Status column. Ready means the probe answered and abcZ found nothing to point out. For any other status, hover the row to read why; No reply is explained in the chapter Troubleshooting.
- Double-click the probe's row, or click it once and then click Open device. abcZ opens the Overview page of that probe and reads it once more.
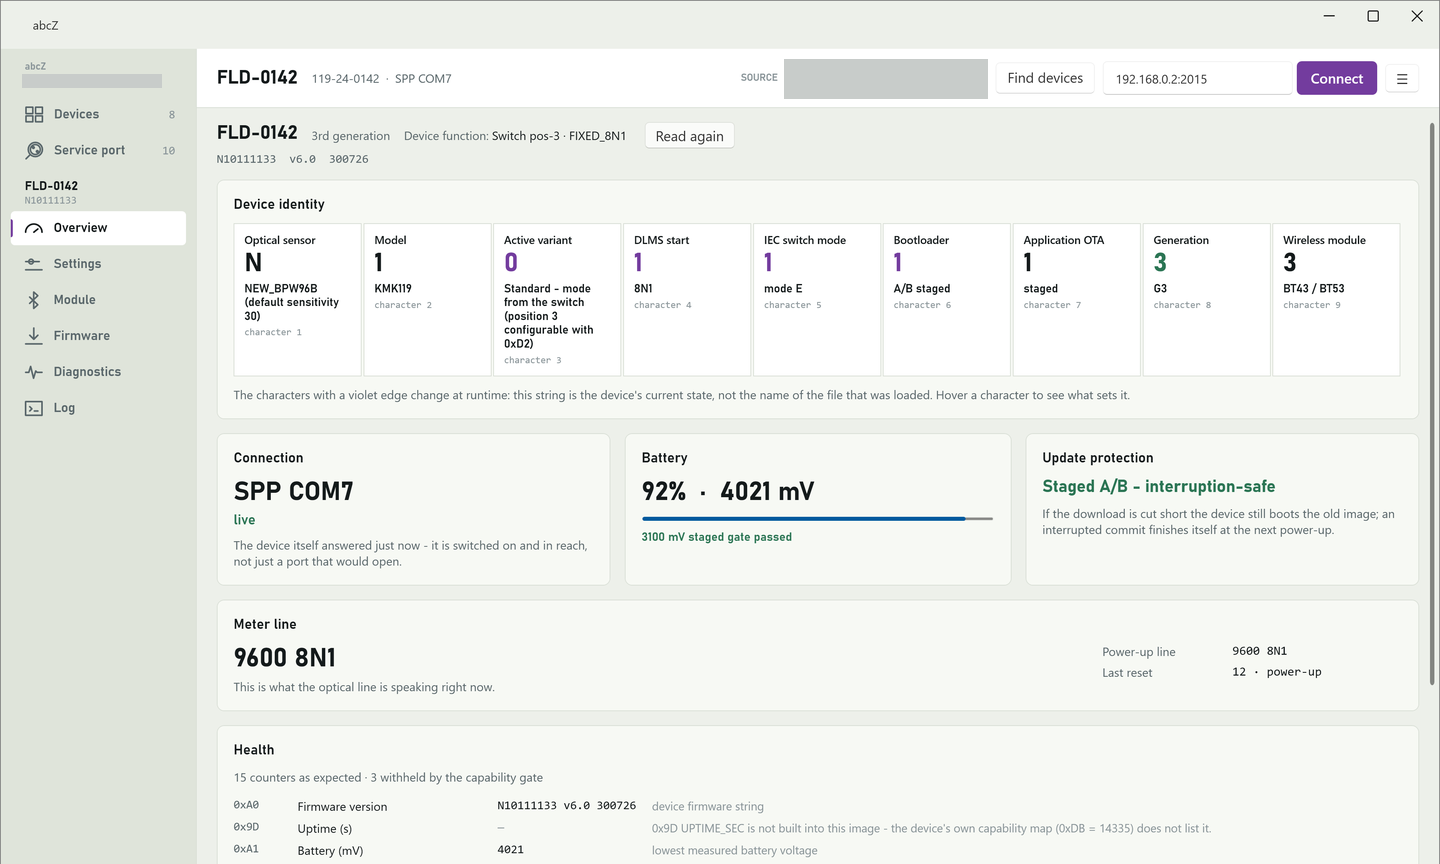
- Read the Overview page: the probe's name and firmware at the top, then Device identity, Connection, Battery, Update protection, Meter line and Health. Reading the Overview page changes no setting of the probe. The chapter Overview explains every card.
- When you have finished, switch off each probe you have read: open it, open the Settings page in the left bar and click Turn off (0xC2). abcZ does not ask again: the probe switches off at once, the same as with its power button, and the connection to it is gone. To use the probe again, switch it on by hand.
NOTE:
So that the probes in your list stay reachable while you work, abcZ suspends the auto power-off of every probe it reads on the Devices page and that answers with its identity. The probe's own setting is not changed, and closing abcZ does not end the suspension (the chapter Devices lists every way it ends). That is why you switch each probe you have read off when you are done.
Where to go next
- To change a setting of the probe, see the chapter Settings.
- To update the firmware of one probe or several, see the chapter Firmware.
- If something does not work, see the chapter Troubleshooting; the chapter Log says how to copy the log for support.
Devices
The Devices page is where abcZ finds your probes and lists them, one row per probe. Everything else in abcZ starts from a row of this list.
Finding probes over Bluetooth and over the network
The SOURCE list at the top right of the window says where the device list comes from. It does not limit what you can do with a probe once it is in the list.
- Bluetooth BLE + SPP (Serial Ports): the Windows serial ports of paired probes plus a 15 second Bluetooth Low Energy scan, in one list. A probe that is seen both ways gets one row, and abcZ then talks to it over its serial port.
- Bluetooth SPP (Serial Ports) Only: only the serial ports of probes paired in Windows. There is no scan, so the search is quicker.
- Bluetooth BLE Only: only what the Bluetooth Low Energy scan sees. Use it to check whether a probe is visible to the scan at all.
- Connect by IP address (KMK Wi-Fi): for a KMK179, which is reached over the network. A KMK179 never shows up in a Bluetooth search; you type its address instead (see below).
abcZ remembers your choice for the next start. Changing it closes the probe you have open and empties the list; nothing is read until you start a search. While probes are being read the list cannot be changed: abcZ says "The devices are being read right now - wait for that to finish before changing where they come from."
- Choose the source in SOURCE.
- Click Find devices. abcZ empties the list and starts again. Each probe gets a row as soon as it is found, and the row fills in when the probe has been read. abcZ only opens probes it recognises as REDZ probes (by the REDZ service a probe announces over Bluetooth, by its name or by its Bluetooth address); ports that answered last time are read first.
- To end the search early, click Stop (shown only while a search runs). Probes already being opened still finish and fill their rows; probes not reached yet show Not read.
NOTE:
A search that finds nothing is not proof that no probe is there: a short Bluetooth scan can miss one. Run Find devices once more before you look for another reason.
To read one serial port without a full search, click Select port (next to Find devices; shown only for the two sources with serial ports) and pick the port. Ports of paired REDZ probes are listed first, with the probe's name and address. Other ports are listed below them; reading one of those first asks you to confirm with Read it anyway, and its row is then marked chosen by hand. The rest of the list stays as it is: only the row of that port is added or refreshed.
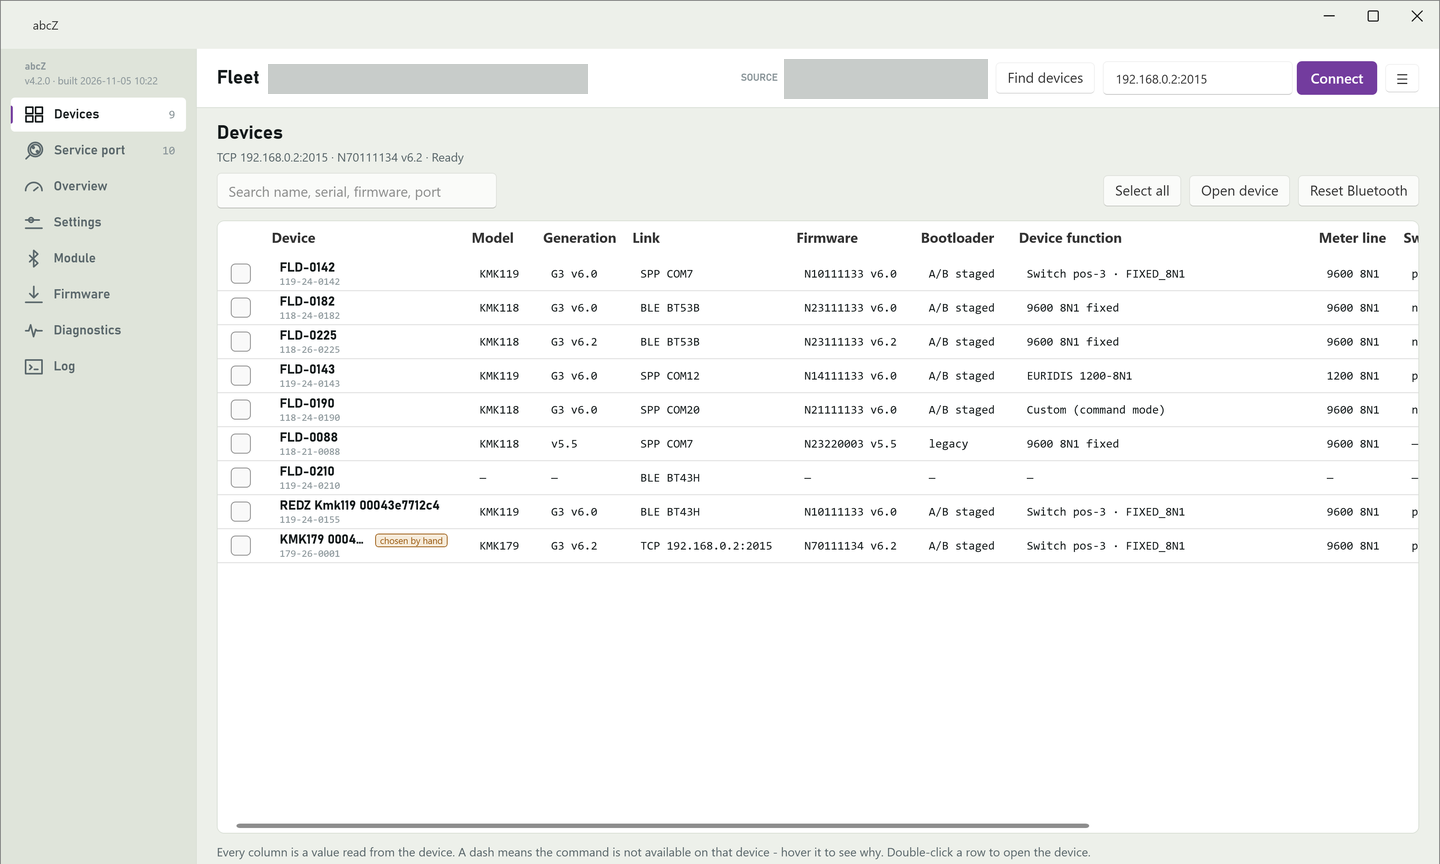
For a KMK179, choose Connect by IP address (KMK Wi-Fi). A box for the address appears at the top. Type the probe's IP address and port, for example 192.168.4.145:2015 (if you leave the port out, abcZ uses 2015), and click Connect. abcZ connects, reads the probe and adds its row. The box stays open, so you can add the next probe the same way. If the address cannot be used, abcZ says why next to the box. abcZ remembers the last address you tried and offers it next time.
NOTE:
On Connect by IP address (KMK Wi-Fi) there is nothing to search: clicking Find devices there empties the list, and the probes you added must be connected again.
The device list and its columns
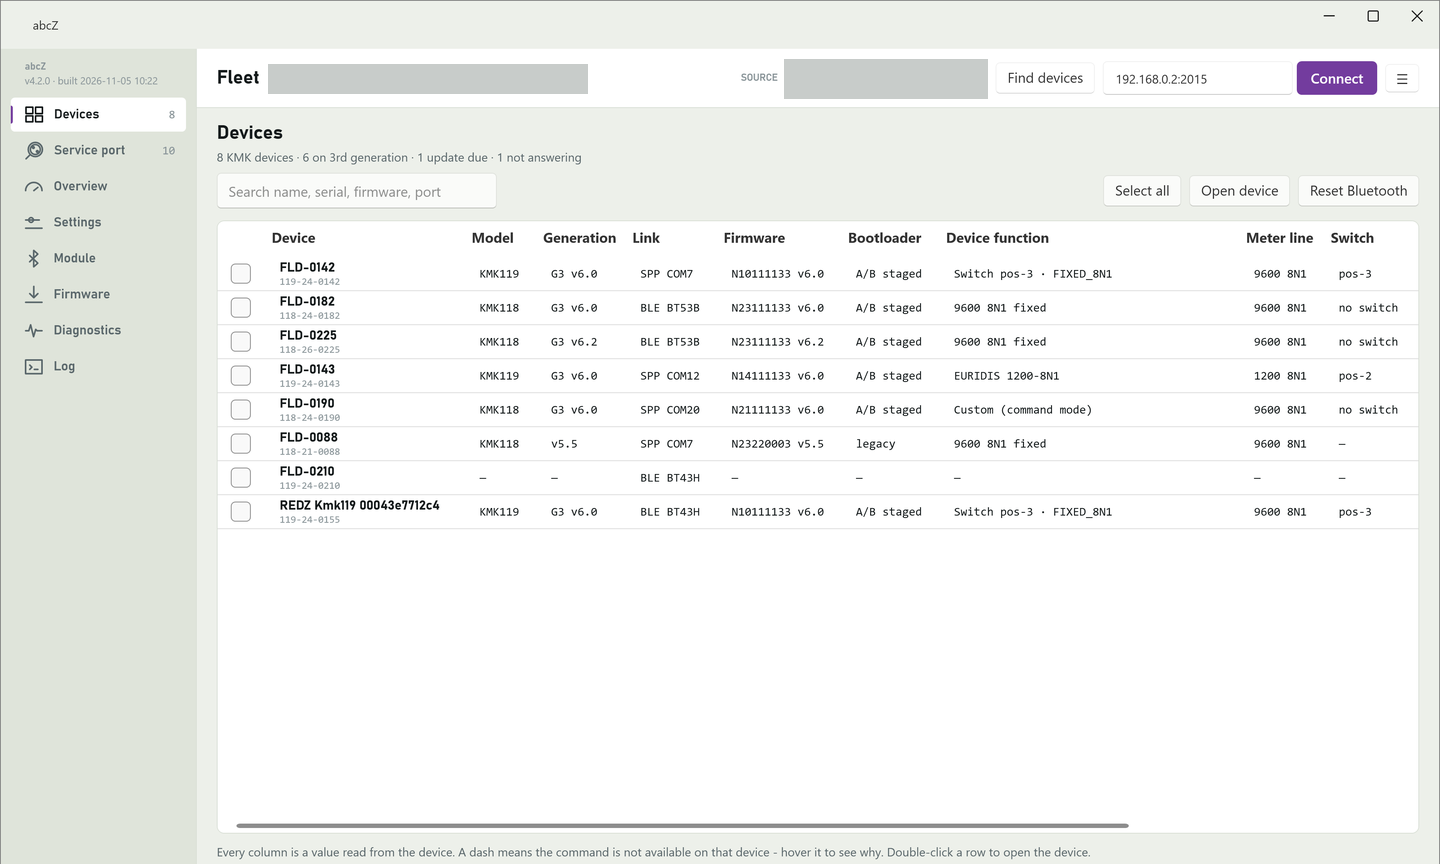
The Device and Link columns show how abcZ found the probe and how it reaches it; every other column shows a value read from the probe. The columns are:
| Column | What it shows |
|---|---|
| Device | The probe's name, and under it its serial number or Bluetooth address. A small label can follow the name: unnamed (the probe reports no name of its own), disconnected (the last read lost the connection; double-click the row to connect again) or chosen by hand (a probe added by its IP address, or a port abcZ does not recognise that you chose to read with Select port). |
| Model | The probe model, for example KMK119. |
| Generation | G3 and the version for a 3rd-generation probe; for an older probe, its version. |
| Link | How abcZ reaches the probe: SPP and the COM port, BLE, or TCP and the address. |
| Firmware | The firmware name and version the probe reports. |
| Bootloader | A/B staged or legacy: which kind of firmware loader the probe has. |
| Device function | What the probe is set to do right now. On a KMK118 this is a setting. On a KMK119 or KMK179 with the standard firmware, the position of its switch decides it. |
| Meter line | The speed and framing the probe uses toward the meter, for example 9600 8N1. Hover the cell to see where the value comes from. |
| Switch | The switch position, for example pos-2, or no switch. |
| Auto-off | After how many seconds the probe switches itself off when idle, or off. See "Auto power-off while abcZ is connected" below for what off and held mean here. |
| Sensitivity | The probe's sensitivity setting. |
| Battery | Battery charge in percent and the battery voltage in mV. On a probe with older firmware this cell shows a dash. |
| Status | The result of the read; the next table explains each value. |
A dash in a cell means abcZ has no value for it. On a probe that answered, it means the command is not available on that probe (for example, the settings columns on an older probe); hover the cell to read why. On a row that did not answer, every value column shows a dash; hover the row to read why.
| Status | Meaning |
|---|---|
| Ready | The probe answered and abcZ found nothing to point out. |
| Charge first | A 3rd-generation probe whose battery reads below 3100 mV. A firmware update through its A/B staged loader would be refused; charge the probe first. |
| Check settings | The probe answered, but one of its settings needs a look. Hover the row for the reason. |
| Update due | The probe runs older firmware. It works, but the runtime settings, the diagnostic counters and the interruption-safe update arrived with the 3rd generation. |
| No reply | The probe did not answer, or its port could not be opened. This does not mean the probe is off; hover the row for what happened. |
| Not read | abcZ did not read this port: the search was stopped before it got there, the port does not belong to a REDZ probe, or abcZ itself still had another connection to that probe open. Hover the row for the reason. |
While a row is still being read, its status shows Reading. The final status replaces it when the read ends.
Opening one probe, selecting several
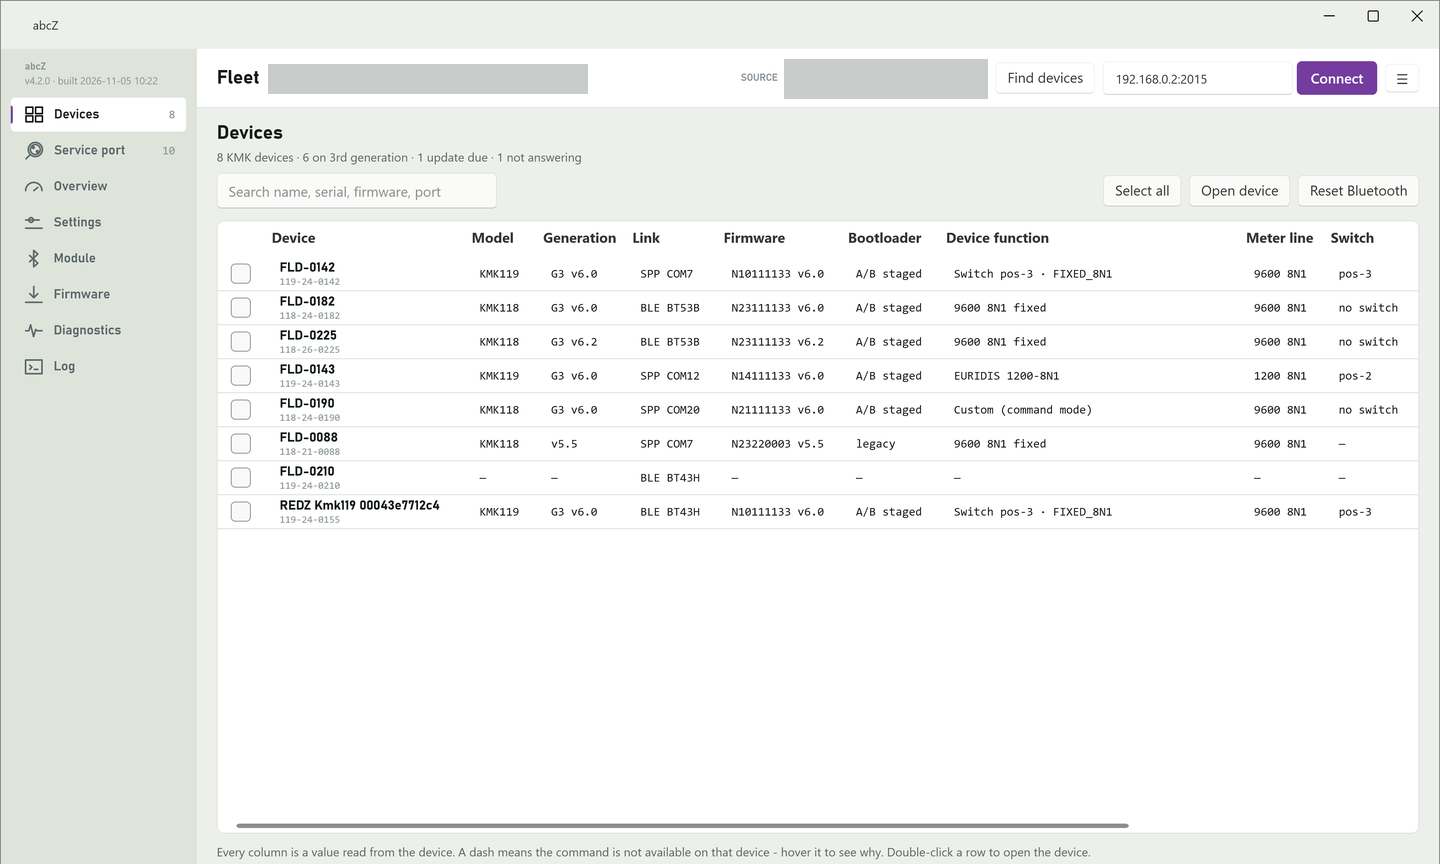
To open a probe, double-click its row, or click the row once and then click Open device. abcZ opens the Overview page of that probe and reads it again; the other pages of the left bar then work on this probe. If a search is still running, opening a probe stops it first. A row that is still being read cannot be opened yet: wait until it fills in and try again.
Opening and ticking are two different things. The tick box at the start of each row selects the probe for work on several probes at once. Select all ticks every row in the list; to tick only some, first type in the search box above the list: it keeps only the rows whose name, serial number or address, link or firmware contain what you typed.
As soon as one row is ticked, a bar appears above the list with the number of ticked probes and these buttons:
- Update firmware... opens the Firmware page in the left bar for the ticked probes (the chapter Firmware). Rows still being read are left out.
- Pair (SPP) and Unpair add or remove the Windows pairing of the ticked probes (next section).
- Clear unticks every row.
Next to the buttons, abcZ warns you about ticked probes that need care: probes with the older firmware loader, probes that do not answer (they will be skipped unless you use the recovery boxes on the Firmware page - the chapter Firmware) and probes still being read.
Pairing a probe in Windows
A probe found by the Bluetooth Low Energy scan can also be paired in Windows, so that it gets a serial port. Tick the probe and click Pair (SPP). This only adds a pairing in Windows: nothing is sent to or written on the probe. Windows then creates serial ports for the probe, usually two, of which only one answers. Click Find devices afterwards; abcZ finds the port that answers by asking it.
Unpair removes the Windows pairing again; the probe is not touched either. Both buttons work only on ticked rows that carry a Bluetooth address. The line under the page title reports, for each probe, whether it worked and, if not, why.
Auto power-off while abcZ is connected
A probe switches itself off after some idle time (the Auto-off column). A probe that has switched itself off cannot be reached until someone switches it on again. So that the probes in your list stay reachable while you work, abcZ suspends the auto power-off of every probe it reads on this page and that answers with its identity: with Find devices, Select port or Connect.
- As soon as the port is open, abcZ tells the probe not to go to sleep. Then it reads the probe. Only if the probe answered with its identity does abcZ then tell it not to switch itself off.
- abcZ does not store anything by itself: the probe's own auto power-off setting stays as it is. Store as power-on default (0xE0) on the Settings page stores what is in the probe at that moment. abcZ tells the probe not to go to sleep (its power-saving mode) before every command it sends, so sleep is stored as off too; only Factory defaults (0xE1) switches sleep back on. If abcZ has suspended auto power-off, the suspended state is stored as well, and the probe will no longer switch itself off. Before you store, write Auto power-off to the value you want with Write and verify.
- The suspension lasts until the probe is switched off and on again, until it is reset other than by a write on the Settings page (a firmware update ends with a reset), until Factory defaults (0xE1) (command mode only) puts the default value back, or until you write Auto power-off on the Settings page. Closing abcZ does not end it.
- In the Auto-off column, off means the probe reported auto power-off as switched off when it was read. That is either the probe's own setting, or a suspension made by abcZ, now or in an earlier session, that is still in force because the probe has not been reset or switched off since. held after a number means the number is the probe's own setting and abcZ has suspended it; hover the cell for the explanation.
- On a probe with older firmware abcZ sends the same suspension, but the Auto-off column shows a dash there, so the list cannot show you whether it is in force.
WARNING:
Because the suspension outlives abcZ, a probe you have read stays on until it is reset or switched off. When you have finished, switch the probes off. To do it from abcZ, open each probe in turn and click Turn off (0xC2) on its Settings page (the chapter Settings).
When a probe does not show up
- Click Find devices again: one short Bluetooth scan can miss a probe. Check that the probe is switched on.
- Switch SOURCE to Bluetooth BLE Only to see whether the probe is visible to the scan at all, or to Bluetooth SPP (Serial Ports) Only if it is paired in Windows.
- A KMK179 never shows up in a search. Use Connect by IP address (KMK Wi-Fi).
- If the row says No reply because the port could not be opened, nothing was sent to the probe. The probe may be out of reach, another program may hold the port, or the Bluetooth link was not set up in time. Check that the probe is on and read it again.
If a probe is in range and switched on but will not connect, Windows may still hold an old Bluetooth connection to it. Reset Bluetooth (next to the search box) switches the PC's Bluetooth off and back on and leaves it on. This changes only the PC: pairings are kept and nothing is written to any probe. Then click Find devices again.
WARNING:
Reset Bluetooth drops every Bluetooth connection of the PC for a few seconds, including a Bluetooth mouse or keyboard. If Bluetooth does not come back on, abcZ says so; switch Bluetooth on again in the Windows settings before you go on.
The menu button at the top right (Application settings) has two more entries that help here. Show other ports also lists the ports that abcZ does not recognise as REDZ probes. They appear as Not read: abcZ does not open them. To read one anyway, use Select port. The entry is remembered for the next start.
abcZ remembers the column widths you set by dragging. If a column has become too narrow to grab, Reset column widths in the same menu puts every column back to its built-in width.
Service port
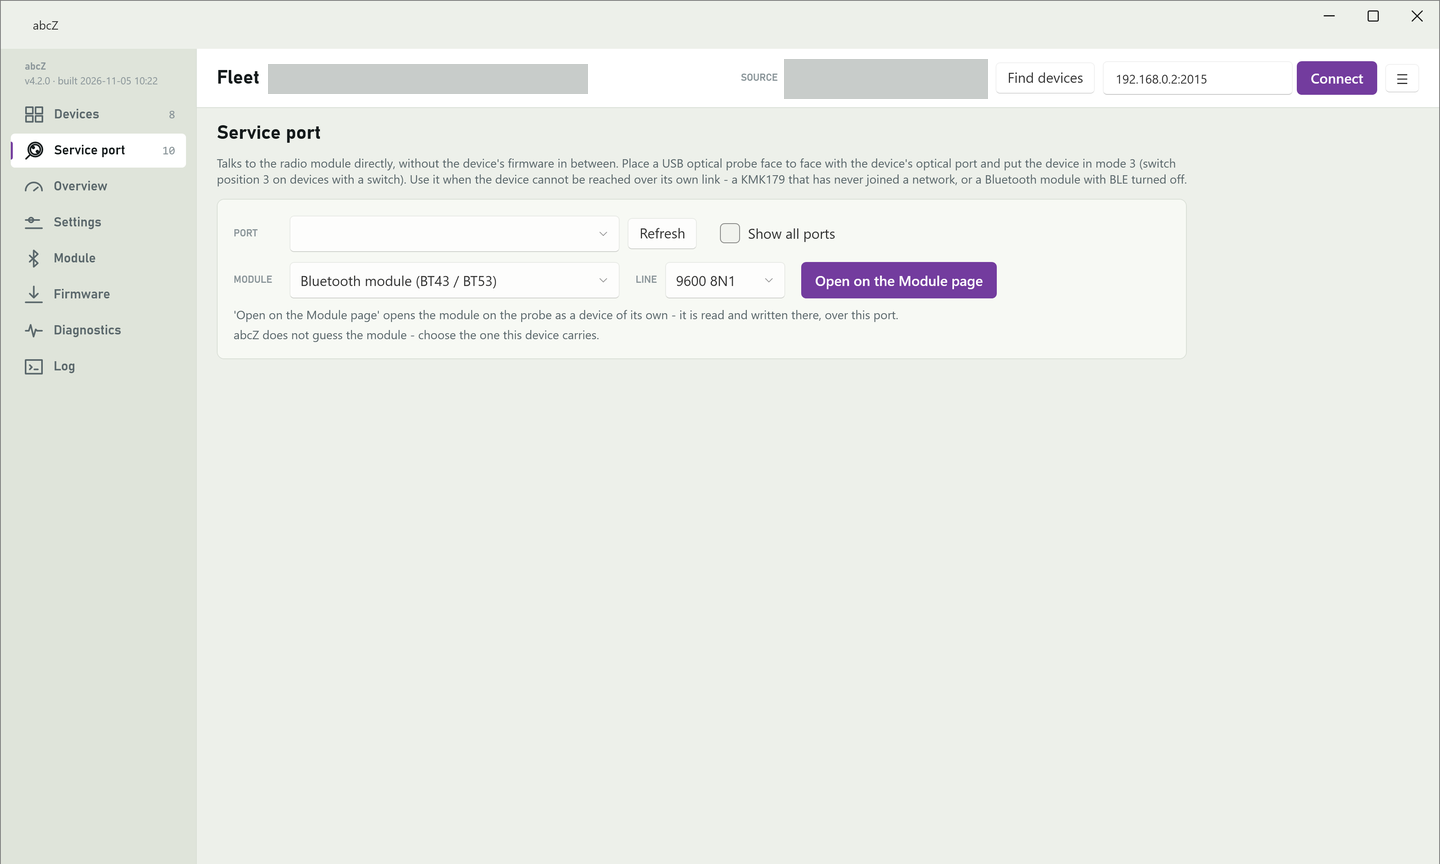
The Service port page lets abcZ talk to the radio module inside a probe directly, without the probe's own firmware in between. It is always available in the left bar, under Devices, also before any probe is opened and when the probe is not in the device list at all. The page itself only chooses the port, the module and the line; the module is read, and its settings are changed, on the Module page.
The number next to Service port in the left bar is the number of KMK optical probes (the USB optical probes abcZ recognises by their USB serial number) that were plugged into the PC when abcZ last refreshed its port list: when it started, when you changed the source, or when you clicked Refresh or ticked or cleared Show all ports on this page. It does not change by itself when you plug a USB optical probe in or out.
What the service port is and when to use it
The service port is the module's own configuration line. abcZ reaches it through a USB optical probe connected to the PC: place the USB optical probe face to face with the optical port of the probe, and put the probe in mode 3 (switch position 3 on a probe with a switch).
Use it when a probe cannot be reached over its own link: a KMK179 that has never joined a network or whose network settings are wrong, or a probe whose Bluetooth module has BLE turned off. A KMK179 that has never joined a network is set up this way.
NOTE:
The service port of a Bluetooth module answers only while no Bluetooth link to that probe exists. Make sure no program is connected to the probe over Bluetooth. If the module still stays silent, a link that Windows still believes in may be blocking it: Reset Bluetooth on the Devices page switches the PC's Bluetooth off and on (the chapter Devices).
Over the service port abcZ talks only to the module, not to the probe's firmware, so it does not suspend the probe's auto power-off. If the probe has switched itself off, switch it on again, check that it is still in mode 3 and read again.
Choosing the port
- In PORT, choose the USB optical probe. The list shows only the KMK optical probes plugged into the PC, each with its model and serial number next to the port name. If your USB optical probe is not in the list, tick Show all ports: the list then holds every serial port of the PC, the ports of paired Bluetooth probes included (with the probe's name next to them), so make sure you pick the USB optical probe.
- abcZ fills the list when it starts, and again when you open the page while the list is empty. It chooses a port by itself: the one you chose before, otherwise the last port a module was read on successfully, otherwise the only port in the list. If you plug in the USB optical probe later, click Refresh.
If no port is chosen, Open on the Module page and Read on the Module page only ask you to choose the port of the optical probe first.
Reading the module over the service port
Besides Refresh, the page has two buttons. Open on the Module page is always there. Read on the Module page appears below it only while a probe opened from the device list is open.
To open the module on the USB optical probe, choose the module and the line, then click Open on the Module page:
- In MODULE, choose the module the probe carries: "Bluetooth module (BT43 / BT53)" for a KMK118 or KMK119, "Wi-Fi module (WF52, KMK179)" for a KMK179. abcZ does not guess the module; you choose it.
- In LINE, keep 9600 8N1 unless the probe's line for switch position 3 was set to another line (the chapter Settings). On a KMK139, choose 19200 8N1: its firmware fixes the line in mode 3 at 19200 8N1. The list offers the five lines a probe can use in mode 3.
- Click Open on the Module page. abcZ closes the probe or module that is open in abcZ, if any, and opens the module on the USB optical probe as a device of its own: the left bar shows it by its entry from the PORT list (the port name and, for a KMK optical probe, its model and serial number), together with over the service port. The Module page opens and abcZ reads the module there. Its settings are read and written there, over this port.
A module opened this way has no link to the probe's firmware: only the Module page (and Log) can be used for it, the other pages of the probe stay off. Use this button also when a probe is open in abcZ but its own link is down, for example a KMK179 whose network settings are wrong: the open probe is closed, and its module is read and written over the service port.
While a probe opened from the device list is open, Read on the Module page reads that probe's module over the service port on the probe's own Module page. It does not use the module and line chosen on this page: abcZ takes the module type from the open probe, and the line from the probe if the probe was in mode 3 when abcZ read it; otherwise it uses 9600 8N1. It switches to that probe's Module page and reads the module over the service port there, after the page's own first read has finished. Values you then write with Write to the module still go over the probe's own link, not over the service port. If the probe is open over Bluetooth, its module's service port may stay silent while that link is up; then use Open on the Module page, which closes the probe first.
abcZ then checks that the module on the USB optical probe is the open probe's module, by the address the module reports. If it is not, or if either address is not known, abcZ puts nothing in the table and the line under the buttons says why; if the open probe's module address is not known yet, click Read all from the module first.
On the Module page the read fills the card with the values the module reported; their Source says read over the service port. The line under the buttons says how many values were read, which names this module does not have, and, if the module stopped answering part way, where it stopped.
If the read does not work, that line says why:
- The module did not answer (Bluetooth module): a Bluetooth link to the probe is up, the port is not the module's configuration line, or the USB optical probe is on the line to the meter instead of the module's line.
- The Wi-Fi module did not answer: the probe is not in mode 3, the USB optical probe is not face to face with the probe's optical port, or the line speed is not the one the probe uses in mode 3.
- The port could not be opened: another program may hold it, or the USB optical probe was unplugged. Nothing was sent to the module.
- (Bluetooth module) Something answered, but not with a module value: abcZ asked once and did not repeat the question. Check the line speed and that the port is the right one.
- (Bluetooth module) The module's loader answered instead of the module: the module's application is not running. abcZ sent the question once and nothing else. Do not switch the probe off, and contact us.
WARNING:
On a KMK179 the card shows the Wi-Fi network name and password as the module reports them, in clear text. Make sure nobody else can see your screen while you work there. The log shows the password only as hidden, with its number of characters.
Our standard on a Bluetooth module
On a Bluetooth module opened from this page, the card has no box to type in. After the read, abcZ fills the New value column with our standard values where the module differs, but only for the settings that can be written over the service port: the class of device, the authentication, the BLE mode, the battery service, the characteristic count and, on a BT53-class module whose firmware supports it, the UART timeout. The name and the connection intervals are not proposed here. When at least one value differs, a bar with Write to the module appears above the card and the line under the buttons says how many values were filled in. If the module already has our standard values, no bar appears and the line says how many are already set, adding that not every one could be checked. In both cases the line lists the name as skipped, with the reason that the device is not open, so its model is not known: our standard name is built from the probe's model, and a module opened this way does not open the probe itself.
- Check the proposed values in the New value column. Nothing is sent until you click Write to the module.
- Click Write to the module. abcZ writes the values one by one over the service port and reads each one back; it stops at the first value that does not verify and does not send the rest. Each verified value is shown in the On the module column with the source read back over the service port.
- The line under the buttons says how it ended. When all values were written and read back, switch the probe off and on before you look for it over Bluetooth Low Energy. If abcZ stopped at a value, the line names it and says how many were written before it and how many were not sent.
NOTE:
This is also the way to correct a Bluetooth module whose BLE setting is off (the chapter Troubleshooting). Only our standard values can be written this way; there is no box to type another value.
Wi-Fi settings of a KMK179
On a Wi-Fi module opened from this page, the SSID and PassPhrase rows of the card have a box in the New value column. Type the new network name and password there; a bar with Write to the module appears above the card.
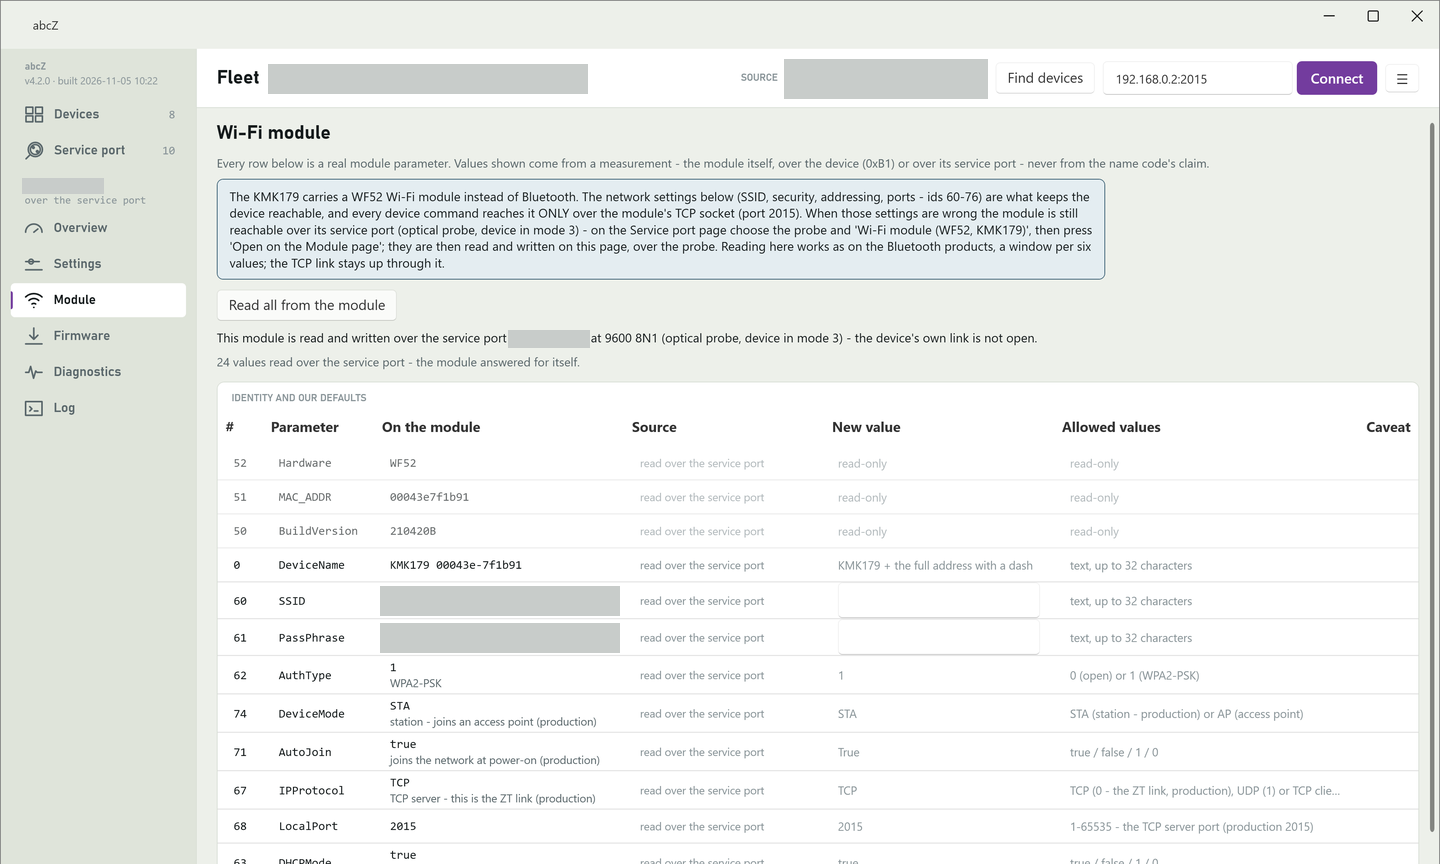
- Change only what you want to change. Only the values that differ from what the module reported are written. An empty box is not written: it does not erase the setting.
- Click Write to the module. If the module did not report IPProtocol TCP or AutoJoin True, abcZ also writes the one that differs: the probe's firmware keeps them anyway.
- abcZ writes the values one by one and reads each one back. Each value that was written and verified is shown in the On the module column with the source read back over the service port, and its box is emptied. A value that could not be verified is not put there; the line under the buttons names it. The log has a line for each value sent; in it the password is shown only as hidden, with its length.
The line under the buttons says how it ended:
- All values written and read back, and the module restarted to use them. Whether the probe joined the network shows only when it answers over it: choose "Connect by IP address (KMK Wi-Fi)" in the SOURCE list at the top of the window, if it is not chosen already, and connect to the probe on the Devices page (the chapter Devices). Changing the source closes the module opened over the service port.
- All values written and read back, but the module did not confirm its restart. It uses them from its next start: switch the probe off and on.
- Stopped at a value that could not be verified. The values before it were written, the rest were not sent, and the module was not restarted: it keeps running on its old settings, and what was written takes effect at its next start.
- The module did not enter its command mode: nothing was written. Check mode 3, the USB optical probe and the line speed, then read again.
- Nothing to write: every value matches what the module reported.
WARNING:
abcZ has no undo button. Before you write, note the values the card shows. To put a value back, click Read all from the module first, so that abcZ compares with what is now in the module, then type the earlier value and click Write to the module. A wrong network setting can make the KMK179 unreachable over the network, but it stays reachable over the service port.
Overview
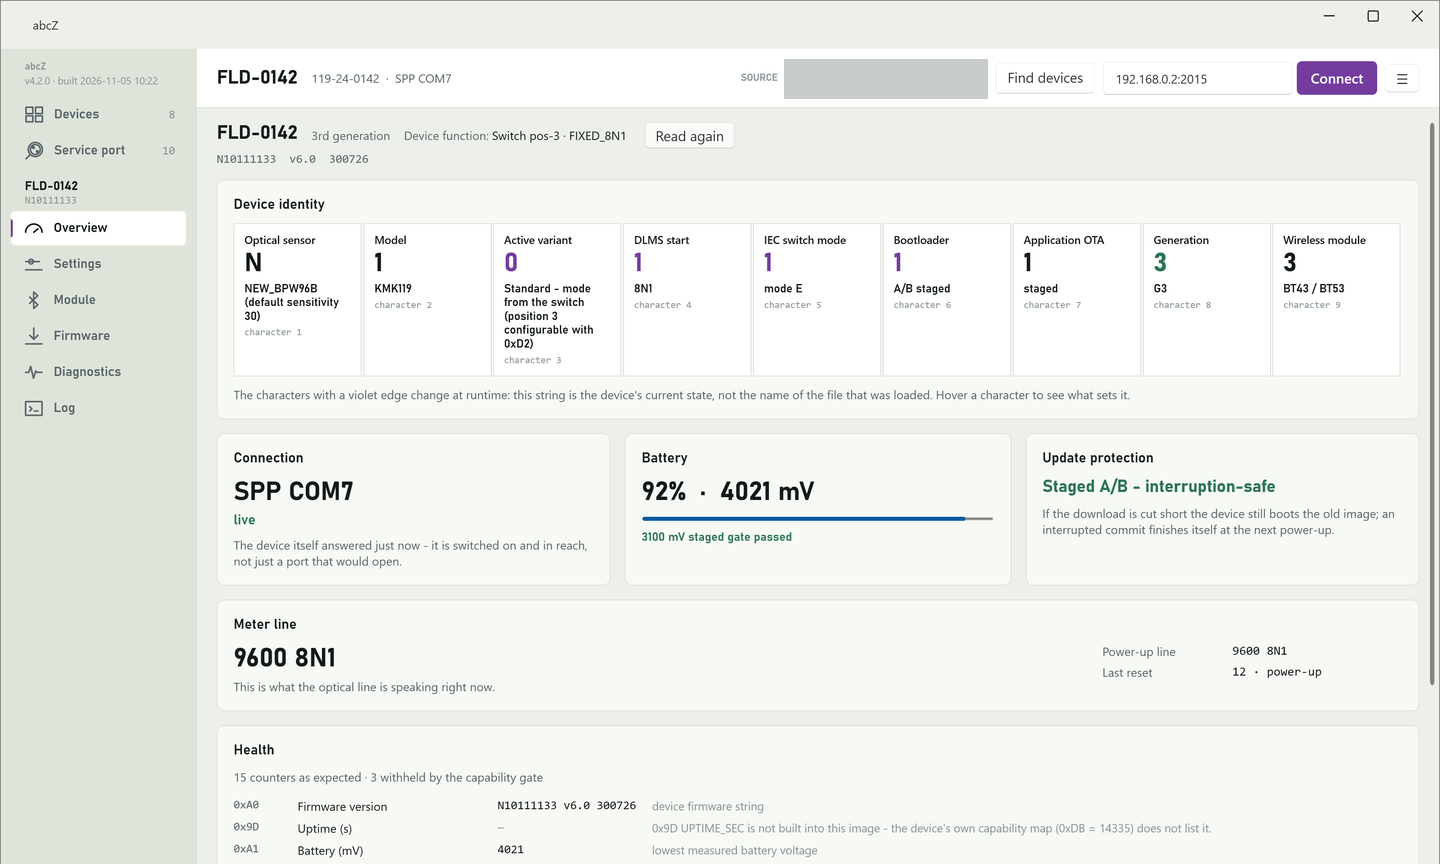
When you open a probe from the device list, abcZ shows this page and reads the probe once more, this time including its diagnostic counters. The page shows what the probe reports about itself right now: who it is, how it is connected, its battery, how safe a firmware update is, the meter line and its health.
The header and Read again
The header shows the probe's name and, under it, the firmware it runs: the nine-character name code, the version and the build date. Hover the firmware line to see whether abcZ asked the probe what it can do or worked it out from the name code.
Device function says what the probe is set to do right now. On a KMK118 it is the function stored in the probe. On a KMK119 and a KMK179 it is the active variant; when the variant leaves the choice to the 4-position switch and the probe reports its settings, it shows the switch position and the mode that position selects. It is not the power-up default of a firmware image: that is only known from the .bin file, on the Firmware page.
Read again opens a new link to the probe, reads it again and refreshes the cards below the header, the counters under Health included. The button is disabled while a read is running.
Reading changes no setting of the probe. The only command abcZ sends that is not a question asks the probe not to go to sleep while abcZ works with it; the probe holds this in its memory only and forgets it when it is switched off and on.
While the read runs, a line under the header says that abcZ is reading the probe. If the link cannot be opened or drops during the read, that line, in warning colour, says why and adds that the values below are from the previous read, not from now; depending on the link, it also says what to try next. If the link opens but the probe does not answer, the red card described under Device identity appears instead. See the chapter Troubleshooting.
NOTE:
If the probe reports that no module write has been recorded since its module was reset to factory values, and the probe's own check has not confirmed its module settings since, an extra card appears under the header: "No module write recorded since this flag was set". On a probe upgraded from v5.x firmware with a raw image the flag can be left over from the old firmware. The card tells you to check the Module page. See the chapter Module.
Device identity
If the probe did not tell abcZ who it is, a red card replaces the cards below. Its title says either that the link could not be opened (nothing was sent to the probe) or that the link opened but the probe did not answer; the text under it says what to do. See the chapter Troubleshooting.
The Device identity card spells out the name code one character at a time. Each cell shows what the character stands for, the character itself, what it means on this probe and its number (character 1 to character 9). Hover a cell to see what sets it.
The characters with a violet edge change at runtime: the name code is the probe's current state, not the name of the file that was loaded. On current firmware these are Function (on a KMK118) or Active variant (on a KMK119 and a KMK179), DLMS start, IEC switch mode and Bootloader; the first three follow the probe's settings, Bootloader says which kind of loader the probe has. The Generation character is shown in green. On older (v5.x) firmware no character has a violet edge, because these values are built into the firmware.
Connection and battery
The Connection card shows the kind of link in large letters and, under it, the details abcZ measured for that link. Below them, live says that the probe itself answered just now: it is switched on and in reach, not just a port that opened. If the probe did not answer, this card is not shown; the red card described under Device identity takes its place.
The Battery card shows the charge in percent and in millivolts, and a line about the 3100 mV limit that a staged firmware update needs: green when the battery is at or above it, red when it is below. On a probe whose firmware has no staged update path, the line says that instead. If the battery could not be read, the card shows a dash and the line says "not read" in red. The battery is measured behind the probe's voltage regulator, so it can show full while it is nearly empty. Charge the probe before a firmware update.
Older (v5.x) firmware reports millivolts only; the card then shows millivolts and whether they are above or below 3100 mV.
Update protection
The Update protection card tells you what happens if a firmware update is cut short:
- Staged A/B - interruption-safe (green): if the download is cut short, the probe still starts the old firmware. If the last step was interrupted, it finishes by itself the next time the probe is switched on.
- Legacy - classic bootloader: not safe against interruption. If the upload is cut short, the probe has no firmware to run and waits in its loader. The card itself gives the way back: tick the probe's row on the Devices page and click Update firmware..., tick the forced-load box, then switch the probe off and on, tick the second box and start, without reading the probe in between - Read again is a read too. The chapter Troubleshooting has the steps in full.
Meter line and power-up line
The Meter line card shows in large letters the speed and framing the probe reports for its optical line, for example 9600 8N1.
Power-up line is the line the probe starts with after it is switched off and on. It can differ from the line it is speaking now; that is normal. The chapter Settings explains how to change either of them.
Device function in the header says who controls the line; the numbers here say which line the probe reports. Hover the large value to see where it comes from: the switch position and variant on a KMK119 or KMK179, the device function on a KMK118. If the probe's firmware does not report its settings, the card shows a dash.
Last reset
Last reset says why the probe last started. abcZ shows the code number followed by its meaning; a code it does not know is shown as the number alone.
| Code | Shown as | What it means |
|---|---|---|
| 0 | software reset | The firmware restarted itself. This is normal after a settings write and at the end of a firmware update. |
| 7 | watchdog | The firmware stalled and recovered by itself. |
| 12 | power-up | The probe was switched on or charged, or its supply dropped too low. |
Health
The Health card is a summary of the probe's diagnostic counters as they were at this read: the probe's own values and the counters that count losses, in the order of the Diagnostics page. Each row shows the command, the name, the value and a short note. A value that differs from what a healthy probe shows is printed in bold warning colour and its note starts with the expected value. A counter the probe does not have is not asked for; it shows a dash and the note says why.
The line above the list counts all the counters abcZ read, also those that are shown only on the Diagnostics page: how many are as expected, off expectation, unreadable or not on this probe.
The line under the list says where the rest are: "Peak-fill and pass-through counters are on the Diagnostics page. The count above includes them." The card shows a single moment. To see all counters and how they move while you do something, use the Diagnostics page; see the chapter Diagnostics.
Settings
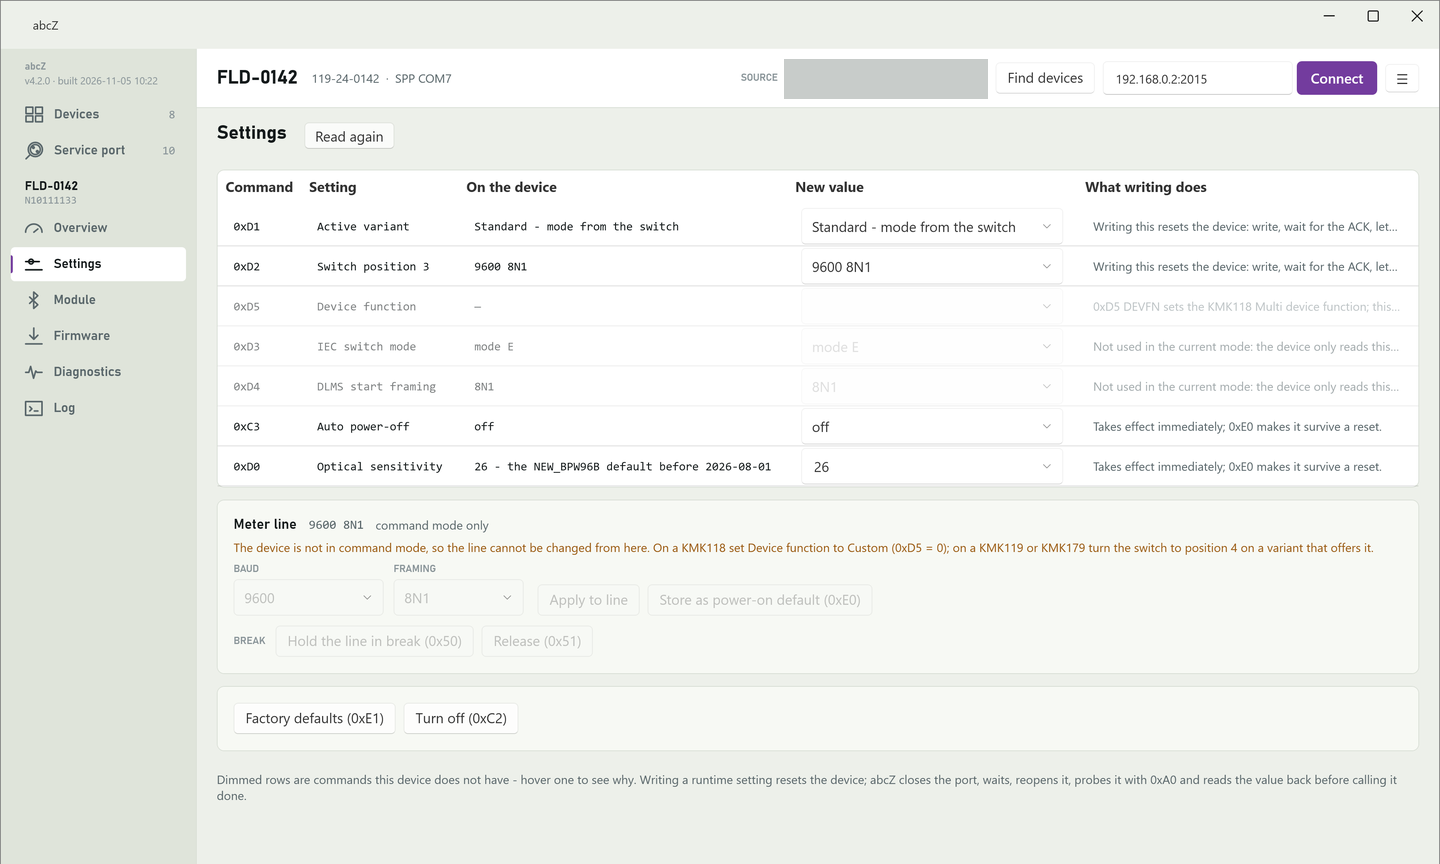
The Settings page shows the settings of the probe you opened and lets you change them. The first time you come to the page, abcZ reads the probe. Everything the page shows is what the probe reported, not what abcZ last wrote. Read again reads every setting on the page once more; nothing is written.
While abcZ is talking to the probe, a thin bar moves under the page title and the boxes on the page are locked.
Reading and writing a setting
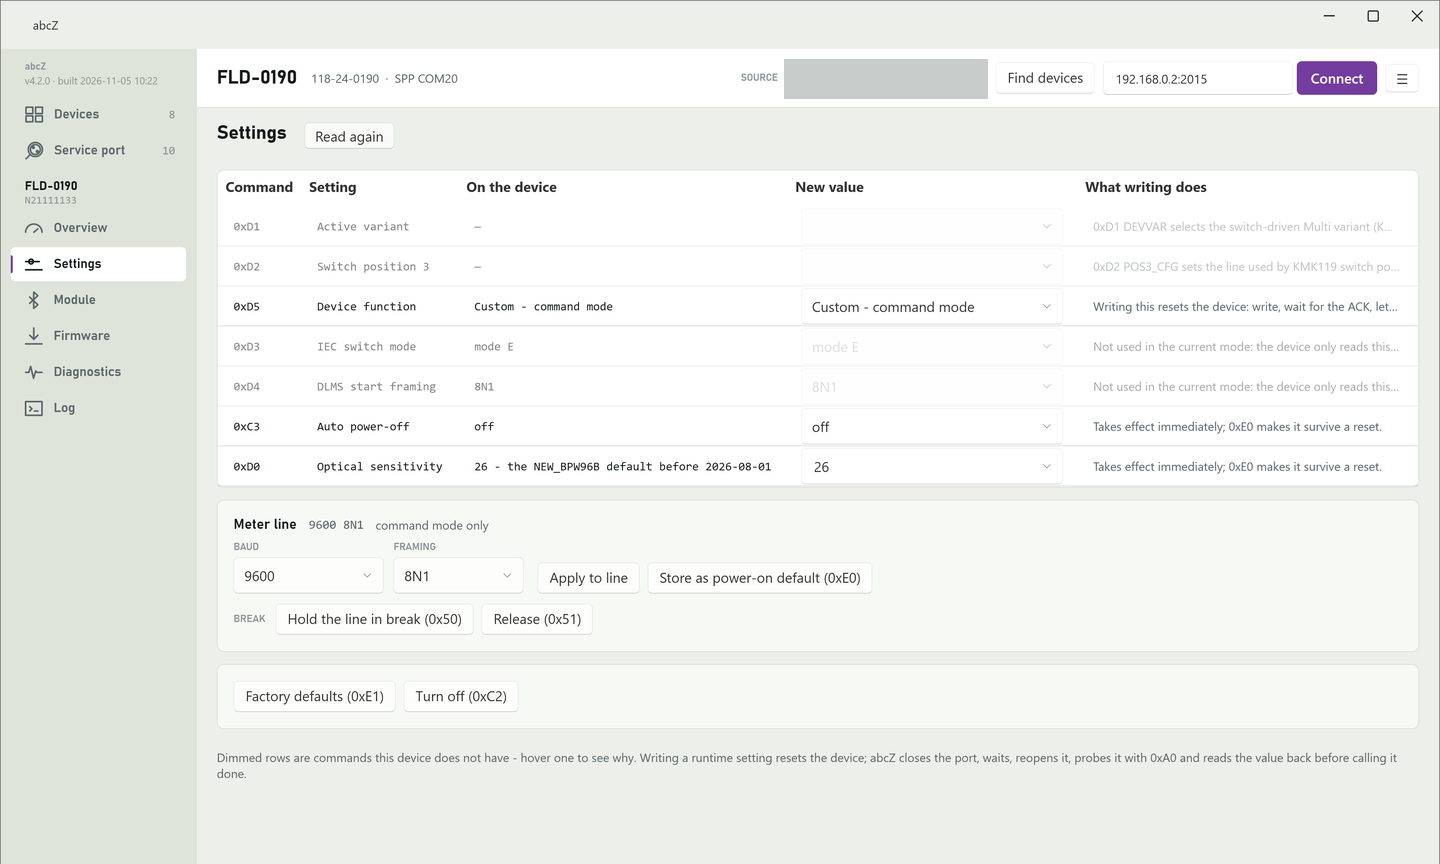
The table has one row per setting:
| Column | What it shows |
|---|---|
| Command | The command code of the setting, for example 0xC3. |
| Setting | The name of the setting, for example Auto power-off. |
| On the device | The value read from the probe. A dash means abcZ has no value for it. |
| New value | The value you want. Pick it from the list. For Optical sensitivity you can also type any number from 0 to 255. |
| What writing does | What happens when this setting is written, or why the row is dimmed. Hover the cell to read the whole text. |
There are two kinds of setting. Auto power-off and Optical sensitivity take effect at once but are kept only until the probe is reset or switched off; to keep them, store them as power-on defaults (see below). The other settings, such as Device function on a KMK118 or Active variant on a KMK119, are stored in the probe, and writing one of them resets the probe.
A dimmed row cannot be changed. Either the probe does not have that command (for example, a setting that only another model or newer firmware has), or the setting has no effect in the mode the probe is in now; its value is kept and applies when the mode changes. The What writing does column says which.
NOTE:
Dimmed rows are commands this probe does not have, or settings that do nothing in its current mode. Writing a setting that resets the probe takes longer: abcZ closes the port, waits, opens it again, checks that the probe answers and reads the value back before it calls the write done.
When you choose a new value, the row is highlighted and a bar appears above the table. It says how many settings will be written and how many of them reset the probe.
- Choose the new value in the New value column of each setting you want to change. If you type a value abcZ cannot send, the selection does not change and the reason appears under the box.
- To start again, click Discard: every row goes back to the value on the device.
- Click Write and verify. abcZ writes all the changes in one go and then reads the probe again.
A setting that resets the probe also throws away earlier changes that you have not stored as power-on defaults, such as an Optical sensitivity or a meter line set before: after the reset the probe starts with its power-on defaults. Changes chosen together in the same write are safe, because abcZ writes the settings that reset the probe first.
While the write runs, a log at the bottom of the page shows each step. For a setting that resets the probe, abcZ closes the port, waits about 12 seconds for the probe to come back, opens the port again and checks that the probe answers; it tries up to five times. At the end abcZ reads every written setting back from the probe.
The line above the log gives the result. "All settings written and verified" means the probe reported every new value when it was read back. If the probe refused a setting, abcZ says so and that setting was not changed. If the probe neither answered nor could be read back, abcZ says the result is unknown: click Read again and, if the old value is still there, write it once more.
If the probe does not come back after a reset, the write stops with "The device stopped answering after a reset." Switch the probe off and on again, open it again and read it.
So that the probe does not switch itself off in the middle of a write, abcZ suspends its auto power-off for the duration of the write, also again after each reset the write causes. At the end it puts back the value the probe had when the write started. A probe you opened from the Devices page was suspended by that read (the chapter Devices), so the value put back is off: writing other settings keeps the suspension. Writing Auto power-off itself leaves the value you chose, and Factory defaults (0xE1) puts the default value back.
Two cases leave the probe without auto power-off after the write: abcZ could not read the value when the write started, or the probe's value is one abcZ cannot send back. The log says so in a line that starts with WARNING. The probe then stays on until it is reset or switched off and on again.
NOTE:
The suspension lasts until the probe is switched off and on again, until it is reset other than by a write on the Settings page (a firmware update ends with a reset), until Factory defaults (0xE1) (command mode only) puts the default value back, or until you write Auto power-off on the Settings page. Closing abcZ does not end it.
The meter line: speed, framing, break
The Meter line card shows the speed and framing the probe uses toward the meter right now. It can be changed only while the probe is in command mode. When it is not, the card says so and how to get there: on a KMK118, set Device function to Custom - command mode in the table above; on a KMK119 or KMK179, turn the switch to position 4 on a variant that offers command mode.
On a probe with older firmware abcZ cannot read the mode, so the card stays locked and gives the same reason, whatever mode the probe is in.
- Choose the speed in BAUD and the framing in FRAMING.
- Click Apply to line. abcZ sends the change and then reads the line back from the probe. The message at the bottom of the card says whether the probe now reports the line you asked for.
The new line is kept only until the probe is reset or switched off. To keep it, click Store as power-on default (0xE0) (next section).
NOTE:
Above 19200 baud abcZ shows a warning at the bottom of the card. A session that sends requests to the meter and reads its answers, such as IEC or DLMS, needs 19200 baud or less.
Hold the line in break (0x50) drives the meter line low. While the line is held, the probe cannot talk to the meter at all. A banner on the card reminds you of this. Release (0x51) ends the break; the line comes back with the speed and framing it had. Both buttons work only while the probe is in command mode.
WARNING:
The line stays held after abcZ closes. abcZ cannot ask the probe whether its line is held, so if a probe does not read the meter, click Release (0x51) even if abcZ shows no banner: an earlier session may have left the line held.
Storing the power-on defaults
Store as power-on default (0xE0) makes the probe's current values of sleep, Auto power-off, Optical sensitivity and the meter line its power-on defaults: the probe starts with them after every reset and every power-up. abcZ then reads the probe again. The button sits in the Meter line card and can be clicked only while the probe is in command mode. The result appears at the bottom of that card.
WARNING:
Store as power-on default (0xE0) on the Settings page stores what is in the probe at that moment. abcZ tells the probe not to go to sleep (its power-saving mode) before every command it sends, so sleep is stored as off too; only Factory defaults (0xE1) switches sleep back on. If abcZ has suspended auto power-off, the suspended state is stored as well, and the probe will no longer switch itself off. Before you store, write Auto power-off to the value you want with Write and verify.
There is no undo. To change the stored values later, set the values again and store them once more, or use Factory defaults (0xE1) (next section). Both work only while the probe is in command mode.
Factory defaults and switching the probe off
Factory defaults (0xE1) puts the probe back to its firmware's defaults: sleep on, the default auto power-off of the probe's firmware, the default sensitivity and a meter line of 300 7E1. The settings that reset the probe when written (such as Device function and Active variant) are deliberately left as they are. abcZ sends the command at once, without asking, and then reads the probe again; look at the On the device column to see the values the probe took.
The probe accepts this only in command mode. Outside it, abcZ says "The device is not in command mode - the factory reset is refused outside it." and nothing changes.
Factory defaults also ends the suspension of auto power-off that abcZ made when it read the probe (the chapter Devices). If you click Store as power-on default (0xE0) after it, sleep is stored as off again (see above). To go back to your own values, set them again and store them. The result message appears at the bottom of the Meter line card.
Turn off (0xC2) switches off the probe you have open, the same as its power button. abcZ does not ask first. The connection is gone until you switch the probe on again by hand. Other probes in the list are not affected: to switch several probes off, open each one in turn.
Module
The Module page shows the settings of the radio module inside the probe you have opened: the Bluetooth module of a KMK118, KMK119, KMK138 or KMK139, the Wi-Fi module of a KMK179. The page title says which one. The page is available once a probe is open, or once you open a module from the Service port page (the chapter Service port).
Reading the Bluetooth or Wi-Fi module
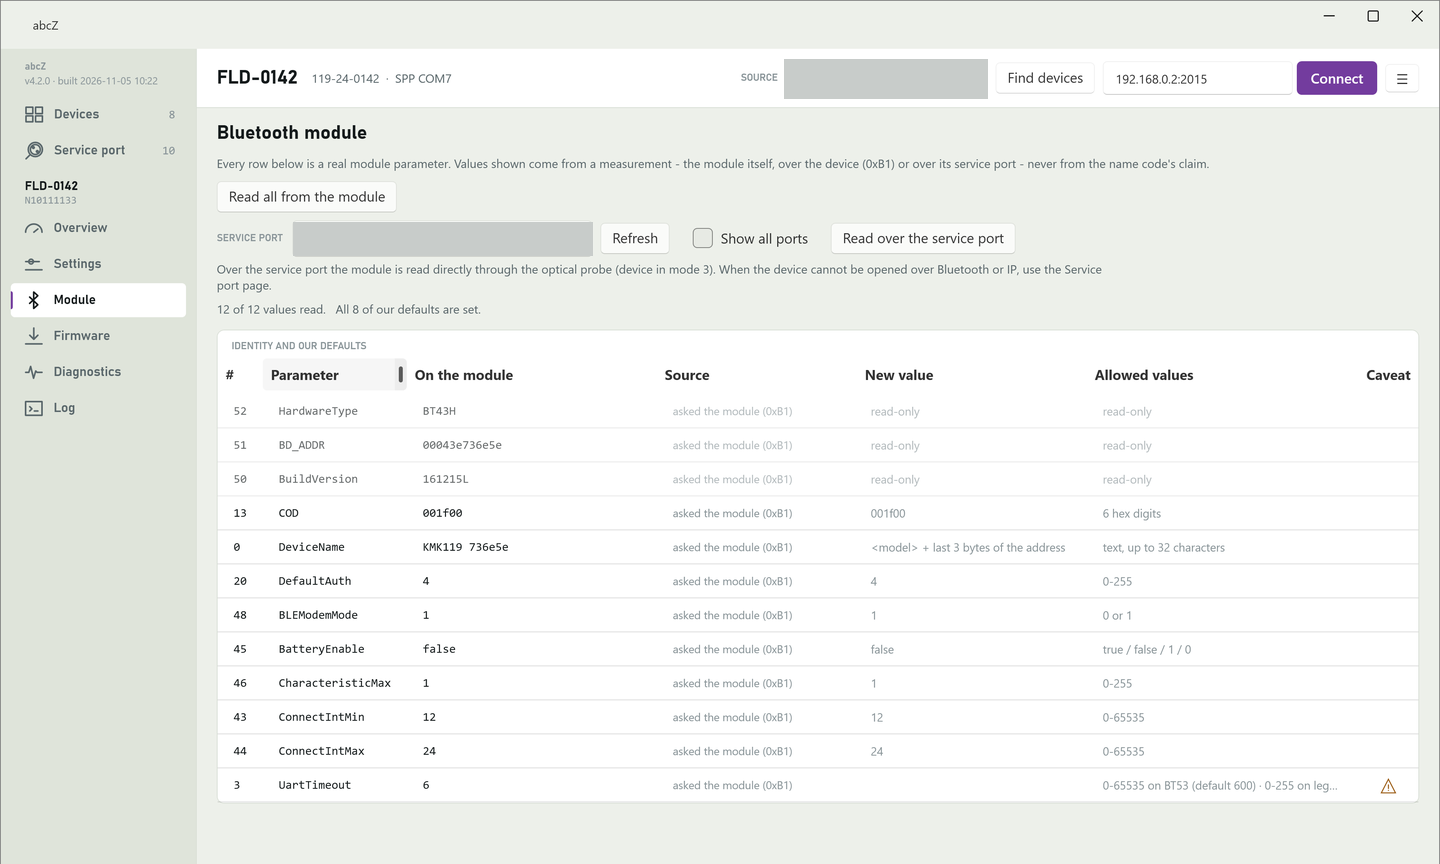
When you open the page, abcZ reads the module by itself: it asks the probe to ask its module, a few values at a time. A bar under the title and the line under the buttons show how far it has come. This happens once for each probe you open; to read again, click Read all from the module.
Read all from the module asks the module through the probe. Over Bluetooth Low Energy, abcZ collects each answer after reconnecting to the probe. If the probe's firmware cannot ask its module, or cannot do it over the link you use, the button stays off and abcZ says why next to it. If abcZ could not ask the probe at all just then, it says so and you can click the button to try again.
If the probe answered with its identity in the device list, abcZ suspended its auto power-off then (the chapter Devices). Each read through the probe on this page also tells the probe not to go to sleep. A read over the service port sends nothing to the probe's firmware and does not.
The second way is the module's service port: a USB optical probe face to face with the probe's optical port, and the probe in mode 3 (the chapter Service port). Choose the USB optical probe in SERVICE PORT and click Read over the service port. The list follows the same rule as on the Service port page: only KMK optical probes unless you tick Show all ports, and, unless you chose one before, the port of the last successful read is chosen by itself; Refresh updates the list. abcZ talks to the module directly, so this works with any firmware of the probe. It chooses the module from the probe's identity. It opens the port at the line the probe reported if the probe was in mode 3 when abcZ read it, otherwise at 9600 8N1.
Before it puts anything in the table, abcZ checks that the module on the USB optical probe is this probe's module, by the address the module reports. If it is not, or if an address is not known, the table stays as it was and the line under the buttons says why. The other results use the same words as described in the chapter Service port.
A note under the row reminds you: when the probe cannot be opened over Bluetooth or IP, use the Service port page.
NOTE:
The service port of a Bluetooth module stays silent while a Bluetooth link to the probe is up. If it does not answer, make sure no program is connected to the probe over Bluetooth and read again. If it still stays silent, a link that Windows still believes in may be blocking it: Reset Bluetooth on the Devices page switches the PC's Bluetooth off and on (the chapter Devices). The chapter Service port lists what else keeps the port silent.
On a module opened from the Service port page, the SERVICE PORT row is replaced by a note that names the port and the line and says that the probe's own link is not open. The page reads the module over that port when it opens, and Read all from the module reads it again the same way. The chapter Service port describes what you can do there.
Identity and our defaults
The IDENTITY AND OUR DEFAULTS card lists the module's identity first: its type, its address and its firmware version. Below them come the settings you work with day to day; for most of them abcZ has a standard value. On a Bluetooth module these are the class of device, the name, the authentication, the BLE mode, the battery service, the characteristic count, the connection intervals and the UART timeout. On the Wi-Fi module of a KMK179 they are the device name and the network settings: SSID, password, security, device mode, auto join, IP protocol, the local port the probe listens on, and DHCP.
Every row is a real module setting. A value is shown only when it was measured, never guessed from the probe's name; the Source column says where it came from.
| Column | What it shows |
|---|---|
| # | The setting's number. |
| Parameter | The setting's name, as the module itself names it. |
| On the module | The value read from the module. For a coded value, abcZ adds what it means. |
| Source | Where the value came from: asked through the probe, read over the service port, measured on the Bluetooth Low Energy link, or the probe's stored answer from when it last asked its module. After a write over the service port it says that the value was read back. |
| New value | Our standard value for the setting, where the standard has one, or read-only for a setting the module never lets anyone write. Showing it sends nothing. On a KMK179 the SSID and password rows have a box you can type in; leave it empty to leave the module alone. |
| Allowed values | The values the probe accepts for this setting. |
| Caveat | A warning sign where a written value may not do what it seems to; hover it to read the warning. |
After a read through the probe, abcZ may fill the New value column with our standard for the settings where the module differs, and show a bar with Write to the module above the card. Nothing is sent until you click it; clicking it writes those values to the module. On a KMK179, a network setting that does not match your network can make the probe unreachable over the network; it is still reachable over the service port (the chapter Service port). If you are not sure the proposed values are right for your site, do not click it. A Bluetooth module opened from the Service port page gets the same kind of proposal after its read, limited to what can be written over the service port (the chapter Service port).
On a KMK179, a note above the buttons explains that these network settings are what keeps the probe reachable: every command reaches it only over the network. When they are wrong, the module is still reachable over its service port: on the Service port page, choose the USB optical probe in PORT and "Wi-Fi module (WF52, KMK179)" in MODULE, then click Open on the Module page; the settings are then read and written on this page, over the USB optical probe.
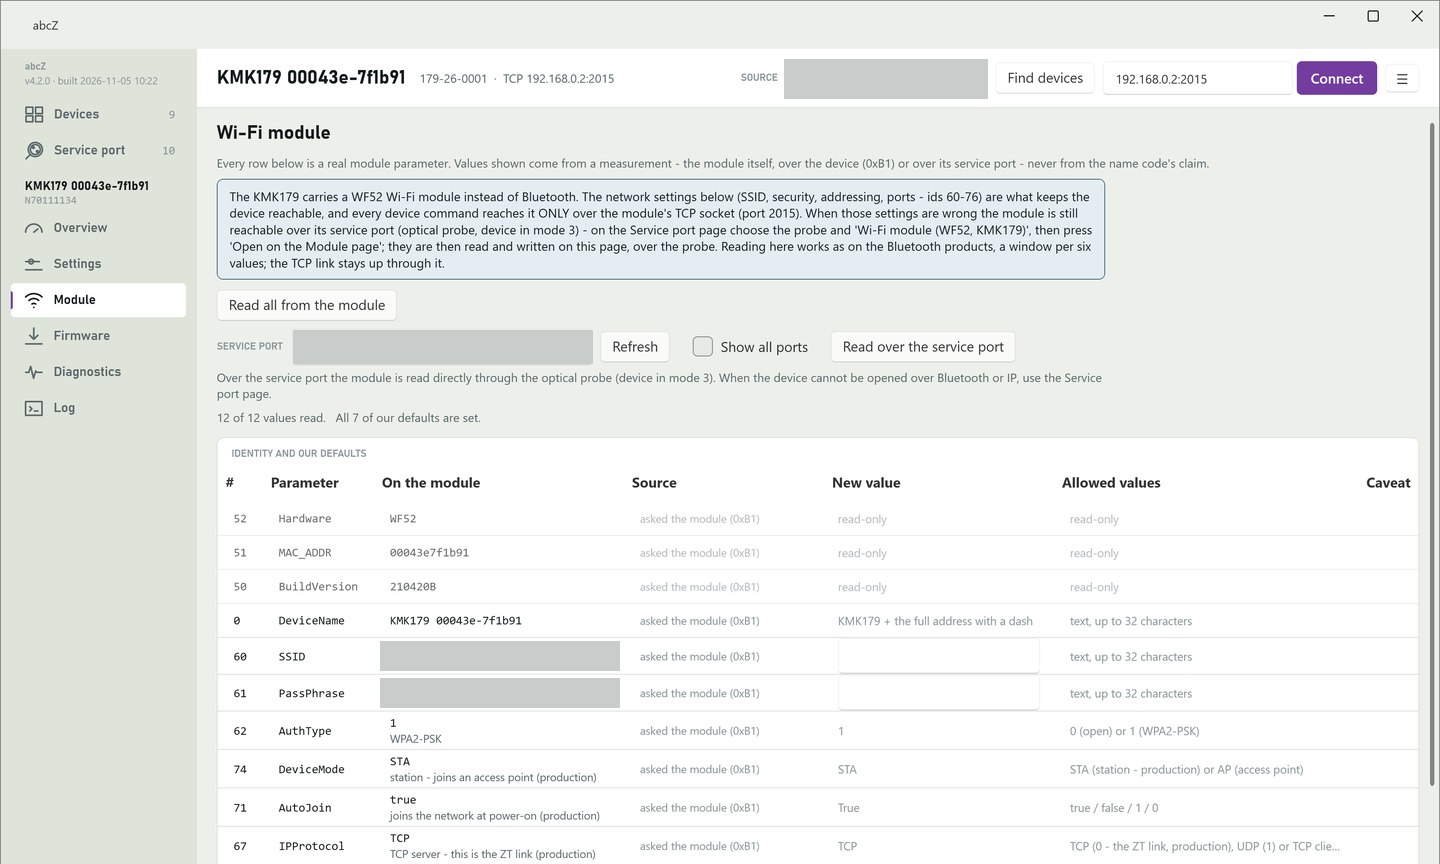
To change the network name or password of a KMK179, type the new value in the SSID or PassPhrase box and click Write to the module. On a KMK179 you opened from the device list, abcZ writes it over the network link you are using, so a wrong value can cut that link. If that happens, or if the probe cannot be reached over the network at all, correct the values over the service port: on the Service port page, choose the USB optical probe in PORT and "Wi-Fi module (WF52, KMK179)" in MODULE, then click Open on the Module page. This closes the KMK179 if it is still open in abcZ and opens its module over the USB optical probe; correct the values there (the chapter Service port).
NOTE:
abcZ writes the Wi-Fi password to the log only as hidden, with its number of characters. The other values you write, the network name among them, are in the log as written (the chapter Log).
Firmware
The Firmware page loads a new firmware image into one probe or into several probes at once. It works in three steps: you choose the image, abcZ shows the plan, and the update runs only when you start it from the plan.
Updating one probe or several
To update several probes, tick their rows on the Devices page and click Update firmware... in the bar above the list. abcZ opens the Firmware page for the ticked probes; rows that are still being read are left out.
To update only the probe you have opened, click Firmware in the left bar. The page then holds just that probe. Each time you open a probe or click Update firmware..., abcZ starts the page afresh for the new selection.
The page title shows Firmware campaign and the number of probes. If a search on the Devices page is still running, a badge next to the title says so; starting the update stops the search.
NOTE:
A probe that did not answer is listed on the page too. It is skipped, and the plan says why, unless you assign an image to its row and tick one of the two boxes described under Older probes.
Choosing the image
The card One image per model and firmware version has one row for each group of probes that takes the same image: one model with one firmware generation (for example KMK119 with v6.x). A probe that did not give its identity has a row of its own, named unidentified.
Click Choose a .bin... on a row and pick the image file. abcZ opens the folder you used last. If the file is for another model, abcZ does not assign it and says so on the row. When the file belongs to another firmware generation than the probes (for example a v6.x image for v5.x probes), the row explains what that means; this is how an older probe is brought to newer firmware.
A probe on the older loader needs the raw image, the file whose name ends in _LEGACY.bin. A compressed image would leave such a probe unable to start. If the compressed file belongs to another firmware generation than the group (for example a compressed v6.x image for v5.x probes), abcZ does not assign it and says so on the row. For any other probe on the older loader abcZ refuses a compressed image when the update runs, before anything is sent to that probe, and its row shows refused. Groups that still have no image are skipped, not guessed at; the line under the card's title counts them.
When the page has only one group, a yellow card above the list names any probe the image does not fit and the reason. Choosing a file sends nothing to the probes.
The card The image only sets the power-up default explains that the images of one model and firmware version differ only in the mode the probe starts in, and that the update does not write a probe's function back. Choose the image with the mode you want at power-up. After the update, read the probe again: the Device function column on the Devices page (and the same line on the Overview page) shows what the probe is set to do now. On a KMK118 you change it on the Settings page (the chapter Settings); on a KMK119 the switch position decides it.
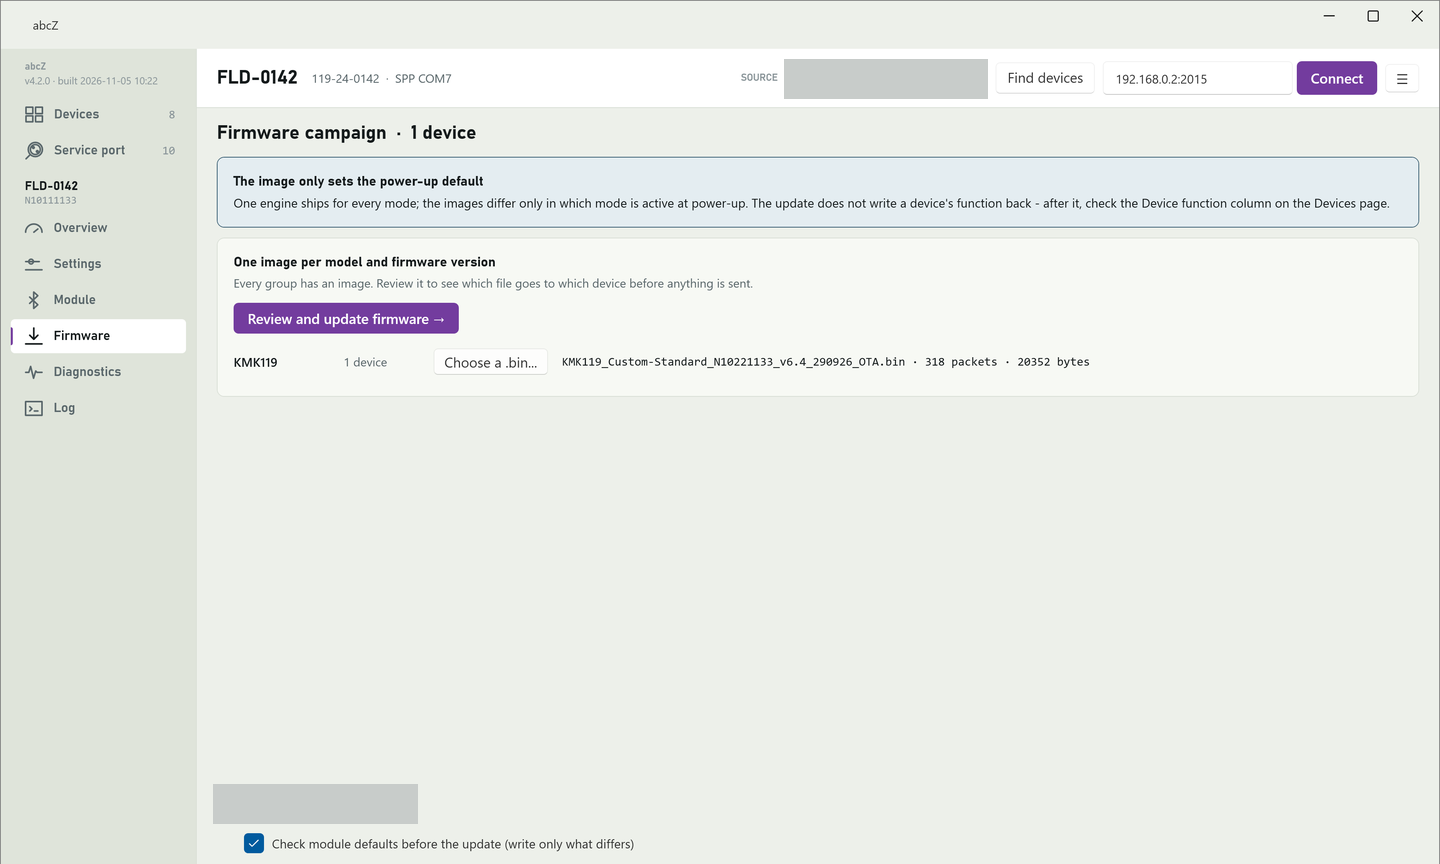
At the bottom of the page, on the image and plan steps, there is a box Check module defaults before the update (write only what differs) (on a KMK179 it names the Wi-Fi module's network settings). When it is ticked, abcZ reads the module settings of each probe just before its update and writes only those that differ from our standard values; hover the box to see which settings. If everything matches, nothing is written. A failed check never stops the update, and its result appears under the probe's row. The check does not run when several probes are updated together over Bluetooth Low Energy (the row says it was skipped), on a probe that gets the forced load, and on the extra attempt for a probe that dropped out. The box is ticked at the start when at least one selected probe has the A/B staged loader. Untick it if the module settings must stay as they are: then nothing is sent to the module.
Reviewing the plan and starting
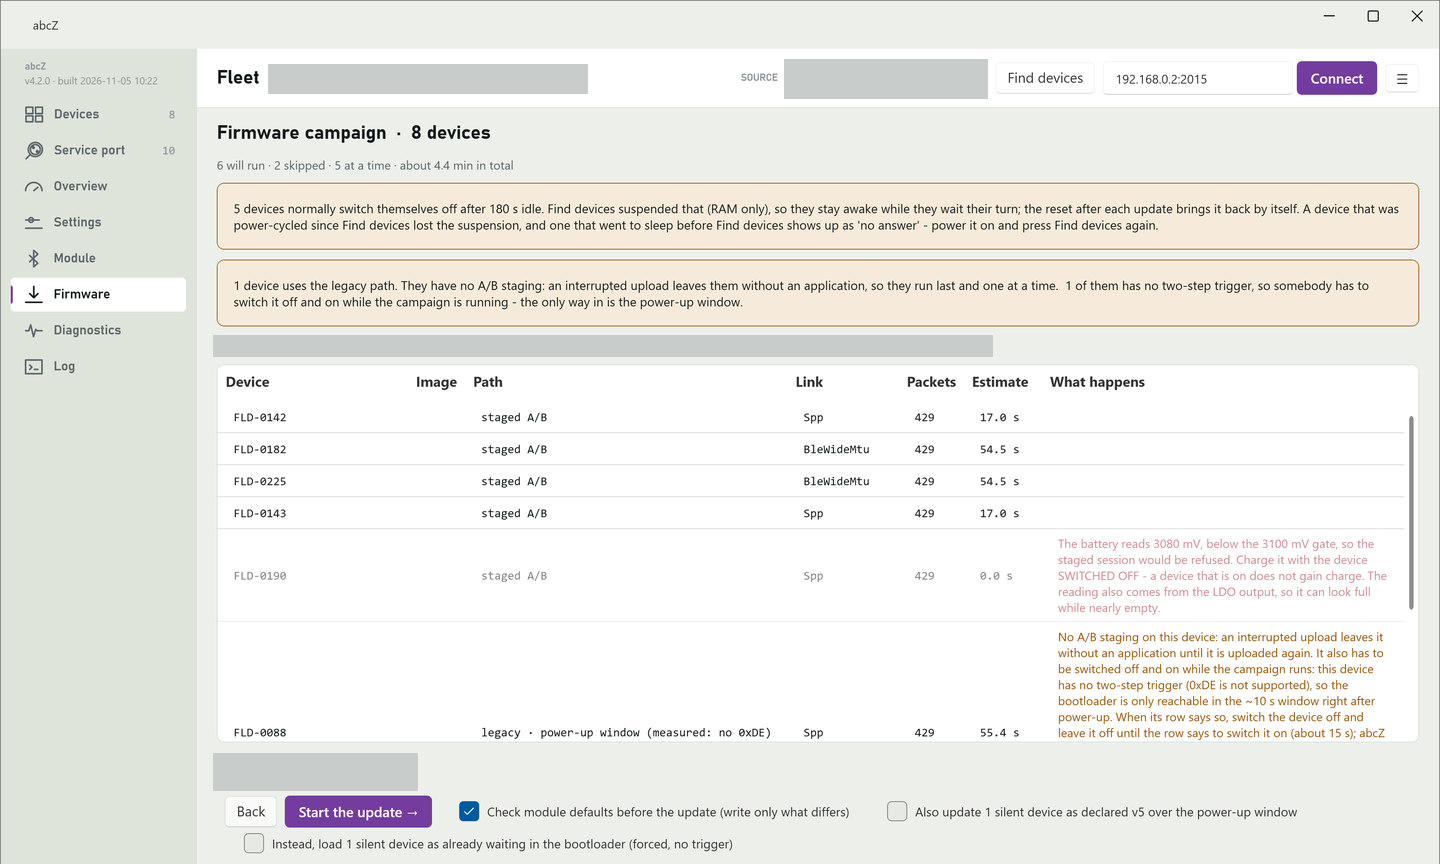
Click Review and update firmware in the image card. abcZ shows the plan; still nothing has been sent to any probe.
The line above the table says how many probes will be updated, how many are skipped, how many run at a time and about how long it takes in total. The table has one row per probe:
| Column | What it shows |
|---|---|
| Device | The probe's name. |
| Image | The file that goes to this probe. |
| Path | How the image gets in: staged A/B for the interruption-safe loader, or legacy with the way the loader is reached (see Older probes). |
| Link | The connection the upload uses. |
| Packets | The number of packets, counted from the image file. |
| Estimate | The expected upload time in seconds. |
| What happens | What you need to know about this probe, or, in red on a dimmed row, why it will be skipped. |
A probe with the A/B staged loader whose battery read below 3100 mV is skipped; on the Devices page its status is Charge first. The row adds how to charge: "Charge it with the device SWITCHED OFF - a device that is on does not gain charge." Read the probe again after charging and plan again.
Back returns to the image step without sending anything. Start the update sends the images exactly as the plan says. abcZ updates the probes with the A/B staged loader first, several at a time, and the probes on the legacy path last, one at a time.
While the update runs
Each probe gets a row with its progress in percent and its current state, for example queued, connecting, uploading and verifying. Messages for the probe appear under its row. Apart from what a row asks you to do, leave abcZ and the probes alone until every row has finished.
On the A/B staged path a dropped connection does not end the update at once: abcZ connects again, asks the probe how much of the image it already holds and continues from there. If the connection drops three times in a row without progress, or cannot be opened again after four attempts, abcZ gives up: the row fails and the probe keeps its old firmware. When several probes ran together, abcZ gives a probe that dropped out one more attempt after the others have finished.
Probes wait for their turn, and a probe that switches itself off cannot be updated. When abcZ read the probes on the Devices page, it suspended the auto power-off of every probe that answered, until it is next switched off and on or restarted (the chapter Devices). If some probes in the plan normally switch themselves off, a yellow card above the plan says so. When a staged upload starts, abcZ suspends the probe's auto power-off once more, in the probe's memory only, until the probe next restarts or is switched off and on. The restart at the end of a completed update brings the probe's own setting back; an upload that stops before that end sends no restart, so the suspension stays. For a probe on the legacy path abcZ sends no new suspension: it stays awake only through the suspension from the read on the Devices page.
Stop the campaign is shown while the update runs. Do not use it to cut an upload short. What it does depends on the path:
- On the A/B staged path a probe whose upload was running keeps its old firmware and the upload has to be started again. Staged probes that had not started yet stay queued; nothing was sent to them.
- On the legacy path, once abcZ has started the probe's loader, stopping leaves the probe without firmware, waiting in its loader, even if no packet was sent yet; its row shows in the bootloader and you must follow the section When an update is interrupted.
- Probes on the legacy path that have not started yet are not started. A probe that is still waiting for you to switch it off and on has received nothing.
The result
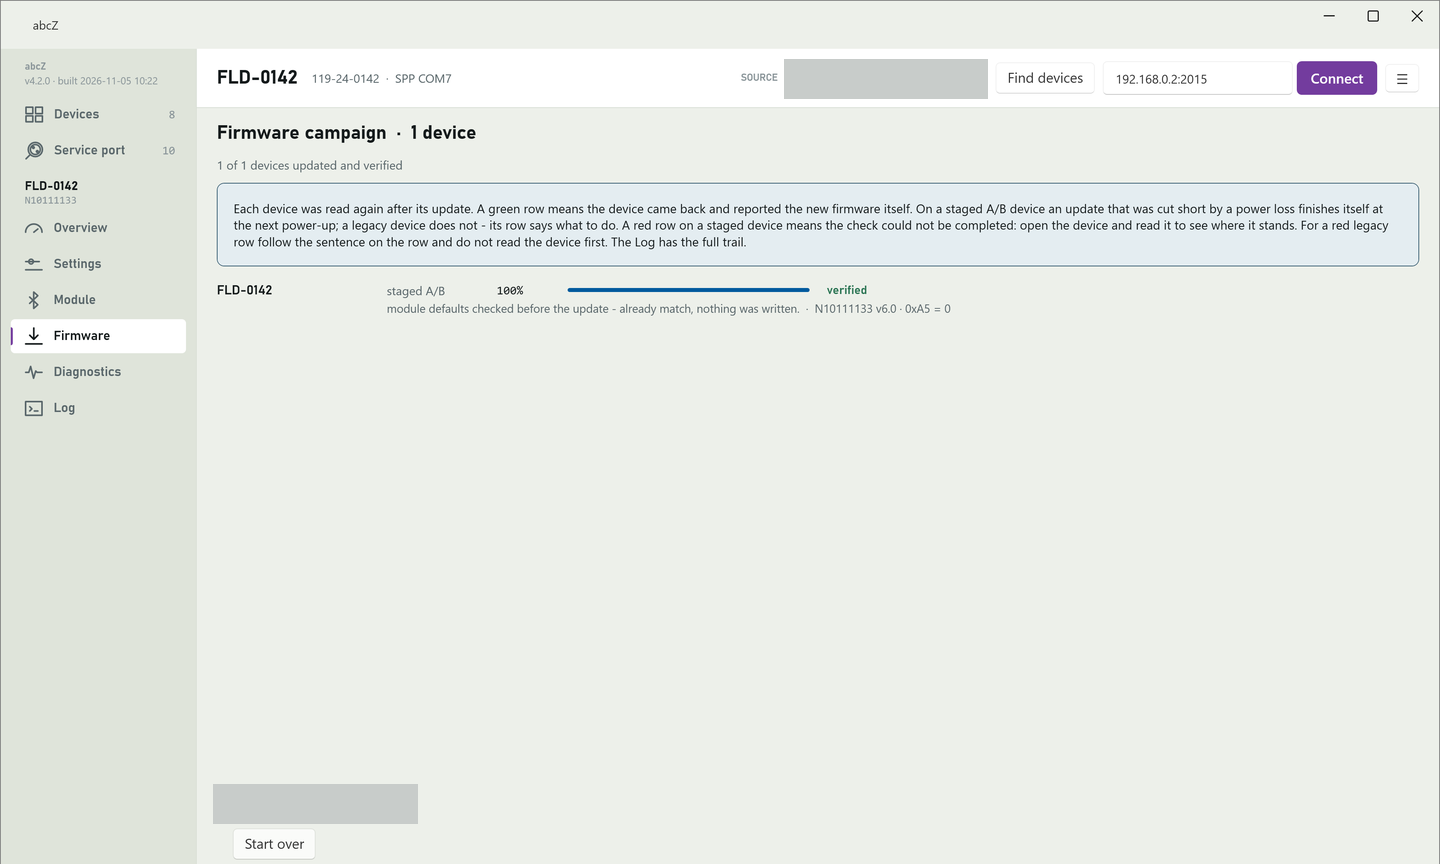
When every row has finished, a line counts the probes that were updated and verified, those that were loaded but not read back, and those that failed. abcZ reads every probe again after its update: "A green row means the device came back and reported the new firmware itself." A legacy probe that was read back shows the state loaded, verified.
- loaded - not read back: the upload finished, but the probe did not answer within about 45 seconds. Switch it off and on, read it on the Devices page and check the firmware version before you rely on the update.
- A red row on a probe with the A/B staged loader means the check could not be completed. Open the probe and read it to see which firmware it runs.
- A red row on a legacy probe: follow the sentence on the row and do not read the probe first. The section When an update is interrupted explains why.
- A row whose state ends in check settings: the new firmware went in and the probe was read back, but a setting needs attention. Contact support and send the record from the Log page (the chapter Log says how).
Start over clears the result and returns to the image step; it sends nothing. The Log page keeps the full record of the update.
Older probes (v5.x loader)
A probe without the A/B staged loader is updated on the legacy path: all probes with v5.x firmware, and newer probes whose Bootloader column shows legacy. This path is not safe against interruption: an upload that stops halfway leaves the probe without firmware until it is loaded again. A yellow card above the plan reminds you of this. abcZ reaches the loader in one of two ways, and the Path column shows which:
- Two-step trigger: abcZ itself tells the probe to start its loader, and nobody has to touch the probe. If the probe does not hand over to its loader, for example because its battery is too low, the row shows not triggered and nothing is written. Charge the probe and start again.
- Power-up window, on a probe that does not know the two-step trigger (v5.x): the loader can only be reached right after the probe is switched on, so you have to switch it off and on while the update runs. Follow the row: it first says "switch the device off and leave it off - abcZ sees it by itself", then "abcZ sees the device off - switch it on now". There is no button to press. If the moment is missed, nothing is written: the probe stays in its old firmware and the row asks for another off and on.
The power-up window works only over Bluetooth. On a wired port abcZ cannot see the probe switch off, so it skips the probe. Over Bluetooth Low Energy the new connection alone takes several seconds of that short window, so for a v5.x probe use its paired serial Bluetooth (SPP) port. If abcZ does not catch the loader within 10 minutes, it gives up and nothing is written.
abcZ does not measure the battery again before the start. On the A/B staged path it uses the value from the probe's last read; on the legacy path it does not check the battery at all. If a legacy upload stops answering halfway, the row names the battery as the first thing to suspect. Charge an older probe, switched off, before you update it.
A KMK119 with v5.x firmware in command mode (switch position 4) answers no command, so abcZ cannot identify it. For such probes the page offers a box that updates the silent probes as declared v5 over the power-up window. Assign the image to the unidentified row and tick the box. This is your statement, not something abcZ measured: the path reads legacy (declared v5) in the plan and legacy (declared) while it runs. A compressed image is still refused. If the probe is in fact a newer probe that was asleep, the raw v5 image takes it back to v5; a later update brings it forward again.
The second box loads a silent probe as already waiting in the loader (forced, no trigger). It is the way back after an interrupted upload, and only one of the two boxes can be ticked. When you tick it, a card explains what you are declaring and a second box appears, The device has been switched off and on since the interrupted upload. If the probe is not waiting in its loader, it accepts no packet and nothing is written. The next section gives the order of the steps.
When an update is interrupted
On a probe with the A/B staged loader an interrupted update is not a problem. If the upload is cut short, the probe keeps running its old firmware; if the last step is interrupted, it finishes by itself the next time the probe is switched on. Start the update again.
On the legacy path an upload that stops halfway leaves the probe without firmware. It waits in its loader and answers nothing, also after you switch it off and on, and its row says in the bootloader. While abcZ stays open it remembers this probe: it will not trigger it again and offers the forced load for it without reading it. When abcZ is closed, it forgets. Two rules protect the probe:
- Do not start a second upload straight away. An upload started before the probe has been switched off and on can be written to the wrong place.
- Between switching the probe off and on and starting the forced load, do not read it: no Select port, no Find devices, no Open device, no Read again, and do not start abcZ with
--portfor its port. A read at that moment can lock the loader.
The way back is a forced load of the same image file. Do the steps in this order:
- Do not start a second upload yet.
- If you have closed abcZ since the upload stopped, start it and, while the probe is still switched on, read the probe once on the Devices page. Its row shows No reply; that is expected. Skip this step if abcZ has stayed open or if the row already shows No reply.
- Tick the probe's row and click Update firmware... (or, if the Firmware page still shows the result of the stopped upload, click Start over there). Choose the same image file for the probe's group - if you read the probe in step 2, that is the row named unidentified - and tick the box that loads the silent probe as already waiting in the bootloader (forced, no trigger). Leave the box that checks the module defaults before the update unticked.
- Now switch the probe off and on.
- Without reading the probe again, tick The device has been switched off and on since the interrupted upload and start the update.
Without the second box the plan holds the forced load back and says why. The box clears itself when the update starts, so every forced load needs a fresh tick.
The message on the row right after the stop asks you to switch the probe off and on first and then click Start over and tick the two boxes. That order is also right: what matters is that nothing reads the probe between the last power cycle and the start.
If a legacy upload ends with bootloader stuck, nothing was written and the probe stays in its loader. Switch the probe off and on again and click Start over, without reading the probe in between. While abcZ stays open it will not trigger this probe again: the plan holds a triggered row back and asks for the forced load. Tick the forced-load box and The device has been switched off and on since the interrupted upload, then start the update. If you switch the probe off and on once more, as the plan's note asks, do not read it before the start either.
WARNING:
If you are not sure, start nothing. Leave the probe as it is and contact support; the probe keeps waiting in its loader, also after a power cycle. The chapter Troubleshooting has the same steps.
Diagnostics
The Diagnostics page reads the probe's diagnostic counters: how full its buffers got, how many bytes it had to drop on the meter side and on the module side, its battery, uptime and last reset. Its main use is to show what one action cost the probe.
Reading the counters
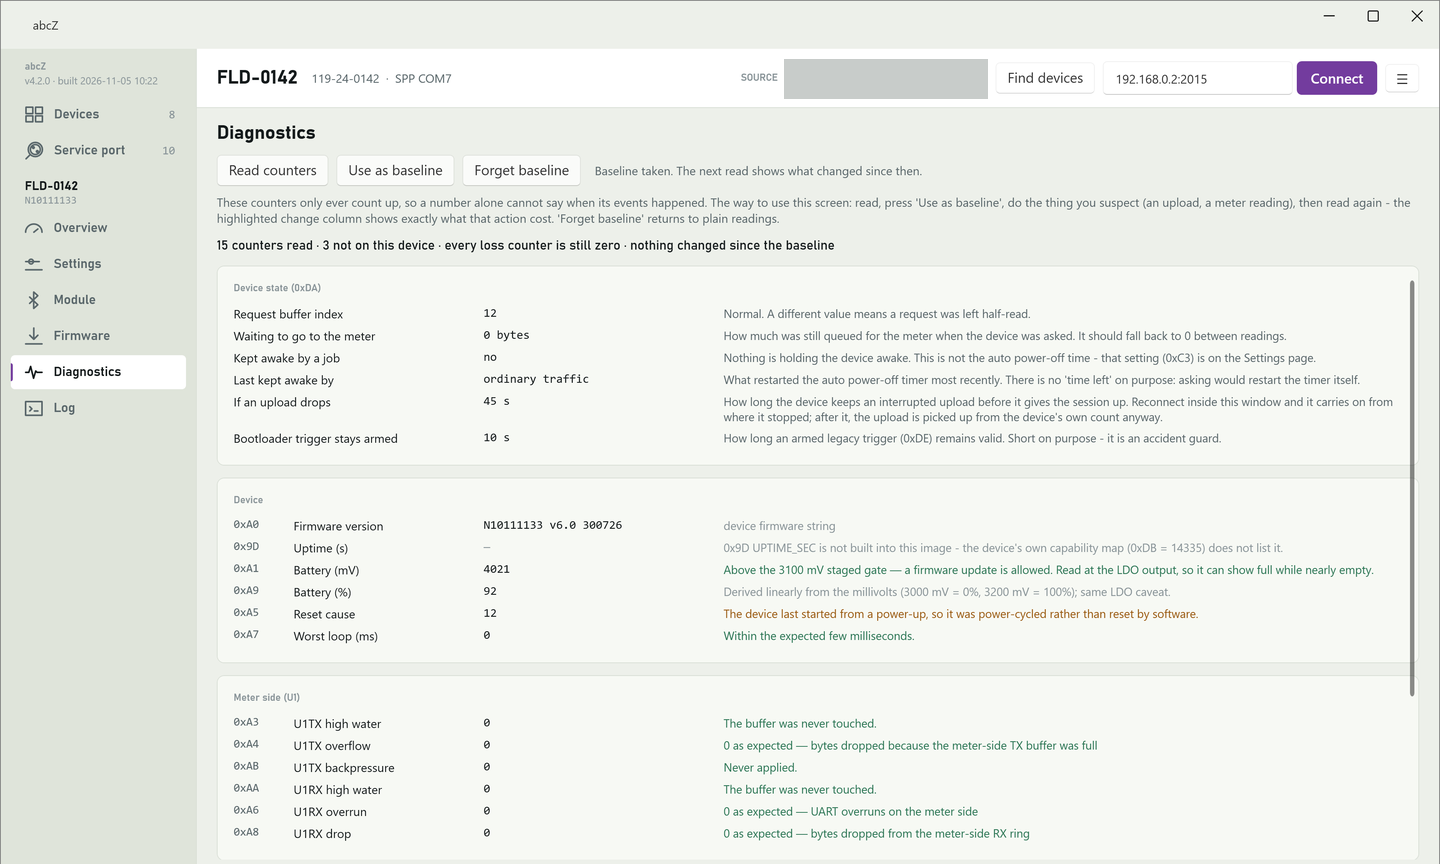
The page does not read by itself. Click Read counters: abcZ opens a link to the probe, reads its identity and then asks for every counter the probe has. The table fills row by row while the read runs, and a thin bar under the title shows that it is busy.
Reading changes no setting. A counter that the probe's firmware does not have is not asked for; its row shows a dash and the note says why.
The counters are grouped by the side they describe:
- Device: firmware version, Uptime (s), battery, Reset cause and the longest pass of the main loop.
- Meter side (U1): the serial line to the meter behind the optical head.
- Module side (U2): the serial line between the probe and its Bluetooth or Wi-Fi module.
Each row shows the command, the counter's name, its value and a note. The note is green when the value is as expected, orange when it needs attention (for example a battery below 3100 mV, or a counter that could not be read) and red when a counter that must stay at zero is not zero. A grey note only explains the row.
The line above the table sums the read up: how many counters were read, how many are not on this probe or could not be read, and whether every loss counter is still zero.
If the link drops in the middle of the read, abcZ connects once more and asks only for the counters it did not get. If that fails too, the rows already read stay on the screen and the summary says that the link dropped in the middle of the round.
If the probe cannot be read at all, a line under the buttons says why and what to try.
abcZ also writes every counter it read into the session log, then the summary, and as warnings the loss counters that are not zero, a last reset from power-up and any loss counter that went up since the baseline. See the chapter Log.
What each counter tells you
The tables below list the counters in the order the page shows them. The last column says which value the page shows with a green note; a counter whose value it does not judge has no fixed value there.
Device:
| Command | Counter | What it tells you | Healthy value |
|---|---|---|---|
| 0xA0 | Firmware version | The firmware name and version the probe reports. | No fixed value |
| 0x9D | Uptime (s) | Seconds since the probe was switched on. Read the other counters next to it. | No fixed value |
| 0xA1 | Battery (mV) | The lowest measured battery voltage. It is measured behind the probe's voltage regulator, so it can show full while the battery is nearly empty. | 3100 mV or more: a firmware update through the A/B staged loader is allowed |
| 0xA9 | Battery (%) | The battery level worked out from the millivolts: 3000 mV is 0 %, 3200 mV is 100 %. | No fixed value |
| 0xA5 | Reset cause | Why the probe last started: 0 is a software reset, normal after a settings write or at the end of a firmware update; 7 is the watchdog, the firmware recovered itself from a stall; 12 is a power-up, the probe was switched off and on. | 0 (7 and 12 are shown in orange) |
| 0xA7 | Worst loop (ms) | The longest pass of the firmware's main loop. A higher value means the loop stalled. | 10 ms or less |
Meter side (U1):
| Command | Counter | What it tells you | Healthy value |
|---|---|---|---|
| 0xA3 | U1TX high water | How full the buffer that sends to the meter got since the last reset. It is not a loss. | 0 (any other value is for information, not a loss) |
| 0xA4 | U1TX overflow | Bytes dropped because the buffer that sends to the meter was full. | 0 |
| 0xAB | U1TX backpressure | How often sending to the meter was held back. On long uploads it can be above 0; that is not an error. | 0 |
| 0xAA | U1RX high water | How full the buffer that receives from the meter got since the last reset. It is not a loss. | 0 (any other value is for information, not a loss) |
| 0xA6 | U1RX overrun | Overruns of the serial line on the meter side. | 0 |
| 0xA8 | U1RX drop | Bytes dropped from the buffer that receives from the meter. | 0 |
Module side (U2):
| Command | Counter | What it tells you | Healthy value |
|---|---|---|---|
| 0x9C | Handed to the module | Meter bytes the probe passed to its module. Compare it with what arrived on the PC. It counts up to 65535 and then starts again at 0. | No fixed value |
| 0x9F | U2TX high water | How full the queue that sends to the module got. U2TX full says whether it filled, this says how far. It is sampled, so the real peak can be higher; about 47 bytes of it are abcZ's own traffic. | No fixed value |
| 0xAC | U2TX full | How often the buffer that sends to the module was full. | 0 |
| 0xAE | U2RX high water | How full the buffer that receives from the module got since the last reset. It is not a loss. | 0 (any other value is for information, not a loss) |
| 0xAF | U2RX overrun | Overruns of the serial line on the module side. | 0 |
| 0xAD | U2RX drop | Bytes dropped from the buffer that receives from the module. This is where a loss on the way from the PC to the meter is counted. | 0 |
Using a baseline to see what one action cost
Most counters only add up, so a number alone cannot say when its events happened. What this page is for is the change: read the counters, take that reading as a baseline, do the one thing you suspect, then read again. The change column then shows what that action cost.
- Click Read counters and wait until the table is complete.
- Click Use as baseline. abcZ remembers this reading; next to the buttons it says "Baseline taken. The next read shows what changed since then."
- Do the one thing you want to measure, for example a meter reading through the probe.
- Click Read counters again. The column next to the values, empty until now, shows in bold how much each value moved since the baseline, for example +3. A value that did not move shows nothing there. The summary line ends with how many values changed since the baseline.
Forget baseline drops the remembered reading; the next read shows plain values again. You can also click Use as baseline again after any read to measure the next action from there.
NOTE:
The baseline is kept only while the probe stays open in abcZ. Opening a probe from the device list, even the same one, starts without a baseline.
NOTE:
When abcZ read the probe in the device list it asked it not to switch itself off, if the probe supports this; the Auto-off column of the device list shows it. Read counters itself does not do this. See the chapter Devices.
Device state
Above the counters, the Device state (0xDA) card shows what the probe reports about its state at the moment of the read. These are not counters, so they get no change column. A row appears only when the probe's firmware reports that field; on older firmware the card is not shown. Hover a row to see its note in full.
| Row | What it tells you |
|---|---|
| Request buffer index | Normal at 12. Another value means a request was left half-read; the probe recovers by itself, but a reading may have been lost. |
| Waiting to go to the meter | How many bytes were still queued for the meter. It should fall back to 0 between readings. |
| Kept awake by a job | Whether a job is keeping the probe awake (yes or no). This is not the auto power-off time; that setting is on the Settings page. |
| Last kept awake by | What last restarted the auto power-off timer. There is no time left shown on purpose: asking would restart the timer itself. |
| If an upload drops | How long the probe keeps an interrupted upload. Reconnect inside this time and the upload carries on from where it stopped; after it, the upload is still picked up from the probe's own count. |
| Bootloader trigger stays armed | How long an armed trigger for the older loader stays valid. It is short on purpose, as a guard against accidents. |
| BLE guard | The probe repairs its own module settings by itself. The number counts only failed repairs. |
| Guard policy, Guard stopped because, Guard last phase, Guard phases opened, Guard phase now | Whether that repair is still due, why its last round ended and how far it got. Read these rows together; their notes say how. |
| Wi-Fi module last event, Wi-Fi module recoveries, Wi-Fi module silence peak | KMK179 only, shown only when not 0: the last status line of the Wi-Fi module, how often the probe reset the module since it was switched on, and the longest silence of the module during a live link. |
| Module lines interleaved | Shown only when not 0: how often the module's status lines arrived mixed together. Read it next to U2RX drop. |
Log
The Log page lists, in order, what abcZ did in this session and what the probes answered. It is always available in the left bar, also before any probe is opened.
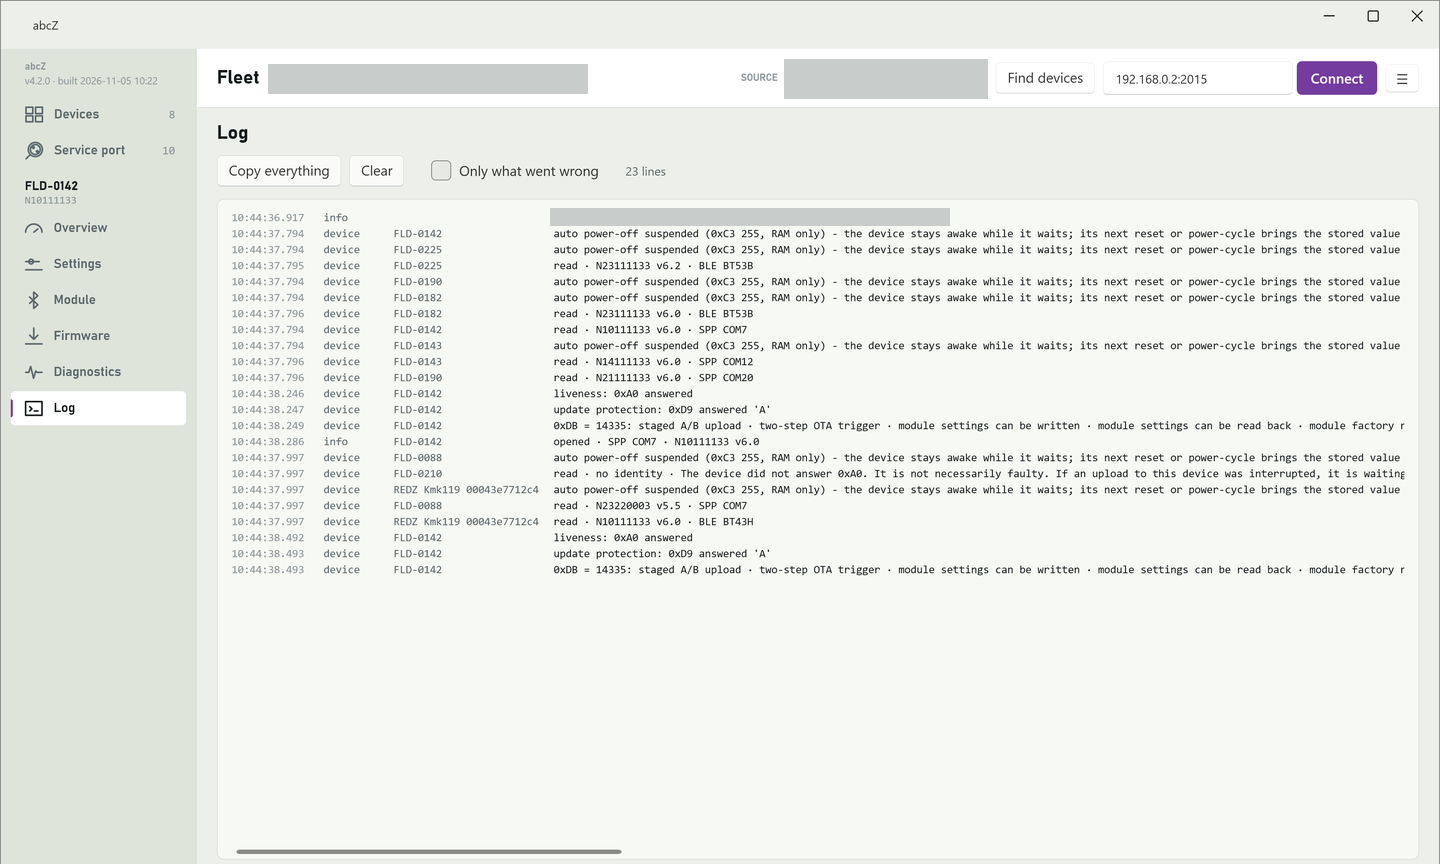
What the log shows
Each line has four columns: the time to the millisecond, the kind of line, the probe it is about (empty for lines about abcZ itself or the whole device list) and the text. There are four kinds:
| Kind | What it means |
|---|---|
| info | Something abcZ did. |
| device | What a probe answered: a value read, a reply, a measured time. |
| warning | The job went on, but there is something you should know. The word warning is shown in warning colour. |
| failure | The job did not work. The word failure is shown in bold red. |
The technical detail that the other pages leave out is written here, for example which command abcZ sent and what the probe replied.
Tick Only what went wrong to see only warning and failure lines. If there are none, the line next to the buttons says "Nothing has gone wrong in this session." Untick it to see everything again; the filter hides lines, it removes none.
Next to the buttons, abcZ shows how many lines are listed. abcZ keeps the last 4000 lines of the session in its memory; Copy everything and Only what went wrong work from those, and if older lines had to be dropped, the line count says how many. The log file keeps every line.
Copy everything and Clear
Copy everything puts the log of this session on the clipboard, also the lines hidden by Only what went wrong. In a long session these are the last 4000 lines, and the copied text then starts with a line that says how many earlier lines were dropped; abcZ.log has them all. abcZ confirms with "The whole session log was copied to the clipboard." Paste it into an e-mail or a text file.
Clear empties the page at once, without asking. It does not touch the log file on disk: everything stays in abcZ.log. After Clear, Copy everything copies only the lines written since.
The log files
abcZ also writes every line to a file named abcZ.log in the folder where abcZ.exe is, next to its settings.json. Each line is written at once, so the file holds the lines up to the moment even if abcZ stops unexpectedly.
In the file each line also carries the date. The file starts with a header line that gives the date and time the session began.
When abcZ starts, it renames the log of the last session to abcZ.previous.log and starts a new abcZ.log; the older previous file is deleted. So you normally have this session and the one before. If abcZ cannot rename the old file when it starts, the new session writes over it. Starting abcZ a second time while it is already open does not touch either file.
NOTE:
If abcZ cannot open the file when it starts, for example because the folder is read-only, the log starts with a warning line that says so. abcZ keeps working; only the log on the page is kept. Copy it before you close abcZ.
Sending the log to support
- Right after the problem, open the Log page and click Copy everything, or take the file abcZ.log from the folder of abcZ.exe. If you have closed and started abcZ again since, send abcZ.previous.log instead, or both.
- Read the text before you send it. When abcZ writes the module through the probe's own link, every value it writes from the Module page appears in the log on a line that contains 0xB0. When it writes a module's settings over the service port, the log has a line for each value sent instead, with the value's name. The Wi-Fi password and the Bluetooth PIN are not written in these lines: they show "(hidden, " and the number of characters instead. The same holds when abcZ reads the module over the service port. The Wi-Fi network name is written as it is.
- If abcZ showed a window that starts with "Something went wrong and the last action was cancelled.", also send the file crash.log from the folder that window names (the abcZ folder in your local application data).
The chapter Troubleshooting lists what else to send for each kind of problem.
Customer test
The Customer test page leads you through the sessions of a field test that we send you as a test package. For each session abcZ names the probe and says what to do. You read the meter with your own reading tool, as you normally do, and tell abcZ how it went. abcZ then reads the probe and adds one line to the result file, which you send back to us.
Opening the page from the menu
- Click the menu button at the top right of the window (Application settings).
- Choose Open the Customer test page. The page opens and Customer test appears in the left bar, below Service port.
The page stays in the left bar until you close abcZ. You can open another page and come back: a session that is running stays where it was.
abcZ can also open the page, and a sequence file, when it starts: see the option --kit in the chapter Appendix: command line.
NOTE:
abcZ finds the probes of a test among the Bluetooth serial ports of the PC, so each probe of the test must be paired in the Windows Bluetooth settings (the chapter Devices), and the SOURCE at the top of the window must be Bluetooth BLE + SPP (Serial Ports) or Bluetooth SPP (Serial Ports) Only. With Bluetooth BLE Only or Connect by IP address (KMK Wi-Fi) the page cannot find the probes. abcZ always talks to the probe over its Bluetooth serial port, whichever way your own tool reads the meter.
The sequence file and the result file
The sequence file is a .json file that comes with the test package. It lists the sessions in their order, the probe of each session (by the end of its Bluetooth address) and the firmware each session needs. You do not write it yourself.
- Next to SEQUENCE, click Browse... and choose the sequence file. abcZ opens it as soon as you choose it. You can also type or paste the path of the file into the box and click Open sequence; double quotes around the path are ignored.
- The page shows the name of the sequence and the session it is at, for example session 1 of 8, the probe that session uses, and next to RESULT FILE the full path of the result file.
abcZ does not start with a file it does not fully understand. If something in the file is wrong, the line under the buttons starts with "This sequence file cannot be used:" and says what is wrong; no sequence is then open on the page, also not one that was open before. Do not edit the file; contact us (the chapter Troubleshooting gives the address).
The result files are kept in the folder abcZ\customer-test in your Documents, not next to abcZ.exe. Each sequence has its own result file, named after the sequence as the page shows it, with the extension .jsonl. Characters that a file name cannot hold become an underscore.
abcZ adds one line to the result file at the end of each session and never changes a line it has written. A line holds the session from the sequence file, the abcZ version, your verdict and note, the time of each step, what abcZ read from the probe (its identity; except on a v5.x probe also its settings, running time and error counters; in some sessions also its module settings and the data it recorded during your reading) and a list of what could not be read. The module's PIN is never read, so it is not in the file.
If the result file of a sequence already exists when you open the sequence, abcZ adds to it and continues after the last session in it; the line under the buttons says how many lines the file holds and at which session the sequence continues, or that every session is already in it. This is how you go on with a sequence on another day or after closing abcZ. If the result file cannot be read, or holds lines of another sequence, abcZ does not open the sequence and says why; in the second case, move that file out of the folder first.
Open folder opens the folder of the result file in Windows. When every session is done, send us the result file from there; we tell you which firmware the probes need next.
Checking the probes before the first session
Before the first session of a sequence, while its result file holds no line yet, the page offers Check the probes. Switch every probe of the sequence on and click it. abcZ connects to each probe once and reads its identity; it does not set anything for the test and adds no line to the result file. The check is optional, but it tells you before the first session whether each probe is the right one with the right firmware.
The page then shows one line per probe: ready, not found on this PC and why, not reached and why, the link opened but the probe did not answer, or not ready, with the firmware the sequence needs and the identity the probe reported. A v5.x reference probe that does not answer can still be used: its line says so. The line under the buttons sums it up. If not every probe is ready, put that right before the first session: a session read with the wrong probe or firmware does not count.
Running a session
The sentence above the buttons always says what to do now, and the page shows only the buttons of that step. While abcZ is talking to a probe, the session buttons are off and a bar moves under the page title.
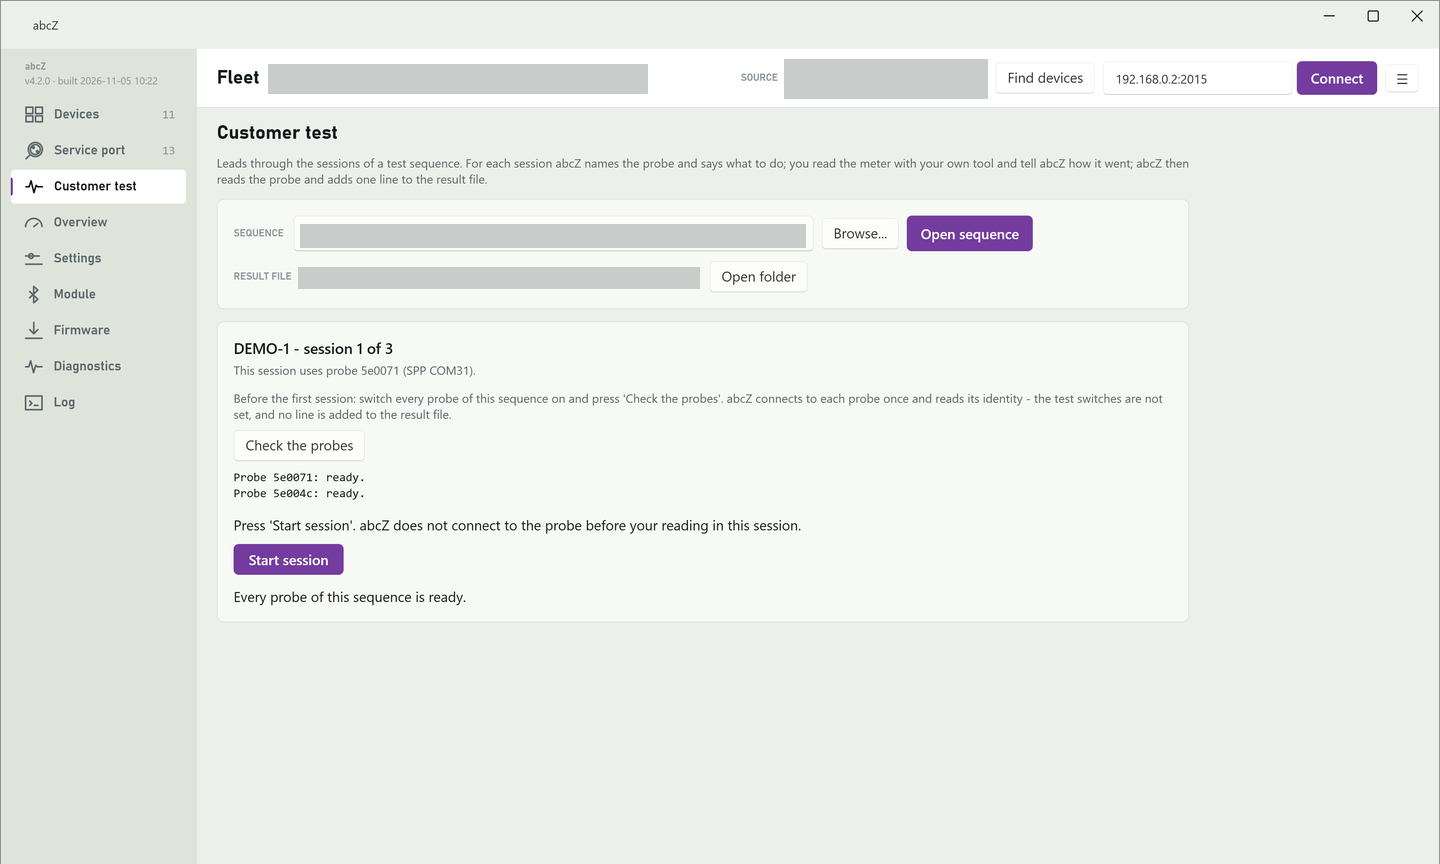
- Click Start session. What happens depends on the session, and the sentence before you click says which: in some sessions abcZ does not connect to the probe before your reading at all; in others it first connects, notes the probe's identity and module settings, sets the test switches (and in some also holds the probe's auto power-off) and lets the link go again. Keep your own reading tool disconnected until abcZ tells you to read.
- If the session asks for it, switch the probe off and on again, then click It is on again as soon as it is on. If the session has a wait, abcZ counts it down from that click, shows the seconds left and tells you not to read yet; it moves on by itself when the wait is over.
- When abcZ says "Read the meter with your own tool now.", read the meter once, as you normally do. When the reading has finished, disconnect your tool and click Passed or Failed: whether your tool read the meter.
- abcZ connects to the probe, reads it, puts back what it set for the test (if it set anything), and adds the line to the result file. The line under the buttons then says that the session is in the result file, with your verdict, and how many items could not be read from the probe, if any.
- Click Next session to go on. Repeat session runs the same session again and adds a new line with the same number; it is offered only until you go on to the next session. After the last session the page says that every session of the sequence is done.
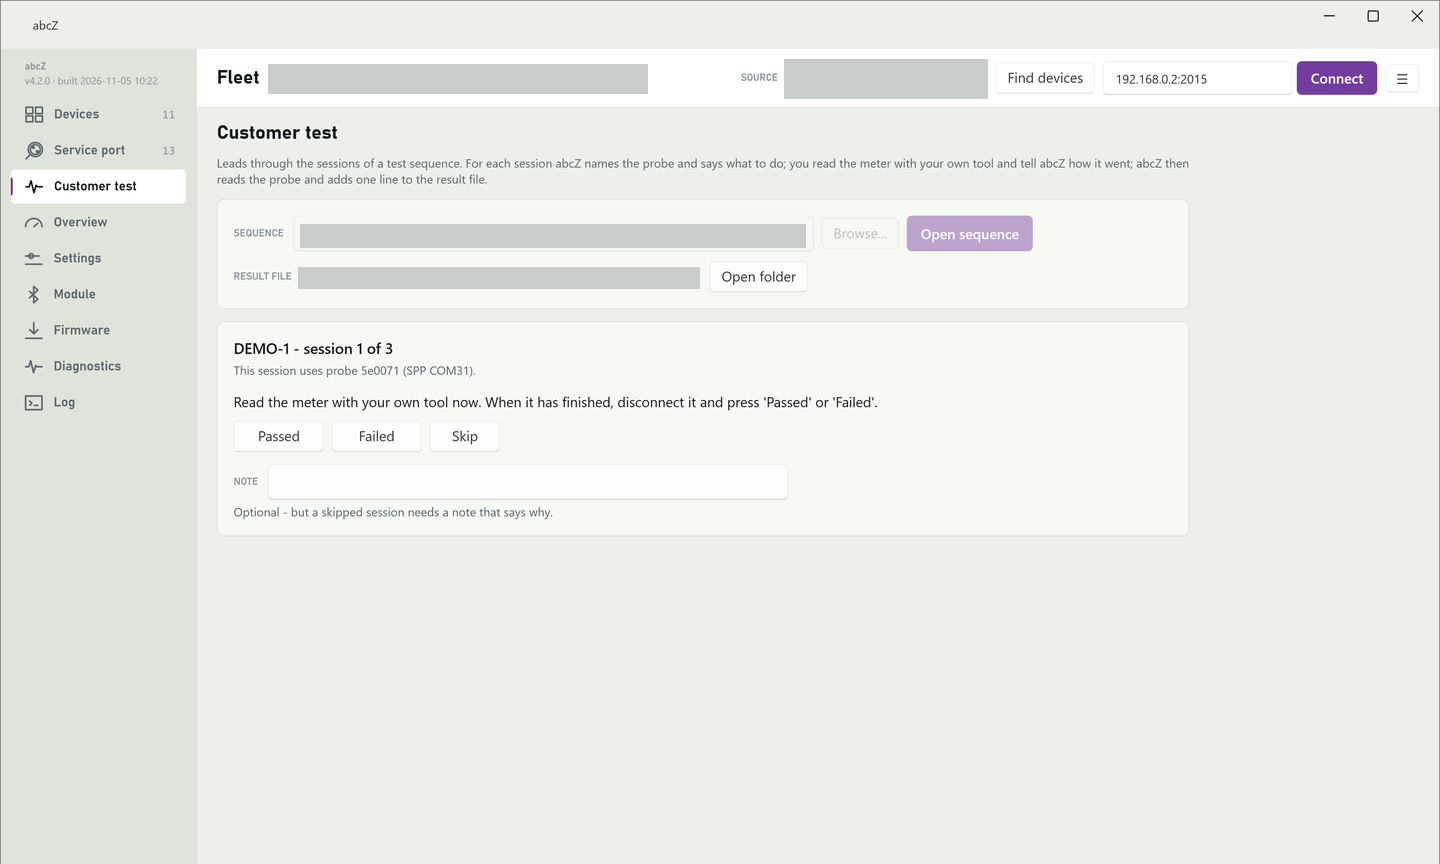
While abcZ waits for the power cycle, counts down or waits for your reading, the page also offers Skip and a NOTE box. A note is optional for Passed and Failed and goes into the line. To skip a session, write in the note why, then click Skip; without a note abcZ does not skip. A skipped session is read and written like the others, with the verdict skipped.
From the start of a session until abcZ has read the probe, no other page of abcZ connects to that probe over Bluetooth; such a page says that a customer test session is running on it. Do not connect any other program to the probe during a session either.
NOTE:
Auto power-off: abcZ holds the probe's auto power-off only in a session whose start sentence says so, from the start of that session until it has read the probe, and then puts it back. If it could not hold it, the page says so: read the meter without a long wait. In every other session, and between sessions, abcZ does not hold it. Go through the steps without long pauses; if a probe has switched itself off before its session starts, switch it on again. Do not switch a probe off during a session unless abcZ asks you to.
In a session where abcZ prepares the probe and does not ask you to switch it off and on, the probe must have been on for at least 70 seconds; otherwise abcZ says how many seconds to wait and does not start. If abcZ cannot reach the probe at the end of a session, it still writes the line, with what could not be read; you can then click Repeat session.
When a session does not start or a line is not written
- The session did not start: the line under the buttons says why, for example the wrong probe, the wrong firmware, or the probe not reached, and whether the test switches were set. Put it right and click Start session again. If it said "The probe could not be reached:", run that session to its end, then switch the probe off and on: until then it may not switch itself off.
- The probe of the session is not found: no Bluetooth serial port of the PC belongs to it. Pair the probe in the Windows Bluetooth settings, then start again.
- The line was written, but abcZ found after the reading that the probe or its firmware is not what the session needs. The session does not count: put that right and click Repeat session.
- The line could not be written to the result file: the line under the buttons gives the path and the reason. abcZ keeps the line; put the reason right and click Write the line again.
WARNING:
Do not close abcZ while a session is running or while a line waits for Write the line again: abcZ does not ask, and the line of that session is lost. When you open the sequence again, it continues after the highest session number in the result file, that is at the interrupted session; a session that is already in the file can then no longer be repeated. In a session that sets the test switches, abcZ puts back what it set only at the end of its reading, and the switches stay on the probe also when it is switched off and on. So if abcZ was closed during such a session, if the page says that something could not be put back, or if the line had to be written again (the page then does not say whether everything was put back), switch the probe off and on, then run the next session of that probe that sets the test switches to its end before you use the probe for anything else. If no such session is left, contact us. Another sequence can be opened only when no session is running.
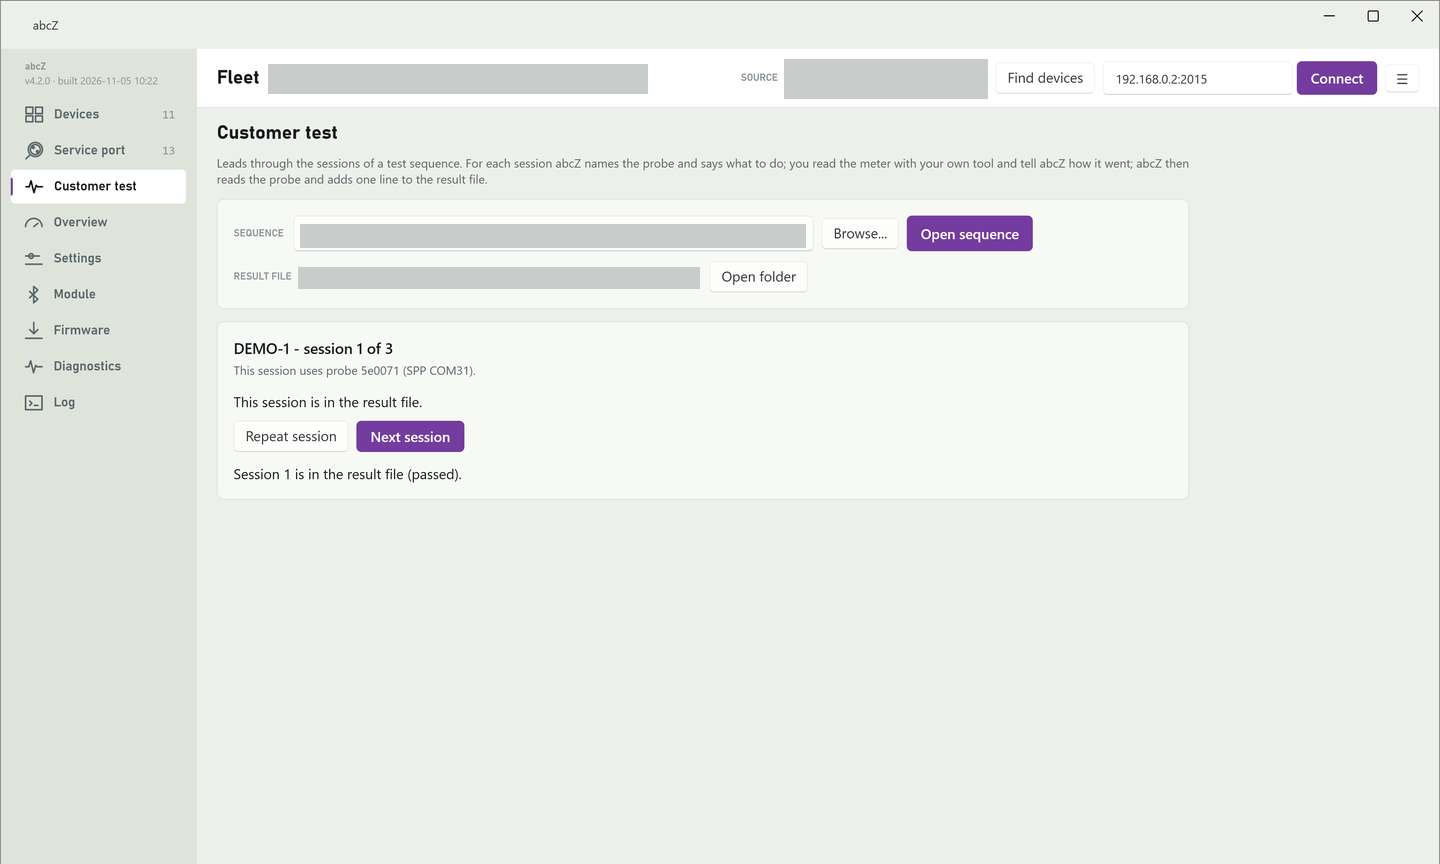
Troubleshooting
This chapter covers a probe that does not answer, a firmware update that stopped halfway, a probe that does not appear in the list, and what to send to support.
A probe that does not answer
When a probe does not answer, its row in the device list shows No reply. Hover the row: abcZ explains what happened and what to do. Do not open the probe to read more: Open device reads it again, and after an interrupted update that is what you must avoid. There are three cases:
- The port or link could not be opened (the explanation starts with "The port could not be opened"). Nothing was sent to the probe. This does not mean that the probe is off: the port also fails to open when the probe is out of reach, when another program holds the port, or when the Bluetooth link is not set up in time. Check that the probe is switched on, close other programs that may use the port, and read it again.
- The link opened but the probe did not answer, over a serial port or over Wi-Fi (the explanation starts with "The device did not answer 0xA0. It is not necessarily faulty."). First think of an interrupted firmware update: a probe whose upload on the legacy loader was cut short waits in its loader and answers nothing. Then do not read it again; follow the section An update that stopped. If no upload to it was interrupted, there is one more cause on a KMK119 only: in command mode (switch position 4), older firmware (v5.x) answers no command at all. Turn the switch to 1, 2 or 3 and switch the probe off and on, or update it to newer firmware.
- The Bluetooth Low Energy link is up but the probe did not answer. If an upload to this probe was interrupted, do not read it again; follow the section An update that stopped. Otherwise the known cause is a Bluetooth module that is still in its factory state: it accepts the connection but does not pass anything on to the probe, and this cannot be fixed over Bluetooth Low Energy. Probes with firmware that has a build date of 9 August 2026 or later (abcZ shows the build date after the version at the top of the Overview page of a probe that answers) repair this by themselves within about 30 seconds: wait and read the probe again. Because the probe did not answer, abcZ has not suspended its auto power-off; check that it is still on before you read it again. On older firmware the module's BLE setting has to be corrected over a serial (Bluetooth Classic) connection or over the service port. Over a serial connection, open the probe and go to its Module page: after reading the module through the probe, abcZ proposes our standard values where the module differs, the BLE mode among them, and Write to the module writes them (the chapter Module). This works only if the probe's firmware can ask its module: if Read all from the module stays off and abcZ shows a reason next to it, use the service port. Over the service port, place a USB optical probe at the probe's optical port, put the probe in mode 3 and make sure no program is connected to the probe over Bluetooth. On the Service port page choose the USB optical probe in PORT and "Bluetooth module (BT43 / BT53)" in MODULE, and click Open on the Module page. After the read, abcZ proposes our standard values where the module differs, the BLE mode among them; click Write to the module, then switch the probe off and on before you look for it over Bluetooth Low Energy (the chapter Service port). The name is not proposed over the service port; once the probe answers again, its Module page proposes the standard name after a read through the probe.
An update that stopped
Look at the Bootloader column of the device list. On a probe with the A/B staged loader, an update whose download is cut short leaves the old firmware running, and an interrupted last step finishes by itself the next time the probe is switched on. Start the update again on the Firmware page.
On a probe with the legacy loader, an upload that stops halfway leaves the probe without firmware: it waits in its loader and answers nothing, also after you switch it off and on, and its row on the Firmware page says in the bootloader. Two rules protect it:
- Do not start a second upload straight away. An upload started before the probe has been switched off and on can be written to the wrong place.
- Between switching the probe off and on and starting the forced load, do not read it: no Select port, no Find devices, no Open device, no Read again, and do not start abcZ with
--portfor its port. A read at that moment can lock the loader.
The way back is a forced load of the same image file. Do the steps in this order:
- Do not start a second upload yet.
- If you have closed abcZ since the upload stopped, start it and, while the probe is still switched on, read the probe once on the Devices page. Its row shows No reply; that is expected. Skip this step if abcZ has stayed open or if the row already shows No reply.
- Tick the probe's row and click Update firmware... (or, if the Firmware page of the stopped upload is still open, click Start over there). Choose the same image file and tick the box that loads the silent probe as already waiting in the bootloader (forced, no trigger). Leave the box that checks the module defaults before the update unticked.
- Now switch the probe off and on.
- Without reading the probe again, tick The device has been switched off and on since the interrupted upload and start the update.
The message on the Firmware page right after the stop asks you to switch the probe off and on first and then click Start over and tick the two boxes. That order is also right: what matters is that nothing reads the probe between the last power cycle and the start.
If a legacy upload ends with bootloader stuck, nothing was written and the probe stays in its loader. Switch the probe off and on again and click Start over, without reading the probe in between. While abcZ stays open it will not trigger this probe again: the plan holds a triggered row back and asks for the forced load. Tick the forced-load box and The device has been switched off and on since the interrupted upload, then start the update. If you switch the probe off and on once more, as the plan's note asks, do not read it before the start either.
WARNING:
If you are not sure, start nothing. Leave the probe as it is and contact support; the probe keeps waiting in its loader, also after a power cycle.
A probe that does not appear in the list
Click Find devices once more, since one short Bluetooth scan can miss a probe, and check that the probe is switched on. A KMK179 never appears in a search; connect it with Connect by IP address (KMK Wi-Fi). The chapter Devices lists the further steps, among them Reset Bluetooth.
What to send to support
Our support address is hi@redz-sc.com. Send us the following:
- Write down which probe it is (the name and the serial number or address from the Device column), its Status, and what you did just before the problem.
- Right after the problem, open the Log page and click Copy everything, or take the file abcZ.log from the folder of abcZ.exe. If you have closed and started abcZ again since, send abcZ.previous.log too.
- You do not need to remove the Wi-Fi password or the Bluetooth PIN from the log: abcZ writes them there only as hidden, with their number of characters. Other settings written to a probe, the Wi-Fi network name among them, are in the log as they were written; the chapter Log explains what the log holds.
- If abcZ showed a window that starts with "Something went wrong and the last action was cancelled.", also send the file crash.log from the folder that window names.
Admin mode
Admin mode is for service use: changes made there can make the probe unreachable. Contact us before using it.
Appendix: command line
You can start abcZ.exe with options, for example from a shortcut or a command window. Without options abcZ starts as described in the chapter Quick start. Support may ask you to start abcZ with one of them.
abcZ does not search for probes because of an option. Only the serial port named with --port is read at start; everything else works on what that read found.
| Option | What it does |
|---|---|
--port COMx | Reads only this serial port at start, for example --port COM18, and adds its row to the device list. If the port does not belong to a paired REDZ probe, abcZ reads it without asking first (Select port asks in that case) and marks the row chosen by hand. If no port name follows, if the port does not exist on this PC, or if the source has no serial ports (Bluetooth BLE Only, Connect by IP address (KMK Wi-Fi)), nothing is opened and abcZ says why on the Devices page and in the log; for a missing port it lists the ports the PC has. |
--open [name] | Opens a probe from the list on its Overview page, as Open device does. Without a name, the first row is opened. A name can be the probe's name, its serial number or its Bluetooth address (with or without colons). Use it together with --port: on its own it opens nothing, see the note below the table. |
--campaign | Ticks every probe in the list and opens the Firmware page for them, as Update firmware... does, and goes on to the page's plan step. Use it together with --port, like --open. |
--bin file | Chooses this firmware file on the Firmware page, with the same checks as a file you choose in the file window. The file is given only to the probes whose model matches it. It applies to the page opened at start with --open or --campaign, and to the page opened later in the session with Update firmware.... If the file cannot be read, the page says so. |
--screen page | Shows this page of the left bar at start: devices, overview, settings, module, firmware, diag (the Diagnostics page) or log. A page that cannot be selected yet is not shown: the pages of a probe need --open (or, for firmware, --campaign). |
--kit [file] | Opens the Customer test page. With a file, the page opens that sequence file as if you had chosen it there. If you also give --screen, the Customer test page is the one shown. The chapter Customer test describes the page. |
--log file | Writes the session log to this file too, in addition to abcZ.log. The file is replaced at each start. The first lines of the session are only in abcZ.log. The same care as for abcZ.log applies before you send it (the chapter Log). |
--ble | Uses Bluetooth BLE Only as the source for this session. Your saved choice in SOURCE is not changed; the list shows the source in use. |
--spp | Uses Bluetooth SPP (Serial Ports) Only as the source for this session, in the same way. If you give both --ble and --spp, --ble is used. |
NOTE:
Without --port, --open and --campaign open nothing. abcZ says: "Nothing was opened: --open and --campaign do not search on real hardware - a search opens every KMK device it finds and holds its auto power-off. Add --port COMx to read one port, or press Find devices." On a source without serial ports, abcZ asks you instead to read the probe from the Devices page first.
The read made by --port is the same read as on the Devices page: as soon as the port is open, abcZ tells the probe not to go to sleep, and if the probe answers with its identity, abcZ suspends its auto power-off (the chapter Devices lists every way the suspension ends). Switch the probe off when you are done, as described in the chapter Quick start. Because --port reads the probe, do not use it for a probe whose firmware upload was interrupted and that you have switched off and on since; follow the chapter Troubleshooting instead.
Write the options in lower case, exactly as shown.
Examples
- abcZ.exe
--spp--portCOM18--openreads only COM18 and opens that probe on its Overview page. - abcZ.exe
--portCOM18--campaign--binfollowed by the image file reads COM18 and opens the Firmware page for that probe with the image already chosen.
NOTE:
If abcZ is already open, starting it again with options does nothing: the second start closes and the open window says that the options were not applied. Close abcZ first.